The post Apple Hops Over iPadOS 16, Releasing iPadOS 16.1: How to Get It first appeared on Joggingvideo.com.
]]>
Apple on Monday released iPadOS 16.1 for its iPad lineup — jumping straight from July’s iPadOS 16 public beta to Monday’s update serving as the first official version of iPadOS 16.
Like iOS 16 for the iPhone, the iPadOS update includes the ability to edit and unsend text messages, share photos and videos more easily with the iCloud Shared Photo Library, and check out sports scores on your lock screen via Live Activities, as well as several new features specific to the iPad.
As long as you have a compatible iPad, like the iPad Pro or iPad Air (3rd generation and later), you can download and install iPadOS 16.1 right now. Here’s how.
And if you’ve got an iPhone and want to update to the latest mobile software update, here’s how to download iOS 16.1 on your iPhone as well as 7 hidden features and settings we found in iOS 16.
Does your iPad support iPadOS 16.1?
Apple says that the following devices support iPadOS 16.1:
- iPad Pro (all models)
- iPad Air (3rd generation and later)
- iPad (5th generation and later)
- iPad Mini (5th generation and later)
If you don’t know which iPad you have, go to Settings > General > About and check next to Model Name, which should include both the model and generation of your iPad.
How to download iPadOS 16.1
If you have any of the Apple tablets listed in the previous section, you’re good to download and install iPadOS 16.1. To download the latest software, go to Settings > General > Software Update and then just wait a few seconds for the iPadOS 16.1 update to appear.
Now hit Upgrade to iPadOS 16.1 > Download and Install, enter your passcode if prompted and wait for iPadOS 16.1 to download, agree to the terms and conditions, then wait again. Once the download is complete, hit Install Now and your iPadOS 16.1 will restart. When it boots back up, you’ll have iPadOS 16.1 on your iPad.
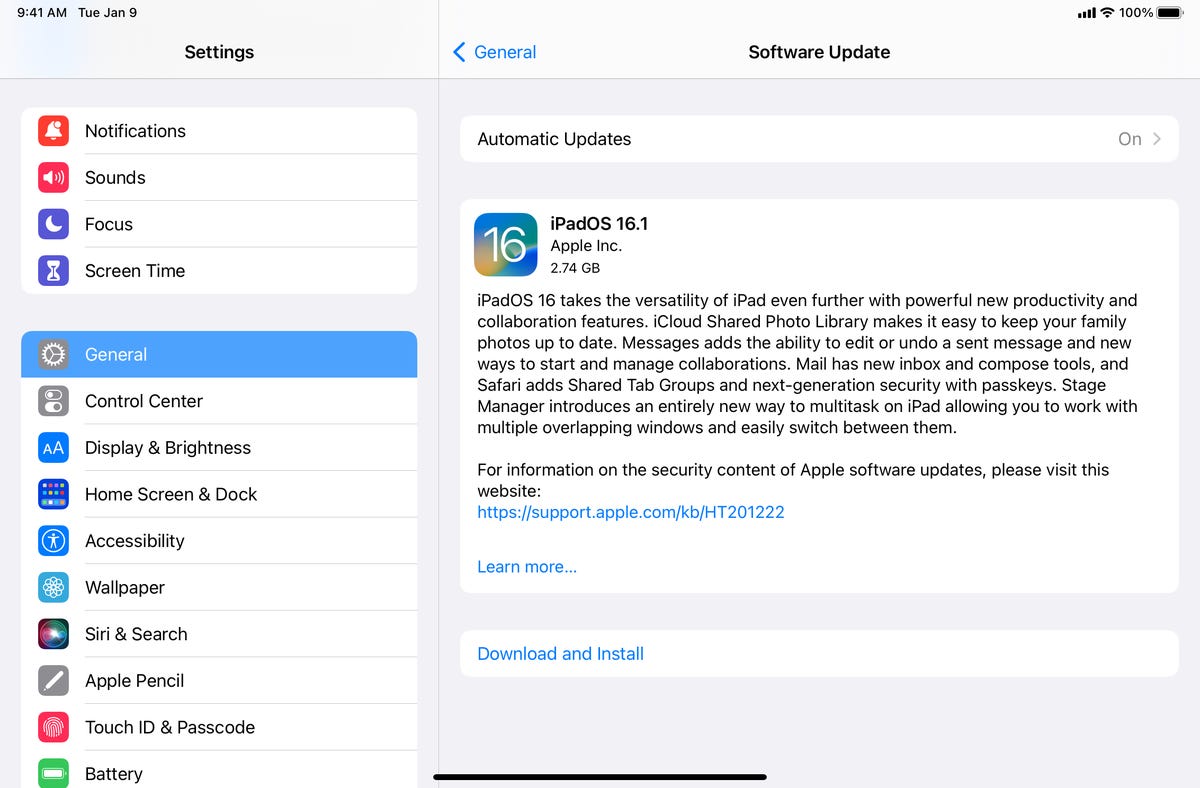
Make sure you have enough storage space before you download and install iPadOS 16.1.
Nelson Aguilar/CNET
Will you get all the new iPadOS 16.1 features?
As long as your iPad supports iPadOS 16.1, you should get most new features, but there are a few caveats. A handful of new iPadOS 16.1 features, which are listed below, will only work on iPads that have the M1 or M2 chip:
- External display support (M1 iPad and later)
- Reference mode (12.9-inch iPad Pro)
- Magnifier Detection (2020 iPad Pro)
- Door Detection (2020 iPad Pro)
- Virtual memory swap (iPad Air 5 256GB or M1 iPad Pro)
- Stage manager (iPad Pro 3rd generation and later)
Need an iPad, but not sure which one to get? Check out the best iPad for 2022 and the best iPad deals.
The post Apple Hops Over iPadOS 16, Releasing iPadOS 16.1: How to Get It first appeared on Joggingvideo.com.
]]>The post Pixel 7 Pro vs. iPhone 14 Pro: Which Phone Camera Is Better? first appeared on Joggingvideo.com.
]]>This story is part of Focal Point iPhone 2022, CNET’s collection of news, tips and advice around Apple’s most popular product.
Google’s Pixel 7 Pro has an excellent triple-camera setup that’s already seriously impressed me, alongside the phone’s slick new design and streamlined Android 13 software. But the competition is fierce, with Apple’s latest iPhone 14 Pro also packing some potent specs and a set of cameras that can take truly superb images.
So which one does it best and which one should you consider if you’re looking for the best photography phone around? I took both phones around the stunning Edinburgh suburb of Leith to find out.
It’s an interesting matchup as both phones have similar camera offerings with a main standard lens, an ultrawide lens and a telephoto zoom. And both have already proven their photographic prowess in our full reviews, with rich images and excellent dynamic range being delivered on both sides.
Pixel 7 Pro, main lens.
Andrew Lanxon/CNET

iPhone 14 Pro, main lens.
Andrew Lanxon/CNET
Take a look at the photos above from the Pixel 7 Pro’s 50-megapixel and the iPhone 14 Pro’s 48-megapixel main camera lens. Both scenes are well exposed here, with controlled blue skies and plenty of detail to be seen in the more shadowy areas. The iPhone’s color balance is a bit warmer, which I think suits the scene well, although the Pixel’s image is arguably a touch more natural looking.
Pixel 7 Pro, ultrawide lens.
Andrew Lanxon/CNET

iPhone 14 Pro, ultrawide lens.
Andrew Lanxon/CNET
Switch to the ultrawide lens, and again both phones have done a great job in capturing this high contrast scene above. There’s very little to choose between them, but I think the Pixel 7 Pro’s more natural color tones might give it the edge.
Pixel 7 Pro, 5x optical zoom lens.
Andrew Lanxon/CNET

iPhone 14 Pro, 3x optical zoom lens.
Andrew Lanxon/CNET
Things change when we switch to the zoom lenses though, most notably because the Pixel 7 Pro’s 5x offers a much closer view than the 3x optical zoom of the iPhone 14 Pro. I love a longer zoom as it helps you find different photo compositions in a scene that would be lost to those who only have wide angle lenses. Using the zoom lens for the photos above let me capture a totally different scene, but I didn’t have to physically move to get it.
That extra reach is noticeable on the Pixel’s shot, with a much closer zoom on the buildings in the distance. Both phones have achieved a good exposure however, and while the Pixel’s image is noticeably warmer (particularly on the buildings themselves), I like the color balances of both shots.
Pixel 7 Pro, 5x zoom lens.
Andrew Lanxon/CNET

iPhone 14 Pro, 3x zoom lens.
Andrew Lanxon/CNET
Again, that extra zoom on the Pixel let me get a tighter composition on the buildings next to the river in the images above, and it’s a better-looking photo as a result. That said, I prefer the tones and exposure of the iPhone’s shot, with brighter whites and a more vibrant pop of orange visible on the central building and richer blue tones in the sky.
Pixel 7 Pro, ultrawide lens.
Andrew Lanxon/CNET

iPhone 14 Pro, ultrawide lens.
Andrew Lanxon/CNET
The ultrawide photos above are more mixed however. While both phones achieved a generally decent exposure, they both have slightly blown out highlights visible in the distant clouds. And while I prefer the more natural blue sky of the iPhone 14 Pro, the Pixel 7 Pro has achieved more vibrant color tones on the buildings and trees toward the center of the frame. It’s tough to make a call on which is “better” here.
Pixel 7 Pro, main lens.
Andrew Lanxon/CNET

iPhone 14 Pro, main lens.
Andrew Lanxon/CNET
Back to the main camera lens, and there’s again very little to choose between the two pictures above. There’s tons of detail in both, and the overall exposure is spot on. If I were nitpicking — which I am — I’d say the Pixel 7 Pro’s sky has a bit too much of a purple tinge in it and it’s a slightly more contrasty scene overall. While that’s resulted in deeper orange hues on the fall leaves, it’s less representative of the actual colors of the scene. It’s largely down to personal preference, but I’m marginally erring toward the iPhone’s shot here.
Pixel 7 Pro, ultrawide lens.
Andrew Lanxon/CNET

iPhone 14 Pro, ultrawide lens.
Andrew Lanxon/CNET
The photos above show the same scene but from the ultrawide lens this time. To my eye, it’s an easier win for the iPhone here. The overall color balance is more natural. And while the iPhone kept a decent contrast in the darker area in the bottom left, the Pixel has tried to brighten this area artificially, resulting in a weird-looking grey patch that I’m not keen on.
Pixel 7 Pro, wide-angle lens with macro focus.
Andrew Lanxon/CNET

iPhone 14 Pro, wide-angle lens with macro focus.
Andrew Lanxon/CNET
With the Pixel 7 Pro now packing auto-focus on its ultrawide lens, it’s able to offer macro photography as it can focus within a couple of inches of the lens. It’s something Apple introduced on the iPhone 13 Pro, and it’s great fun to experiment with.
In the macro photos above, I prefer the image from the Pixel 7 Pro’s camera. The white balance has resulted in more vibrant — and more accurate — blue-purple tones on the flower’s petals. The leaves in the background also have more of an emerald tone, rather than the yellow-green tones seen on the iPhone’s shot.
Pixel 7 Pro, wide-angle lens with macro focus.
Andrew Lanxon/CNET

iPhone 14 Pro, wide-angle lens with macro focus.
Andrew Lanxon/CNET
And it’s much the same in the pictures above when I used the phones to get a low-down shot of this dandelion, with the blue sky behind it. The Pixel 7 Pro’s shot has much more vibrant green tones in the grasses around the subject. The iPhone 14 Pro captured a warmer scene, with more yellow tones seen in the grasses that I personally don’t like as much.
Pixel 7 Pro selfie camera test.
Andrew Lanxon/CNET

iPhone 14 Pro selfie camera test.
Andrew Lanxon/CNET
The Pixel 7 Pro is packing a 10.8-megapixel front-facing selfie camera, which is slightly below the iPhone 14 Pro’s 12 megapixels. It’s not a huge difference, there is slightly more detail visible when you zoom in. Both shots are generally solid, however, although I think the Pixel has gone a bit too “HDR” by reducing the highlights on my face too much. Personally, I prefer how I look in the iPhone’s image.
Pixel 7 Pro wide-angle selfie test.
Andrew Lanxon/CNET

iPhone 14 Pro wide-angle selfie test.
Both phones have a wider-angle option for the front-facing cameras, which is helpful if you want to capture more of your surroundings or want to squash more of your friends into the picture. I took the photos above in this mode, and the Pixel actually has the edge slightly in terms of fine image details. But again, I prefer the exposure and contrast from the iPhone as the Pixel’s HDR has flattened the tones in my face a bit too much for my liking.
Pixel 7 Pro, night mode.
Andrew Lanxon/CNET

iPhone 14 Pro, night mode.
Andrew Lanxon/CNET
When switching to night mode on both phones, I had to give an early win to the iPhone in the photos above. Its white balance produced a nicer-looking shot without the overly warm orange tone seen in the Pixel’s image.
Pixel 7 Pro night mode, 100% crop.
Andrew Lanxon/CNET

iPhone 14 Pro, night mode, 100% crop.
Andrew Lanxon/CNET
It’s also clear that the iPhone’s image is sharper when cropping in to 100% on both images, with the Pixel’s shot showing some motion blur, particularly on the pub sign. Look at the spotlights on the wall sculptures above; the Pixel’s shot hasn’t been able to capture the dynamic range here, resulting in blow-out areas, while the iPhone has done a much better job of keeping those bright tones under control.
Pixel 7 Pro, night mode.
Andrew Lanxon/CNET

iPhone 14 Pro, night mode.
Andrew Lanxon/CNET
There’s not as much to choose between in these night-time shots above that I took overlooking Leith Shore. Both have similar color tones, exposure and only marginal improvements on the iPhone’s shot when viewed at 100%.
Pixel 7 Pro night mode, 5x zoom.
Andrew Lanxon/CNET

iPhone 14 Pro, night mode, 3x zoom.
Andrew Lanxon/CNET
Switch to the zoom mode, and there’s a bigger difference between the two phones. In the images above, the Pixel’s shot is brighter and more vibrant but suffers hugely from motion blur, despite that fact that I stabilized myself against a bridge wall when taking the shot. I took three images here and this was the best I could get.
Pixel 7 Pro, night mode, 5x zoom at 100% crop.
Andrew Lanxon/CNET

iPhone 14 Pro, night mode, 3x zoom at 100% crop.
Andrew Lanxon/CNET
You can really see how blurry the Pixel’s image is when cropping in to 100%. Sure, the iPhone doesn’t have the same reach with its 3x zoom. But its shot is much sharper and clearer, and it easily takes the win here.
Pixel 7 Pro, night mode.
Andrew Lanxon/CNET

iPhone 14 Pro, night mode.
Andrew Lanxon/CNET
I also found that the Pixel 7 Pro is particularly susceptible to lens flare at night when shooting towards bright light sources like the street lamp shown in the pictures above. While both cameras suffer from lens flare, the Pixel’s is particularly problematic since most of the night sky is filled with red-pink flares surrounding the light. It’s a shame because this would otherwise have been a nice night-time scene.
Which phone takes better pictures?
Both phones took some truly superb photos during this test, and it’s not easy to give either one the definitive win. Some elements of what makes a “better” photo will come down to personal preference. In well-lit outdoor shots, I found that the Pixel 7 Pro achieved a more natural color tone from its main lens than the iPhone managed. But its colors weren’t as good in some wider-angle shots. Of course, you can set up different photographic styles on the iPhone to customize how the camera captures photos and make them look more natural if that’s your preference.
At night the iPhone is the clear winner though, with better colors, crisper detail and a superior ability to handle bright light sources — both in terms of exposure and lens flare. However, the Pixel 7 Pro absolutely takes the win with its superior zoom skills, with its 5x zoom letting you snag beautiful, crystal-clear images that are simply out of reach of the iPhone’s 3x zoom. I also preferred the look of the Pixel’s macro images in all of the tests I shot.
Now playing:
Watch this:
Pixel 7 Pro Review: Google’s Best Phone Gets Better
10:14
So which is “best” will come down to what you want most from your phone camera. If night photography is important, then go for the iPhone 14 Pro. If you want zoom skills to find creative compositions in your landscapes and street photography, then the Pixel 7 Pro is for you.
If you just want a great all around camera to snap vibrant shots of your kids at the beach, your friend’s food at a local market or some stunning woodland scenes on your next hike, then either phone will suit you incredibly well. Your bigger decision will instead come down to whether you want to go with iOS or Android as your operating system and whether spending the extra hundred bucks or so on the iPhone 14 Pro is worth it.
Pixel 7 Pro: Subtle Tweaks Improve Google’s Best Phone
+16 more
The post Pixel 7 Pro vs. iPhone 14 Pro: Which Phone Camera Is Better? first appeared on Joggingvideo.com.
]]>The post ‘Cannot Verify AirPods’ in iOS 16? Your Earbuds Might Be to Blame first appeared on Joggingvideo.com.
]]>
Apple’s iOS 16 update brings a number of features to your iPhone. This includes a verification step for AirPods. If you’re connecting official AirPods — such as the new AirPod Pro 2 earbuds or the sleek, neutral-toned Kim Kardashian Beats Fit Pro, or other compatible Bluetooth headphone devices — you likely won’t notice a difference.
On the other hand, if you’re attempting to connect earbuds that are fraudulently parading as AirPods, you may get a “cannot verify AirPods” message, indicating the earbuds are possibly a knockoff of official AirPods. A prominent “Don’t Connect” button appears below the alert, but you should still be able to connect via the Bluetooth settings.
Read more: iPhone 14 Models Compared: Every New Apple Phone Compared, From Price to Size
Apple does warn, however, that the unverified devices may not perform as expected. It’s unclear what performance issues users may experience when connecting unofficial AirPods.
Along with the AirPod verification, new features of Apple’s latest operating system for iPhones, iPads and the like include the ability to edit and “unsend” messages, a customizable lock screen and upgrades to Focus Mode, among others.
If you haven’t downloaded the update yet, set aside an hour or so for it, but keep in mind that not all devices are compatible with iOS 16. Here’s how to check if your iPhone is compatible with iOS 16 and how to download the update.
The post ‘Cannot Verify AirPods’ in iOS 16? Your Earbuds Might Be to Blame first appeared on Joggingvideo.com.
]]>The post iOS 16 Won’t Revive the Battery Icon for Every iPhone first appeared on Joggingvideo.com.
]]>
Apple’s iOS 16 offers an impressive set of new features, but it marks the return of an old, much-missed feature, too: the battery life icon on the status bar. Most iPhones, including the new iPhone 14, sport the default feature, as do all iPads once you download the update. However, not all iPhones support the new battery icon feature, even if your phone is compatible with iOS 16.
According to an Apple support page published last Monday, the iPhone XR, iPhone 11, iPhone 12 Mini and iPhone 13 Mini models don’t display the battery icon in the status bar. Instead, owners of these devices will have to continue checking battery status as they always have: by swiping down to the Control Center.
No word as to why those specific iPhones were left out. Apple didn’t respond to a request for comment on whether the battery icon will be available on the devices in the future.
Read more: iOS 16 Cheat Sheet: Your Complete Guide to the iPhone Update
Other exciting iOS 16 features, such as editing and unsending messages, customizable lock screens and verification that your AirPods are indeed AirPods, appear to be available on the iPhones that go left out of the battery icon update.
The battery life display is set to default with the iOS 16 update, but if for some reason it’s not appearing on your iPhone (and you don’t have one of the models listed above), you can activate it under Settings > Battery, then turn on Battery Percentage.
The post iOS 16 Won’t Revive the Battery Icon for Every iPhone first appeared on Joggingvideo.com.
]]>The post 3 Things in iOS 16 You Should Do Immediately After Downloading first appeared on Joggingvideo.com.
]]>This story is part of Focal Point iPhone 2022, CNET’s collection of news, tips and advice around Apple’s most popular product.
Apple’s iOS 16 is out for compatible iPhones. And if you haven’t yet installed the new update, there are plenty of reasons to do so. iOS 16 brings a slew of new features to try, from unsending and editing text messages to viewing all of your saved Wi-Fi passwords. Not to mention, you can erase annoying objects from your iPhone photos, too. (However, if you’re a worrier, here’s why you may want to wait to install iOS 16.)
Read more: How to Download iOS 16 on Your iPhone Today
Once you do update, before jumping in, there are three things you should absolutely do before anything else on iOS 16, all of which will improve your experience on the iPhone. Here’s what you need to know.
For more on iOS 16, here are a few hidden features in iOS 16 you can check out, a cool iOS tool Apple is bringing back and how to get rid of the search button on your iPhone home screen. And here’s how to order the new iPhone 14.

Now playing:
Watch this:
Testing iOS 16 (Edit/Delete Sent Messages, New Lock Screen…
16:22
September is once again a busy month for Apple. Along with iOS 16, Apple is releasing the new iPhone 14, the latest Apple Watches — including the Ultra — and the AirPod Pro 2.
No. 1. Create a new wallpaper option for your iPhone lock screen
Apple has completely redesigned the lock screen on iOS 16, allowing you to fully customize various elements, like the date and time, add tiny widgets to let you keep up with the weather and popular news, and create multiple wallpaper profiles that you can easily switch to and from.
And if that sounds appealing, customizing your lock screen should be the first thing that you do after installing iOS 16.
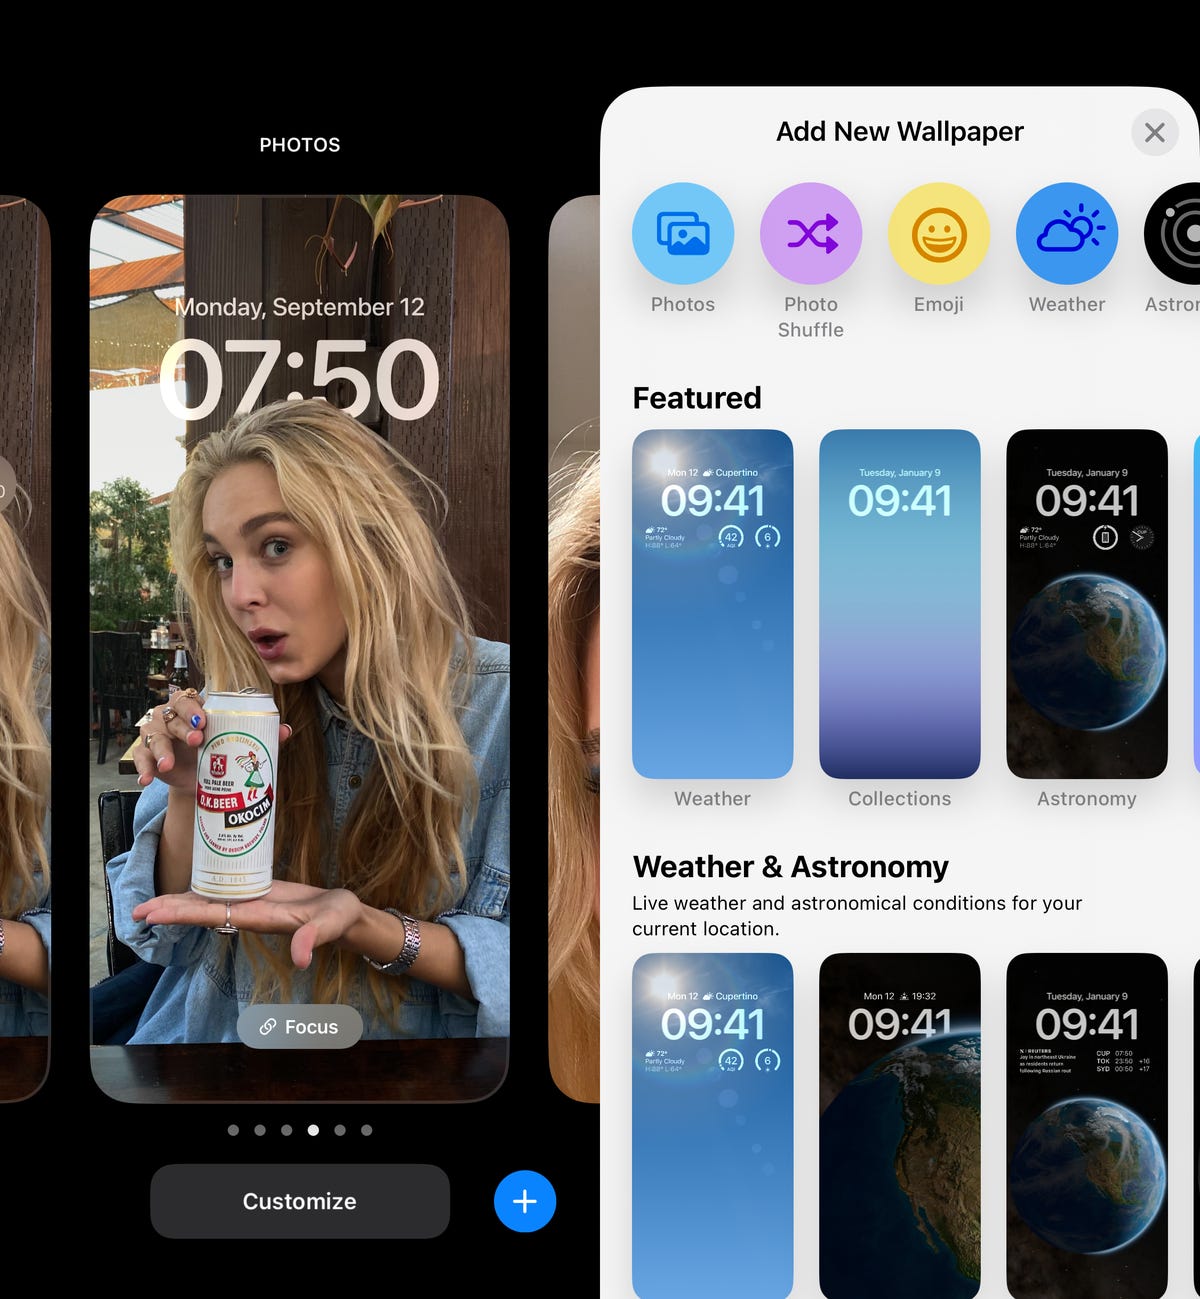
To customize your lock screen, press your finger down anywhere on the screen while it’s locked and then unlock your device when prompted. Once you do that, a brand-new lock screen interface will appear, where you can shuffle through and customize your various lock screen wallpapers.
If you tap the + button at the bottom right to create a new wallpaper, you can browse through various Apple wallpapers, featuring weather and astronomy, emojis and more. A few of these wallpapers contain built-in widgets, but you can also just add them later.
Press down on your existing lock screen wallpaper to add a new profile.
Nelson Aguilar/CNET
If you choose to upload your own photo, look for one that features a person or object clearly in the foreground. If you adjust the image just right, you’ll be able to use the new depth effect feature, which pushes the time behind whatever object is in focus, creating a layered sort of look.
You can then tap any of the lock screen elements, like the date and time, to customize the look. If you hit Add Widgets, you can add tiny transparent widgets to that section of your wallpaper.
When you’re finished, tap Add and choose whether you want to use the wallpaper only on your lock screen or on your home screen as well. Here’s how Apple is changing the lock screen on iPhone 14.
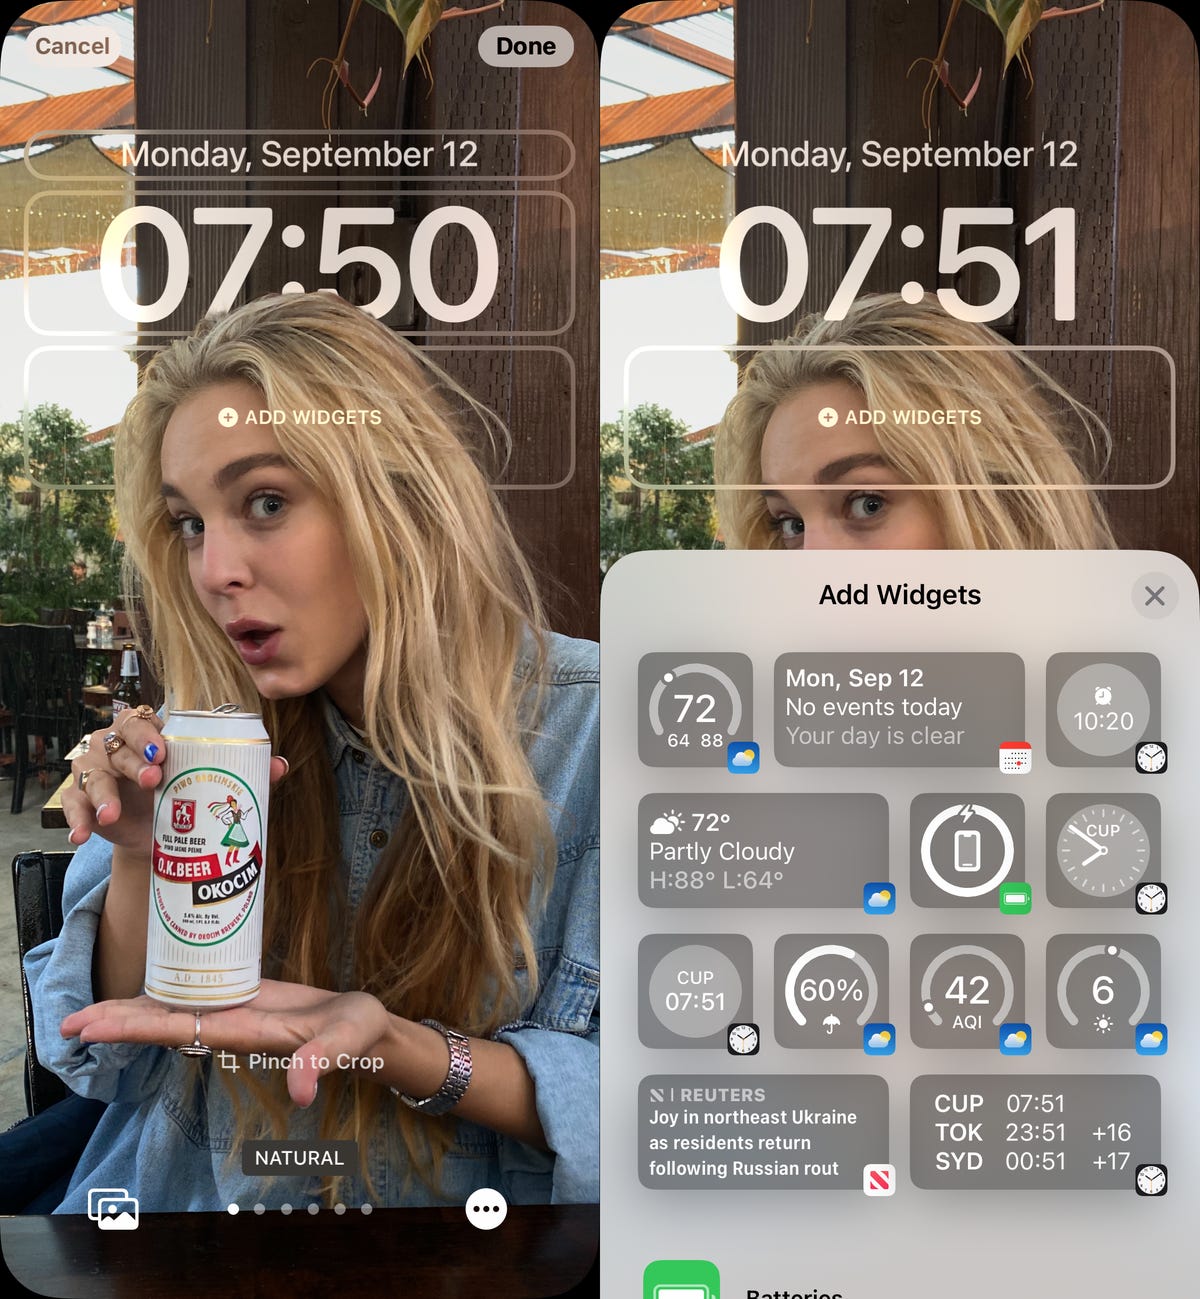
Widgets for weather, your calendar, the news and more.
Nelson Aguilar/CNET
No. 2. Set up a Focus profile so that you’re not distracted by notifications
Last year Apple introduced Focus, the evolution of Do Not Disturb, which you can configure to receive only important notifications and alerts and block everything else out. But the productivity feature has been heavily reworked on iOS 16, and it’s worth checking out and setting up if you want to reduce distractions on your iPhone.
In Settings, go to Focus and then choose a profile or profiles that you want to configure. Inside a Focus profile, you can then choose to receive notifications from certain people and apps, show silenced notifications on your lock screen, hide notification badges and make it so that your lock screen and home screen wallpapers automatically change when your Focus profile is turned on.
Additionally, you can schedule when you want your Focus profile to be turned on (when you go to sleep) and back off (when you wake up). If you use the Health app, you can retrieve your sleep information to choose an adequate schedule for Focus.
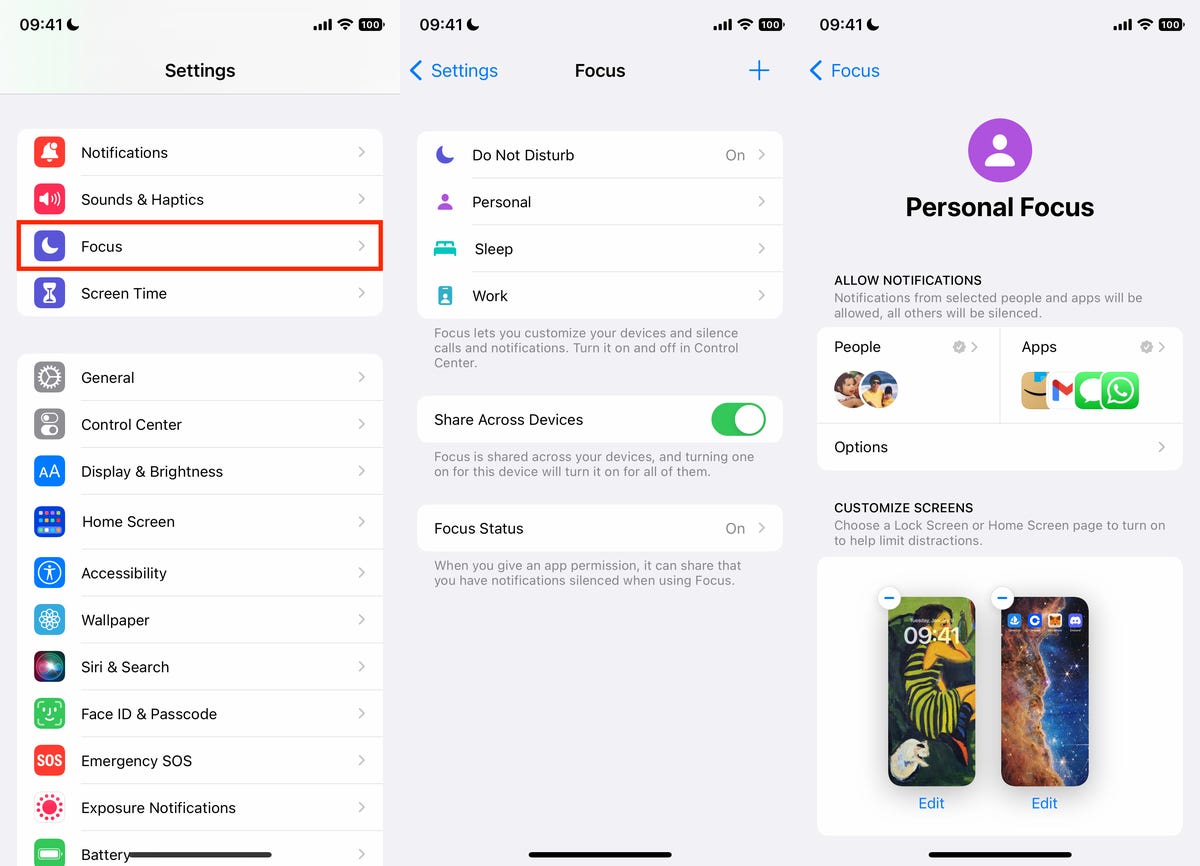
Customize who and what apps you can receive alerts from.
Nelson Aguilar/CNET
And finally, you can use Focus filters to customize how apps and system settings interact with you. For example, you can add an app filter to Safari so that only certain tabs show up, or add a filter to the Mail app so only some email messages get through to you. For system settings, you can throw on a filter to automatically turn on Dark mode and Low Power mode whenever your Focus profile is turned on.
Once your Focus profile is finished, you can swipe down from the top-right side of the screen to access the Control Center and then tap on the Focus control to turn on whatever profile you’ve created.
No. 3. Set up iPhoto to remove duplicate photos and videos to clear up clutter and free up storage
And if you need a quick way to clear some space on your iPhone, there’s now a built-in feature in Photos that scours your camera roll for any duplicate photos and videos. This is a great way to not only do some spring cleaning but also remove files that are taking up storage on your iPhone.
In Photos, go into the Albums tab, swipe all the way down and tap on Duplicates. Now you can go through all your photos and videos and either hit Merge for each set of duplicates or tap Select > Select All > Merge to delete all of the duplicates at once. At the bottom of each photo or video you’ll see the size of the files, so you’ll want to prioritize bigger files first.
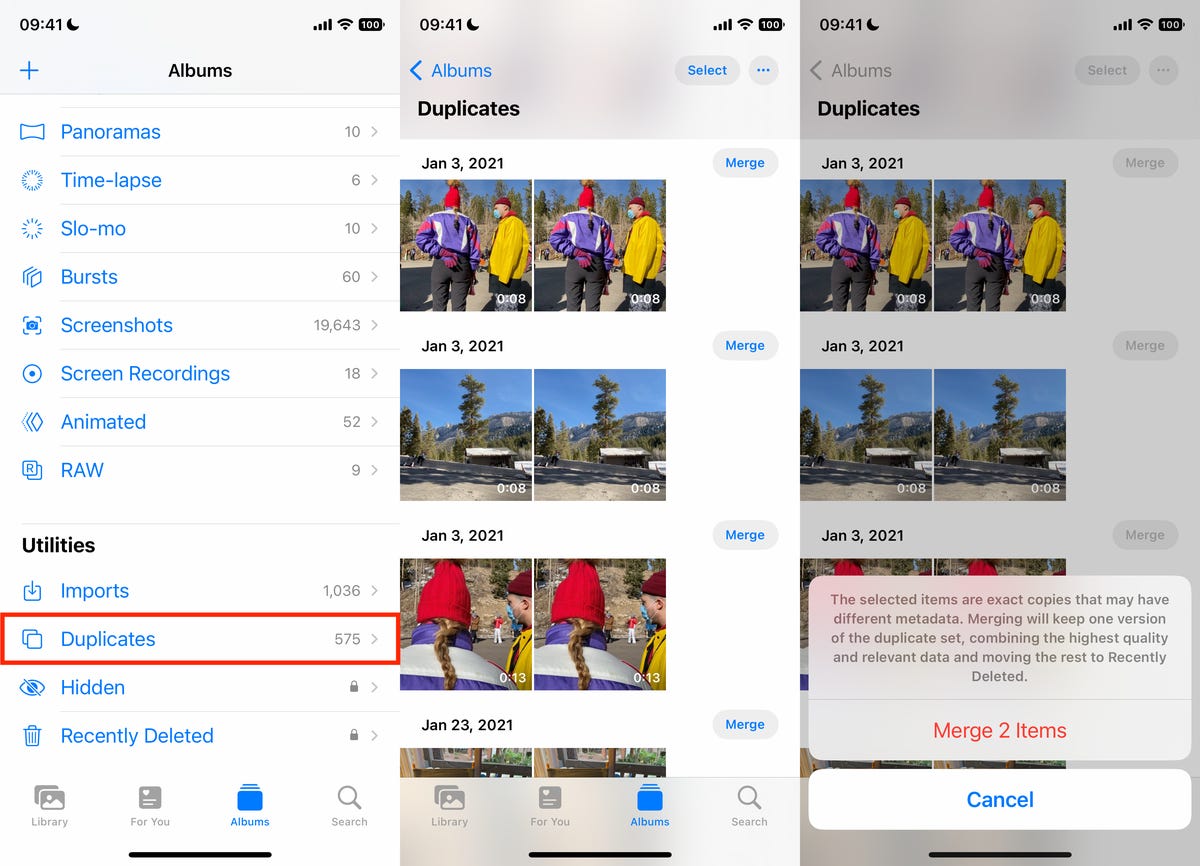
Remove duplicate photos and videos to get more storage on your iPhone.
Nelson Aguilar/CNET
The post 3 Things in iOS 16 You Should Do Immediately After Downloading first appeared on Joggingvideo.com.
]]>The post iOS 16 Cheat Sheet: Your Complete Guide to the iPhone Update first appeared on Joggingvideo.com.
]]>This story is part of Focal Point iPhone 2022, CNET’s collection of news, tips and advice around Apple’s most popular product.
Apple released iOS 16 less than a week after its “Far Out” event, where the company announced the next line of iPhones, Apple Watches — including the Apple Watch Ultra — and the AirPods Pro. We put together this cheat sheet to help you learn about iOS 16 and how to use the new features it brings to your iPhone.
Getting started with iOS 16
- 4 Things to Know About iOS 16
- Will iOS 16 Run on Your iPhone?
- What to Do Before Downloading iOS 16
- How to Download iOS 16 Now
- Why You May Want to Want Before Updating to iOS 16
Using iOS 16
- Now That You’ve Installed iOS 16, Do These 3 Things First
- Everything New on Your iPhone with iOS 16
- 5 Hidden iOS 16 Features You Need to Know About
- How to Fix Annoying Features in iOS 16
- You Can Unsend and Edit Messages in iOS 16
- Get Rid of the Annoying Search Button in iOS 16
- Set Up iOS 16’s New Customizable Lock Screen
- iOS 16’s Photo Editing Tools Work Like Magic
- Get the Battery Status Bar Back in iOS 16
- 2 Major Updates iOS 16 Brings to Maps
- Apple Pay Later: How the iOS 16 Feature Works
- iOS 16’s Lockdown Mode Can Protect You From Cyberattacks
- Passkeys Arrive in iOS 16
- Why You Might Be Missing Some iOS 16 Features
iOS 16 updates
Other things to know about iOS 16
- iOS 16 Features We’re Still Waiting For
- Why You Might Be Getting a ‘Cannot Verify AirPods’ Alert
- You Can Use Your Switch Joy-Cons on iOS 16
Check back periodically for more iOS 16 tips and how to use new iOS 16 features as Apple releases more updates.
Now playing:
Watch this:
Testing iOS 16 (Edit/Delete Sent Messages, New Lock Screen…
16:22
The post iOS 16 Cheat Sheet: Your Complete Guide to the iPhone Update first appeared on Joggingvideo.com.
]]>The post iOS 16 on Your iPhone: All the Best New Features, Explained first appeared on Joggingvideo.com.
]]>This story is part of Focal Point iPhone 2022, CNET’s collection of news, tips and advice around Apple’s most popular product.
Have you downloaded iOS 16 yet? The iPhone update is available for anyone with a compatible device, and installing the software gives you access to loads of new features and settings.
iOS 16, which was first announced in the spring at Apple’s WWDC conference, has gone through several beta versions prior to its public launch alongside the iPhone 14. It comes with a slew of new features and upgrades that aim to improve how your iPhone works. This includes a more customizable lock screen, a way to edit sent messages and a magic photo editing tool. Plus, the battery percentage is back.
Read more: The Best iPhone 14 Cases So Far
If you’re curious about what else iOS 16 offers, read on as we break down the 11 best new features on your iPhone. Just make sure you’ve already completed these three steps first and check out the lesser-known features lurking in iOS 16, too. And here’s why you might want to wait a bit before updating to iOS 16.
Apple’s Newest Releases
- iPhone 14 Pro, Pro Max Review: Welcome to Apple’s Dynamic Island
- iPhone 14 Review: A Good Upgrade for Most People
- Apple Watch Series 8 Review: Improvement By Degrees
- Apple Watch SE Review: Almost Everything I Want
- Apple iOS 16 Released: New iPhone Features From the Update
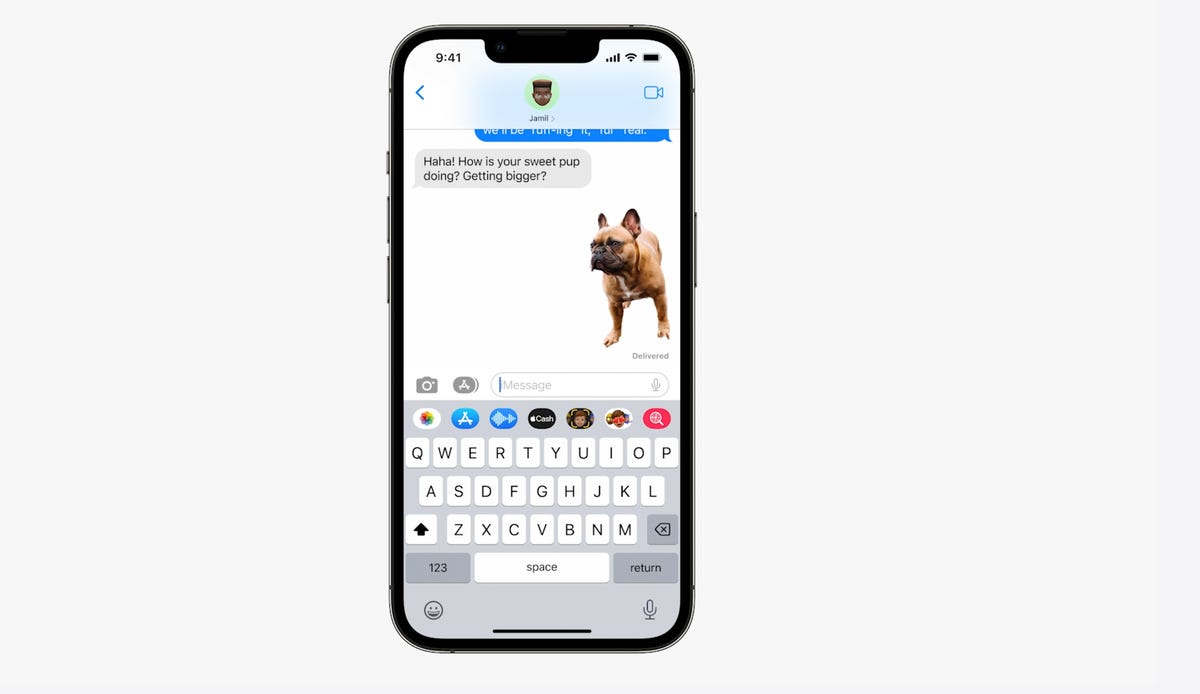
The ability to edit and ‘unsend’ messages
“Embarrassing typos are a thing of the past,” Craig Federighi, Apple’s senior vice president of software engineering, said at WWDC as he introduced three of the most requested features for the Messages app.
First, in iOS 16 you’ll be able to edit sent messages. So if you notice a typo after a message, you’ll be able to edit the message after the fact. A tiny “edited” appears in the status under the message.

In Messages, you can edit previously sent messages.
Apple
Next, and this might be my favorite new feature, you can immediately recall a sent message. If you accidentally send an unfinished message, you can use the Undo Send tool to prevent it from being read and hopefully look less chaotic to your friends and family.
Last, you can mark messages and threads as unread. This could be an excellent tool for when you don’t have time to respond to a message in the moment, but want to make sure you come back to it later.
Now playing:
Watch this:
Testing iOS 16 (Edit/Delete Sent Messages, New Lock Screen…
16:22
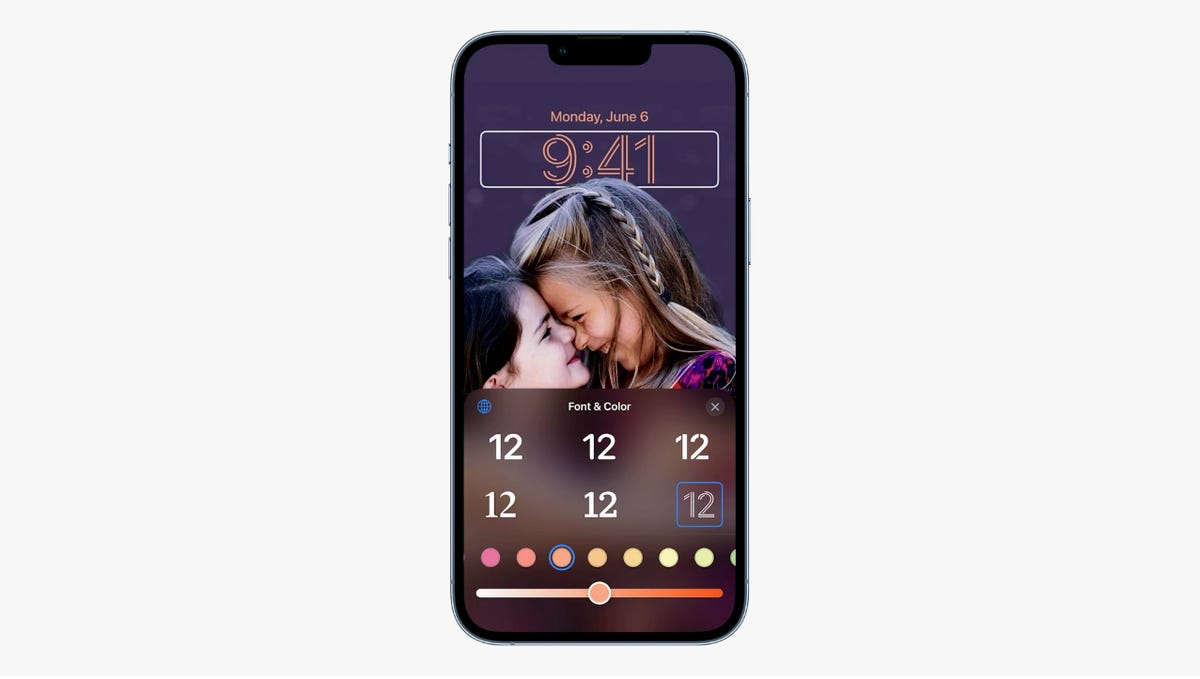
A new customizable lock screen
One of the things you look at the most on your iPhone is the lock screen, especially if you have a Face ID-equipped iPhone. iOS 16 brings the most substantial update to the iPhone’s lock screen yet. Press and hold to edit your lock screen. You can swipe to try out several different styles. Each style changes the color filter for the background photo and the font on the lock screen so everything complements each other. This feels a bit like Apple’s take on Google’s Material You, which launched with Android 12.
You can also customize the fonts for the time and date, and add lock screen widgets like temperature, activity rings and a calendar. The widgets are akin to complications on the Apple Watch lock screen.
Your iPhone will become more customizable in iOS 16. You’ll be able to choose how your lock screen looks, down to the font and color.
Apple
You can even set up multiple customized lock screens with different widgets and easily swipe to switch between them. There’s also a photo shuffle option that automatically changes the pictures on your lock screen.
One feature we’d been hoping to see Apple add was an always-on display. It’s something nearly all Android phones have; even the Apple Watch does. Well, with the new iPhone 14 Pro and iPhone 14 Pro Max, the always-on display has finally arrived.
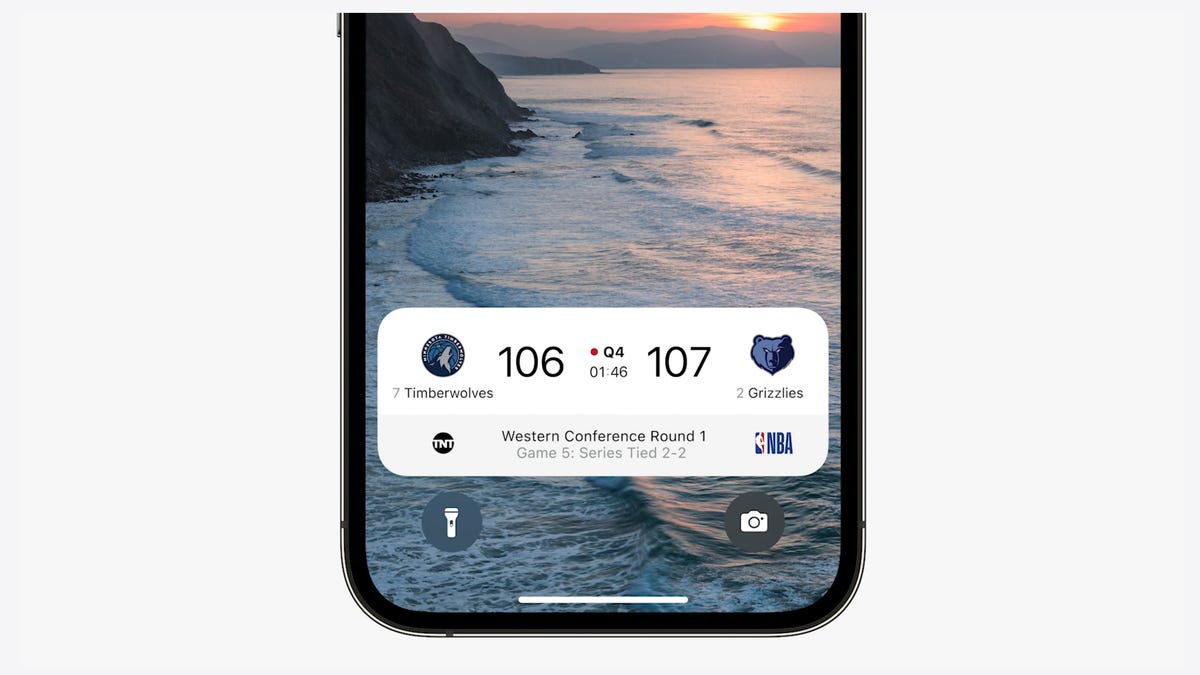
iOS 16 adds a feature that developers can use called Live Activities. This is essentially a mini view of the real-time progress of a workout, sporting event or Uber ride from your iPhone’s lock screen.
Apple
Notifications and live activities
Sometimes notifications can cover up your lock screen’s photo, so iOS 16 moves notifications to the bottom of your display. As you receive them, instead of being compiled into a list, they appear like a vertical carousel. This not only looks better but should be a big help for one-handed use of your iPhone.
iOS 16 also aims to solve another notification problem. Sometimes you get a bunch of notifications in a row from one app, like the score of a basketball game. A new tool for developers called Live Activities makes it easier to stay on top of things happening in real time from your lock screen, instead of getting a series of interruptions.
Live Activities should make it easier to follow sporting events, workouts or even the progress of an Uber ride.
Skip CAPTCHAs using Private Access Tokens
The CAPTCHA — which stands for Completely Automated Public Turing test to tell Computers and Humans Apart — has been a necessary evil across the internet. CAPTCHAs are designed to make sure that a person is accessing a website or service, and not a bot. I find them annoying, as they often involve reading strangely written letters or having to find all the images that have a truck. With iOS 16, Apple plans to start replacing these awkward interactions with Private Access Tokens.
According to a video on Apple’s website demonstrating Private Access Tokens, websites that support the token will essentially log in and authenticate that you are indeed a human without your having to play any of the usual CAPTCHA games. Apple says in the video that the company is working with other companies to roll out support for this feature, so we can’t say the CAPTCHA will be dead after iOS 16 rolls out to the public. But the concept could provide some relief if it gets adopted.
Wallet and Apple Pay Later
ID cards from more states will be available in your Wallet app along with more security and privacy features. In iOS 16 you can also protect your identity and age. So rather than showing your exact birth date, the Wallet app will display your ID and that you’re over 21.
iOS 16 makes sharing keys easier with apps like Mail and Messages. When your friend receives the key, they can add it to the Wallet app on their iPhone. Apple said it’s working to make sure that shared keys are an industry standard and free for others.
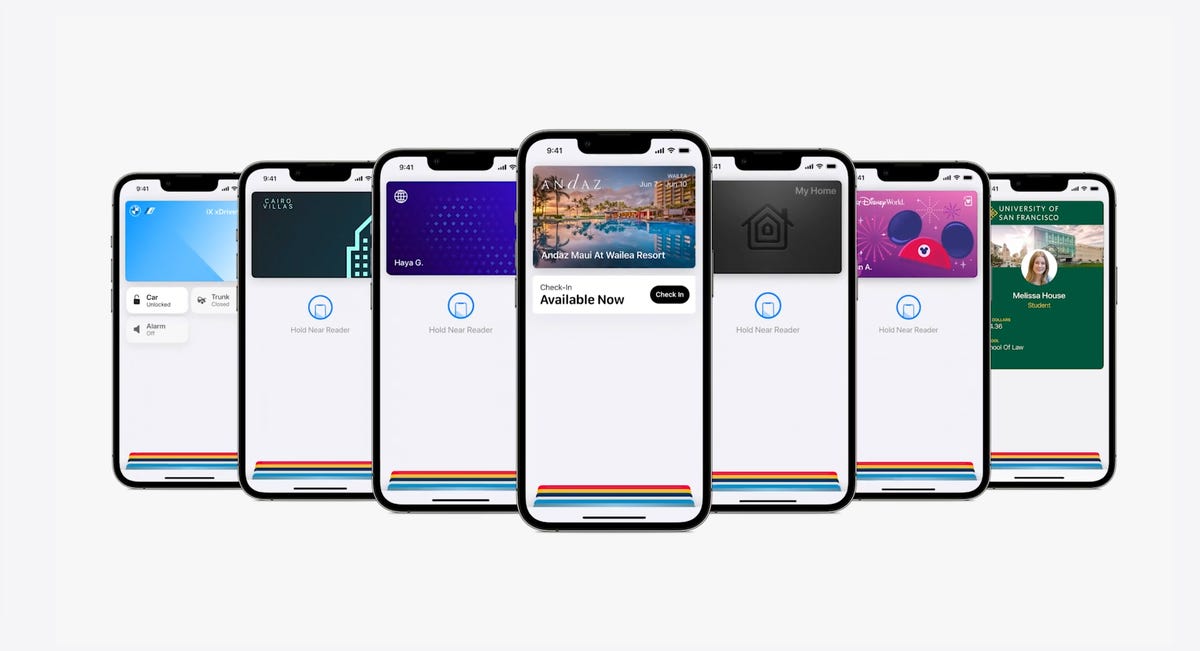
The Wallet app in iOS 16 gets a bunch of small but notable updates, including the Apple Pay Later payment plan.
Apple
Apple Pay will support new types of payments and adds a new feature called Apple Pay Later, a Klarna-like service that lets you split the cost of an Apple Pay purchase into four equal payments spread over six weeks, with zero interest and no fees. Upcoming payments are managed through the Wallet app, making it easy to keep track of dates and payments.
But Apple Pay doesn’t stop there. A new feature will also help you track Apple Pay orders and lets merchants deliver detailed receipts and tracking information. This should make it easier to stay up to date on the status of all your orders.
You can tap and hold on the subject of a photo and separate it from the background. Then you can drag it into another app like Messages to share it.
Apple
Visual Look Up’s tap and drag for photos
In iOS 15, Visual Look Up analyzes your photos and can identify objects like plants, landmarks and pets. iOS 16 takes this to the next level. When you touch a photo’s subject like the dog in the image above, you can lift it away from the background and add it to apps like Messages. Essentially it’s a tap-and-hold tool that removes a photo’s background.
Apple sometimes overuses the word “magic,” but this feature truly seems like it.

During the keynote for WWDC, Apple executive Craig Federighi introduces SharePlay for the Messages app.
Apple
SharePlay comes to Messages
SharePlay, which debuted in iOS 15, lets you have a shared experience while connecting with someone over FaceTime. You can watch TV shows, listen to music in sync and other things. iOS 16 adds the ability to discover more apps that support SharePlay from within FaceTime.
But perhaps one of the coolest things Apple did for SharePlay was to make it work within the Messages app. Apple said that this was one of the biggest requests from app developers. Now when you want to share a movie on Disney Plus, you can start SharePlay together with a friend while chatting in Messages.
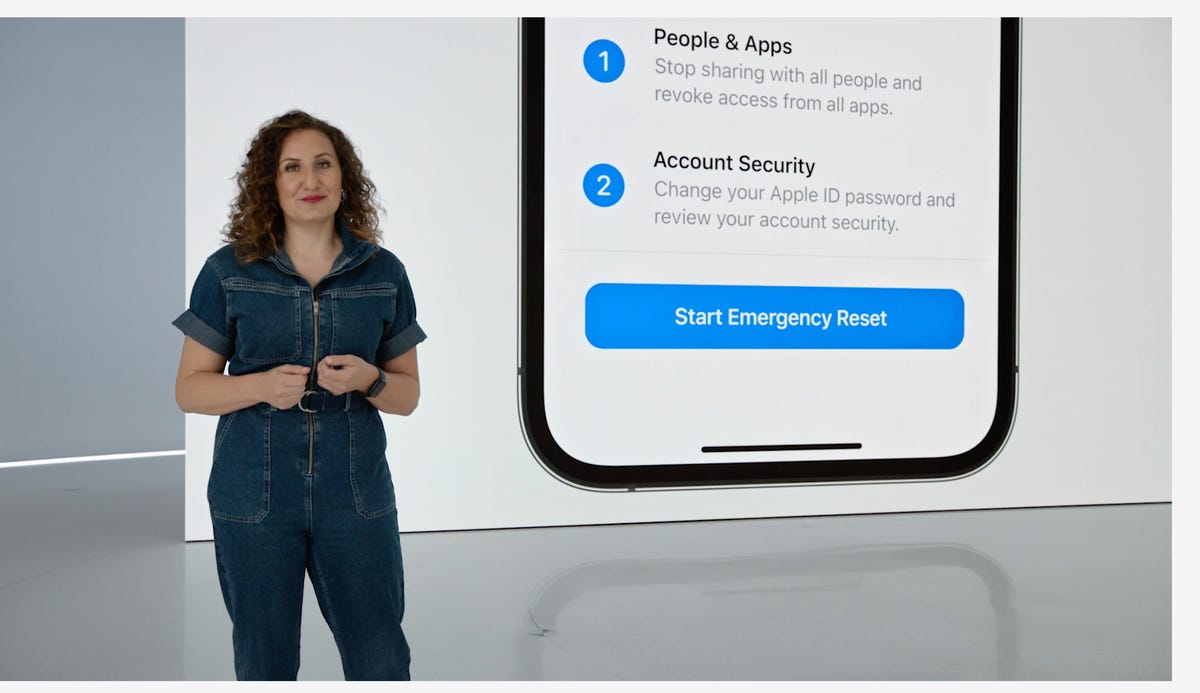
Safety Check lets you quickly reset location sharing and access to passwords. It’s intended to be helpful for people in abusive relationships.
Apple
Safety Check aims to help people in abusive relationships
Safety Check is a new feature intended to be helpful for people in abusive relationships. It lets you review and reset who has access to location information as well as passwords, messages and other apps on an iPhone.
Focus mode updates and Focus filters
Focus mode gets several updates. The first applies Focus behaviors to widgets and lock screen looks. So you could have one lock screen set for when your Work Focus is enabled and another for workouts.
Apple added specific Focus filters that apply your iPhone’s Focus mode within apps. For example, in Safari, you can limit what tabs are shown depending on what Focus mode you have active.
See also
- WWDC 2022 Recap: iOS 16 and Everything Else Apple Announced
- Apple M2 MacBook Air Hands-On: Bigger Screen, Higher Price
- iOS 16 Features iPhone Users Are Going to Love Most
Apple Maps adds transit fare cards
Maps gets several updates. You’ll be able to plan trips with up to 15 different stops along the way. If you start planning a trip with the Maps app on your Mac, you’ll be able to share that to your iPhone.
And in something similar to what Google announced for Google Wallet in Android 13, you’ll be able to see transit fare estimates as well as add more money to a fare card from within Apple Maps.

In iOS 16 you’ll be able to customize Quick Start with a specific child’s iCloud parental controls and settings.
Apple
iCloud family checklist
iCloud gets several new features. One of the more interesting ones is the option to quickly set up a new device for your child. When Quick Start appears, you have the option to pick a user for the new device and use all the existing parental controls you’ve previously selected and configured. However, this is not what many of us still want: the ability to set up separate users for the same device.
There’s a new family checklist with tips for updating settings for your kids as they get older, like a reminder to check location-sharing settings or share your iCloud Plus subscriptions.
For more, check out everything Apple announced at its Sept. 7 “Far Out” event. Plus, here’s how to download iOS 16.
The post iOS 16 on Your iPhone: All the Best New Features, Explained first appeared on Joggingvideo.com.
]]>The post iOS 16: There’s an Easy Fix for the iPhone’s Frustrating New Search Button first appeared on Joggingvideo.com.
]]>This story is part of Focal Point iPhone 2022, CNET’s collection of news, tips and advice around Apple’s most popular product.
If you’ve downloaded iOS 16, you likely noticed a bunch of new features on your iPhone. Many of them are lovely additions that make everyday tasks like sending text messages just a little easier. But, there are others that you might not be so fond of, even if you’re getting the new iPhone 14.
One particularly frustrating feature that comes to mind is the addition of the Search button at the bottom of the home screen (right above your dock). Many people are unhappy with the new home screen setting and here’s why: While the Search feature on iOS is useful for quickly finding text messages, files, settings, websites and photos, the new button is placed in a location where it’s easy to accidentally tap it — especially when you’re scrolling through your various home screen pages.
And when you do inadvertently hit the new Search button, the Search feature blows up in full screen. Then you have to swipe out of it to go back to your home screen, which is annoying.
Read more: The Best iPhone 14 Cases So Far
I’ll explain the easy fix to get rid of the new Search button on your home screen. If you want to learn more about iOS 16, check out how to unsend and edit text messages, view all your saved Wi-Fi passwords and customize your lock screen with widgets. And here’s why you may want to wait before moving to iOS 16.
How to get rid of the new Search button on iOS 16
On your iPhone running iOS 16, launch the Settings application, go to Home Screen and toggle off the Show on Home Screen button underneath “Search.” Instead of the Search button on your home screen, you’ll now see several dots indicating your various home screen pages instead. If you press on it, nothing happens.
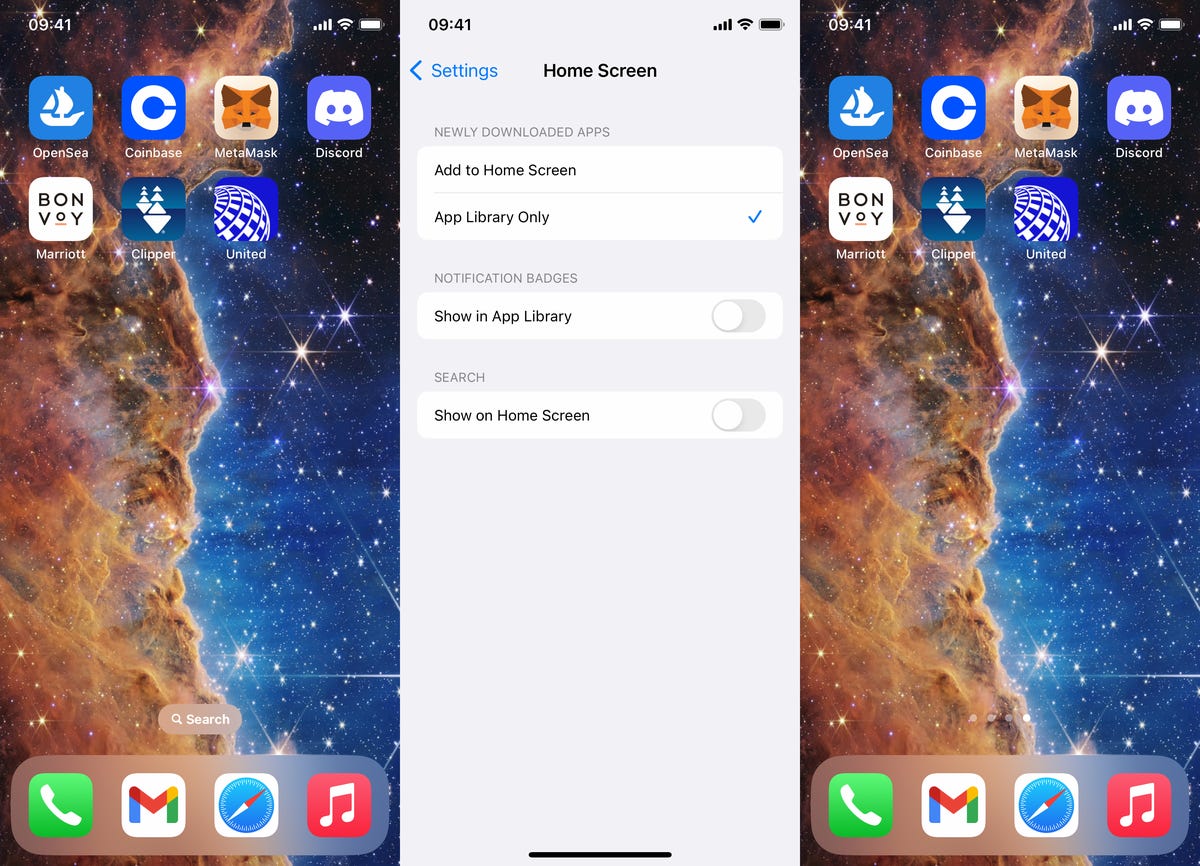
Easily remove the Search button in Settings.
Nelson Aguilar/CNET
If you want to access the Search feature after removing the home-screen button, you can access it the traditional way: swipe down from anywhere on your screen.
The post iOS 16: There’s an Easy Fix for the iPhone’s Frustrating New Search Button first appeared on Joggingvideo.com.
]]>The post Missing Some iOS 16 Features? Your iPhone’s Age Might Be to Blame first appeared on Joggingvideo.com.
]]>This story is part of Focal Point iPhone 2022, CNET’s collection of news, tips and advice around Apple’s most popular product.
The new iOS 16 is out now for compatible iPhones, which means you can download it right now if you have an iPhone 8 or newer.
Unfortunately, even if your iPhone is capable of running iOS 16, that doesn’t mean it will get all the cool new features, like the battery percentage icon in your status bar or the new drag-and-drop photo crop trick.
Depending on your iPhone’s age and processor, your software update may be lacking some of the new settings and features that others are enjoying on iOS 16. Here’s how to find out if you might be missing these features too.
Read more: Should You Upgrade to the iPhone 14? How It Compares to Older iPhones
If you’re interested in getting the iPhone 14, 14 Pro or 14 Pro Max, which arrived Friday and will include every single feature in this list, here is how you can find an iPhone 14 deal and here are some of the best cases you can get.
Battery percentage in the iPhone status bar
Apple used to show off the battery percentage in the status bar until the release of the iPhone X and the notch (which has recently been converted to the Dynamic Island). With iOS 16, the battery indicator has been reintroduced and redesigned — but not for everyone with the latest update.
According to this Apple support page, the status bar battery feature is excluded from the iPhone XR, iPhone 11, iPhone 12 mini and iPhone 13 Mini.
If you want to see a visual indicator of your battery’s charge, you can either add a battery widget to your home screen or swipe down to view the number in the Control Center.
The battery icon lives in the top-right of the iPhone.
Patrick Holland/CNET
Lift subject from photo background
On iOS 16, you can press your finger down on a clear subject, such as a person or a pet, in a photo, to crop it out and then drag and drop it elsewhere, like in your notes, an email or a text message. It does this using Apple’s Visual Look Up feature, which identifies objects in your photos, but both of these features require newer iPhone models.
This feature is available only on an iPhone with a A12 Bionic and later — starting with the iPhone XS/XR — and is not be available on the iPhone X and iPhone 8 series.
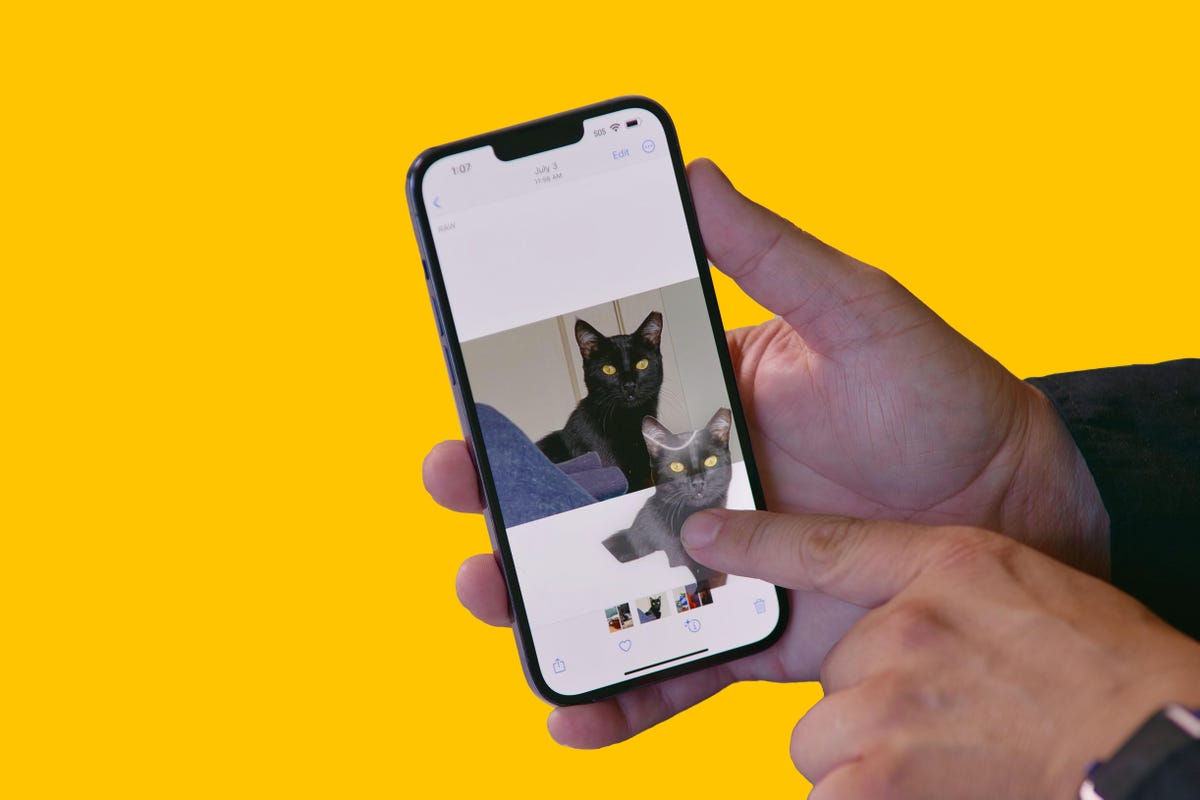
Simply drag and drop to crop your subject from a photo.
Celso Bulgatti/CNET
Wallpaper depth effect on your lock screen
The lock screen added major customization tools with the release of iOS 16, allowing you to play with fonts, colors, wallpaper profiles, widgets — and a new depth effect. As long as your wallpaper features a clear subject in the foreground, the time on your lock screen may appear underneath the object, giving your wallpaper a layered effect. However, the feature also uses Visual Look Up to identify your subject, and so it won’t work on every iPhone.
Once again, this feature is available just on an iPhone with a A12 Bionic chip and later, so iPhone XS/XR and later.
You can see the bottom of the time fall back behind the photo’s subject.
Apple/Screenshot by CNET
Live Text to copy text from videos
The Live Text feature on your iPhone, which was introduced with iOS 15, allows you to copy text from an image and then paste it elsewhere. With iOS 16, the feature has received an update which now lets you copy text from a paused video as well, but only if you have a certain iPhone.
This feature is available only on the iPhone XR/XS and later.
Live Text works on both photos and videos on iOS 16.
Patrick Holland/CNET
New and improved Dictation experience
In iOS 16, Apple has redesigned how Dictation works, making it easier to use voice-to-text and the keyboard together, making the experience more fluid when sending text messages and drafting up emails. The feature uses on-device machine learning, which unfortunately isn’t available on all iPhones.
This feature is once again only available on iPhones with a A12 Bionic chip and later, which includes the iPhone XS/XR and later.
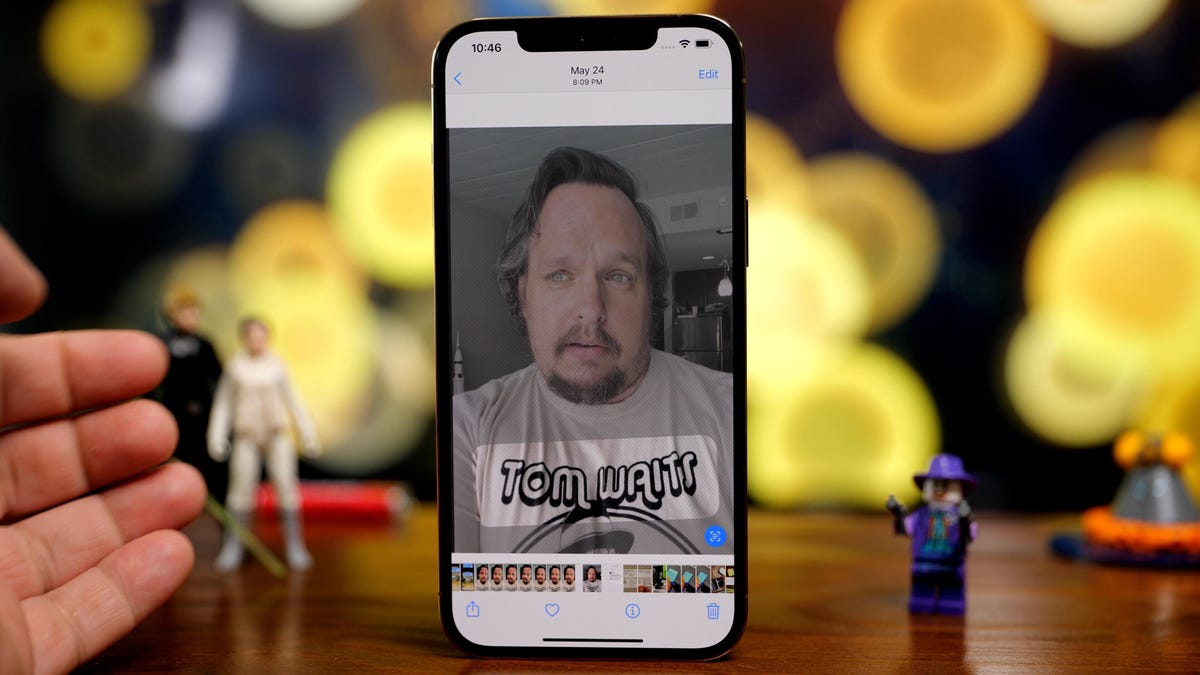
Live captions for FaceTime calls and videos
Live Captions for iOS 16 creates real-time captions for any video playing on your iPhone, whether it’s in your text messages or camera roll, or even if it’s a FaceTime call. The new accessibility feature is geared toward improving communication for those that are hard of hearing, but not everyone will get the change to enable it.
Like most of the features on this list, it’s only available on iPhone models with the A12 Bionic chip and later, which includes the iPhone XS/XR and later (and leaves out the iPhone 8 series and iPhone X).
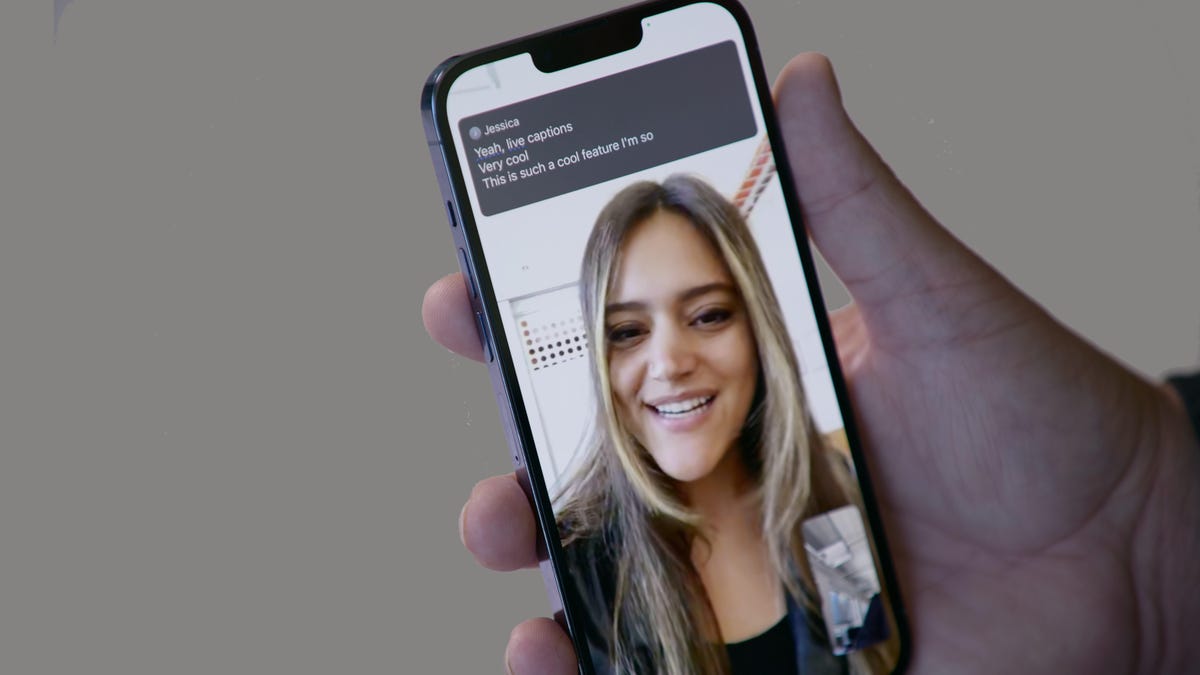
Live Captions on FaceTime allow you to read what the other person is saying in realtime.
Celso Bulgatti/CNET
Other features not available for every iPhone running iOS 16
The features above aren’t the only new or updated features that won’t appear on every iPhone with iOS 16. Below is a full list of missing features and which iPhone models are included.
- Blur foreground objects in portrait photos: Available on the the iPhone 13 and iPhone 14.
- Use your camera to track your medications in the Health app: iPhone XS/XR and later.
- Hang up calls using your voice and other Siri improvements: iPhone XS/XR and later.
- Detect and describe nearby objects, like doors, with your camera: Available on the iPhone 12 Pro, iPhone 13 Pro and iPhone 14 Pro.
For more, here are the first things to do once you get iOS 16 and how to turn off iOS 16’s annoying features.
The post Missing Some iOS 16 Features? Your iPhone’s Age Might Be to Blame first appeared on Joggingvideo.com.
]]>The post Bought the New iPhone 14? Here’s the Easiest Way to Transfer Your Data first appeared on Joggingvideo.com.
]]>
If you bought one of the new iPhone 14 models today, you’re probably ready to tear open the box and start experiencing all the new features of iOS 16. While getting a new phone is exciting, we don’t recommend rushing the setup process. Instead, take the time to make sure your new iPhone 14 is set up to your liking.
Apple has several options for transferring data from iPhone to iPhone, depending on your situation. For instance, you can set it up as brand new, but you’d be starting from scratch with no settings, messages, photos, apps or accounts transferred over. There’s also the option to move everything from your current phone to the iPhone 14 — even if you’re currently an Android user.
We’ll explain the four different methods for restoring your phone from a recent backup of your current iPhone.
1. Restore a recent iCloud backup to your new iPhone
The easiest and quickest method to set up your new iPhone is to restore from a recent iCloud backup. As you walk through the initial setup process, tap Restore from iCloud Backup, sign in with your Apple ID and then pick the most recent backup of your old iPhone.
If the backup is more than a day or two old, I suggest you take an extra few minutes to create a new backup. To do so, open the Settings app on your old phone and search iCloud Backup (click the icon), then select Back Up Now.
Once that finishes, go back to your new iPhone and select the backup you just created as what you want to use to restore from.
Your phone will then restore your settings and preferences, and you’ll be able to start using it in about 15 minutes while it finishes downloading your installed apps.
Once everything is restored, you’ll need to sign back into any accounts you added to your phone, as well as go through your apps and make sure you’re still signed in.
You’ve got several options when it comes to setting up your new iPhone.
James Martin/CNET
2. Use Apple’s direct transfer method
During the setup process, you’ll be asked if you want to directly transfer apps and information from your old iPhone to your new one. This feature was first rolled out with iOS 12.4, so if it’s been a few years since you’ve upgraded phones, it’ll be the first time you’ve seen the option.
The tool is straightforward to use. Make sure you have both phones, preferably plugged in and charging to ensure they don’t run out of battery, a Wi-Fi connection and enough time for the process to finish — it could take over an hour.
The more information you have on your phone, like photos in your camera roll, the longer it will take. When the transfer starts, the phones will show you a time estimate. Every time I’ve used this tool, that estimate has been accurate within a couple of minutes. It’s worth taking the time if you don’t use Apple’s iCloud service to back up your phone.
3. Use a Mac or PC to transfer your data to an iPhone
The method I personally use with every new iPhone is to restore from an encrypted backup using a Mac or PC. Not only does this process transfer all of your apps, settings and preferences, but it also means you don’t have to sign into the countless apps you have on your phone.
Before you can use this method, you’ll need to create an encrypted backup of your current iPhone. I know that may sound intimidating or overly complicated, but it only means you have to check an extra box and enter a password.
On a Mac, you’ll use Finder to back up your old iPhone. We outlined the steps when Apple killed iTunes. Just make sure to check the Encrypt backup box and enter a password you’ll remember when prompted. Let your Mac go to work, creating a backup file. It will let you know when it’s done.
On a PC, you’ll need to use iTunes (it’s not completely dead) to create a backup. That process is explained here. Again, you’ll need to make sure the Encrypt backup box is checked and enter a password.
To restore your new phone, open Finder or iTunes, and connect your phone to your computer. Click Trust when prompted, and then follow the prompts, selecting the backup you just created as what you want to use to restore the phone. You will need to enter the backup’s password before the process begins — so make sure you don’t forget it!
Once it’s done, your new phone will be an exact copy of your old phone and you won’t have to spend any time signing into apps or random accounts.

Apple made an Android app called Move To iOS that makes moving your messages, photos, videos and more from an Android phone to an iPhone easy.
Patrick Holland/CNET
4. Android user? This app is your answer
Apple doesn’t have many Android apps listed in Google’s Play Store, but Move to iOS is one of them. This free app will connect your Android phone to a new iPhone and allow you to transfer the most important information from one phone to the other.
Here’s the entire step-by-step process as well as some caveats, like the fact that it won’t transfer any locally stored music or PDF files.
No matter the process you used to set up your new phone, you’re sure to be giddy with excitement as you explore what it can do.
The post Bought the New iPhone 14? Here’s the Easiest Way to Transfer Your Data first appeared on Joggingvideo.com.
]]>