The post Pixel 7 Pro vs. iPhone 14 Pro: Which Phone Camera Is Better? first appeared on Joggingvideo.com.
]]>This story is part of Focal Point iPhone 2022, CNET’s collection of news, tips and advice around Apple’s most popular product.
Google’s Pixel 7 Pro has an excellent triple-camera setup that’s already seriously impressed me, alongside the phone’s slick new design and streamlined Android 13 software. But the competition is fierce, with Apple’s latest iPhone 14 Pro also packing some potent specs and a set of cameras that can take truly superb images.
So which one does it best and which one should you consider if you’re looking for the best photography phone around? I took both phones around the stunning Edinburgh suburb of Leith to find out.
It’s an interesting matchup as both phones have similar camera offerings with a main standard lens, an ultrawide lens and a telephoto zoom. And both have already proven their photographic prowess in our full reviews, with rich images and excellent dynamic range being delivered on both sides.
Pixel 7 Pro, main lens.
Andrew Lanxon/CNET

iPhone 14 Pro, main lens.
Andrew Lanxon/CNET
Take a look at the photos above from the Pixel 7 Pro’s 50-megapixel and the iPhone 14 Pro’s 48-megapixel main camera lens. Both scenes are well exposed here, with controlled blue skies and plenty of detail to be seen in the more shadowy areas. The iPhone’s color balance is a bit warmer, which I think suits the scene well, although the Pixel’s image is arguably a touch more natural looking.
Pixel 7 Pro, ultrawide lens.
Andrew Lanxon/CNET

iPhone 14 Pro, ultrawide lens.
Andrew Lanxon/CNET
Switch to the ultrawide lens, and again both phones have done a great job in capturing this high contrast scene above. There’s very little to choose between them, but I think the Pixel 7 Pro’s more natural color tones might give it the edge.
Pixel 7 Pro, 5x optical zoom lens.
Andrew Lanxon/CNET

iPhone 14 Pro, 3x optical zoom lens.
Andrew Lanxon/CNET
Things change when we switch to the zoom lenses though, most notably because the Pixel 7 Pro’s 5x offers a much closer view than the 3x optical zoom of the iPhone 14 Pro. I love a longer zoom as it helps you find different photo compositions in a scene that would be lost to those who only have wide angle lenses. Using the zoom lens for the photos above let me capture a totally different scene, but I didn’t have to physically move to get it.
That extra reach is noticeable on the Pixel’s shot, with a much closer zoom on the buildings in the distance. Both phones have achieved a good exposure however, and while the Pixel’s image is noticeably warmer (particularly on the buildings themselves), I like the color balances of both shots.
Pixel 7 Pro, 5x zoom lens.
Andrew Lanxon/CNET

iPhone 14 Pro, 3x zoom lens.
Andrew Lanxon/CNET
Again, that extra zoom on the Pixel let me get a tighter composition on the buildings next to the river in the images above, and it’s a better-looking photo as a result. That said, I prefer the tones and exposure of the iPhone’s shot, with brighter whites and a more vibrant pop of orange visible on the central building and richer blue tones in the sky.
Pixel 7 Pro, ultrawide lens.
Andrew Lanxon/CNET

iPhone 14 Pro, ultrawide lens.
Andrew Lanxon/CNET
The ultrawide photos above are more mixed however. While both phones achieved a generally decent exposure, they both have slightly blown out highlights visible in the distant clouds. And while I prefer the more natural blue sky of the iPhone 14 Pro, the Pixel 7 Pro has achieved more vibrant color tones on the buildings and trees toward the center of the frame. It’s tough to make a call on which is “better” here.
Pixel 7 Pro, main lens.
Andrew Lanxon/CNET

iPhone 14 Pro, main lens.
Andrew Lanxon/CNET
Back to the main camera lens, and there’s again very little to choose between the two pictures above. There’s tons of detail in both, and the overall exposure is spot on. If I were nitpicking — which I am — I’d say the Pixel 7 Pro’s sky has a bit too much of a purple tinge in it and it’s a slightly more contrasty scene overall. While that’s resulted in deeper orange hues on the fall leaves, it’s less representative of the actual colors of the scene. It’s largely down to personal preference, but I’m marginally erring toward the iPhone’s shot here.
Pixel 7 Pro, ultrawide lens.
Andrew Lanxon/CNET

iPhone 14 Pro, ultrawide lens.
Andrew Lanxon/CNET
The photos above show the same scene but from the ultrawide lens this time. To my eye, it’s an easier win for the iPhone here. The overall color balance is more natural. And while the iPhone kept a decent contrast in the darker area in the bottom left, the Pixel has tried to brighten this area artificially, resulting in a weird-looking grey patch that I’m not keen on.
Pixel 7 Pro, wide-angle lens with macro focus.
Andrew Lanxon/CNET

iPhone 14 Pro, wide-angle lens with macro focus.
Andrew Lanxon/CNET
With the Pixel 7 Pro now packing auto-focus on its ultrawide lens, it’s able to offer macro photography as it can focus within a couple of inches of the lens. It’s something Apple introduced on the iPhone 13 Pro, and it’s great fun to experiment with.
In the macro photos above, I prefer the image from the Pixel 7 Pro’s camera. The white balance has resulted in more vibrant — and more accurate — blue-purple tones on the flower’s petals. The leaves in the background also have more of an emerald tone, rather than the yellow-green tones seen on the iPhone’s shot.
Pixel 7 Pro, wide-angle lens with macro focus.
Andrew Lanxon/CNET

iPhone 14 Pro, wide-angle lens with macro focus.
Andrew Lanxon/CNET
And it’s much the same in the pictures above when I used the phones to get a low-down shot of this dandelion, with the blue sky behind it. The Pixel 7 Pro’s shot has much more vibrant green tones in the grasses around the subject. The iPhone 14 Pro captured a warmer scene, with more yellow tones seen in the grasses that I personally don’t like as much.
Pixel 7 Pro selfie camera test.
Andrew Lanxon/CNET

iPhone 14 Pro selfie camera test.
Andrew Lanxon/CNET
The Pixel 7 Pro is packing a 10.8-megapixel front-facing selfie camera, which is slightly below the iPhone 14 Pro’s 12 megapixels. It’s not a huge difference, there is slightly more detail visible when you zoom in. Both shots are generally solid, however, although I think the Pixel has gone a bit too “HDR” by reducing the highlights on my face too much. Personally, I prefer how I look in the iPhone’s image.
Pixel 7 Pro wide-angle selfie test.
Andrew Lanxon/CNET

iPhone 14 Pro wide-angle selfie test.
Both phones have a wider-angle option for the front-facing cameras, which is helpful if you want to capture more of your surroundings or want to squash more of your friends into the picture. I took the photos above in this mode, and the Pixel actually has the edge slightly in terms of fine image details. But again, I prefer the exposure and contrast from the iPhone as the Pixel’s HDR has flattened the tones in my face a bit too much for my liking.
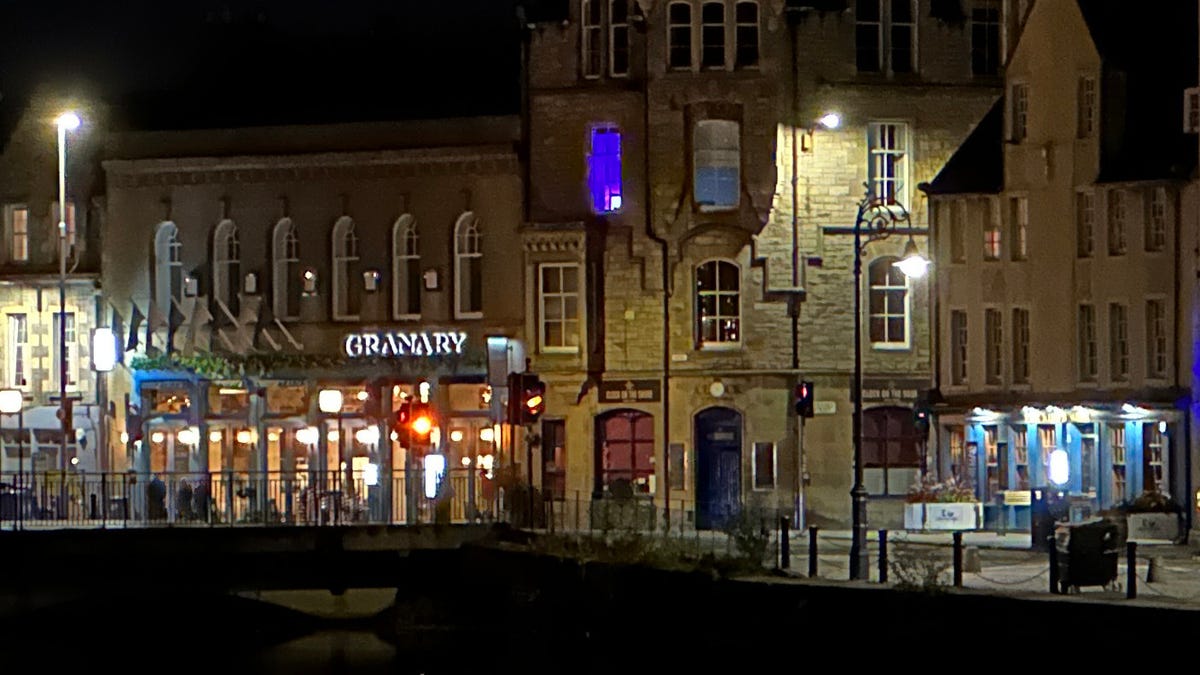
Pixel 7 Pro, night mode.
Andrew Lanxon/CNET

iPhone 14 Pro, night mode.
Andrew Lanxon/CNET
When switching to night mode on both phones, I had to give an early win to the iPhone in the photos above. Its white balance produced a nicer-looking shot without the overly warm orange tone seen in the Pixel’s image.
Pixel 7 Pro night mode, 100% crop.
Andrew Lanxon/CNET

iPhone 14 Pro, night mode, 100% crop.
Andrew Lanxon/CNET
It’s also clear that the iPhone’s image is sharper when cropping in to 100% on both images, with the Pixel’s shot showing some motion blur, particularly on the pub sign. Look at the spotlights on the wall sculptures above; the Pixel’s shot hasn’t been able to capture the dynamic range here, resulting in blow-out areas, while the iPhone has done a much better job of keeping those bright tones under control.
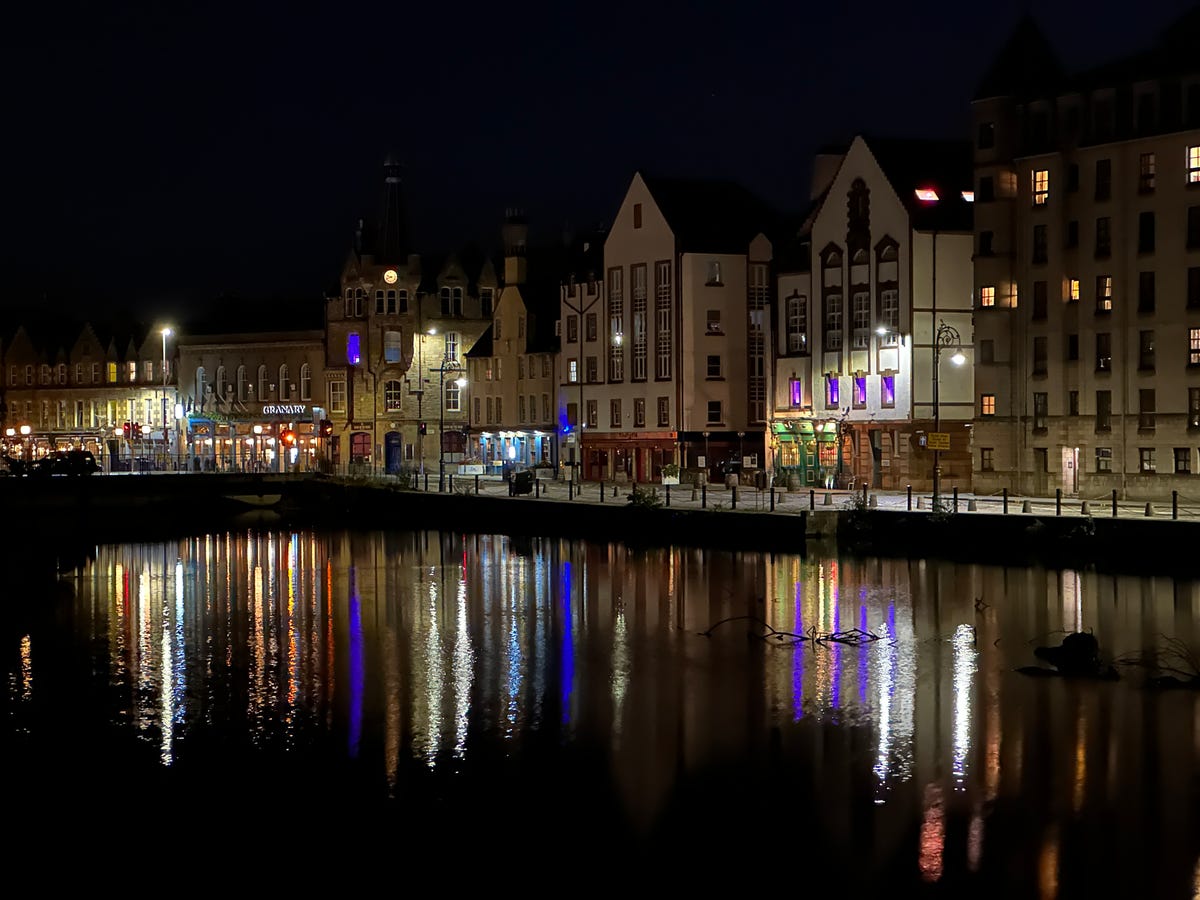
Pixel 7 Pro, night mode.
Andrew Lanxon/CNET

iPhone 14 Pro, night mode.
Andrew Lanxon/CNET
There’s not as much to choose between in these night-time shots above that I took overlooking Leith Shore. Both have similar color tones, exposure and only marginal improvements on the iPhone’s shot when viewed at 100%.
Pixel 7 Pro night mode, 5x zoom.
Andrew Lanxon/CNET
iPhone 14 Pro, night mode, 3x zoom.
Andrew Lanxon/CNET
Switch to the zoom mode, and there’s a bigger difference between the two phones. In the images above, the Pixel’s shot is brighter and more vibrant but suffers hugely from motion blur, despite that fact that I stabilized myself against a bridge wall when taking the shot. I took three images here and this was the best I could get.
Pixel 7 Pro, night mode, 5x zoom at 100% crop.
Andrew Lanxon/CNET
iPhone 14 Pro, night mode, 3x zoom at 100% crop.
Andrew Lanxon/CNET
You can really see how blurry the Pixel’s image is when cropping in to 100%. Sure, the iPhone doesn’t have the same reach with its 3x zoom. But its shot is much sharper and clearer, and it easily takes the win here.
Pixel 7 Pro, night mode.
Andrew Lanxon/CNET

iPhone 14 Pro, night mode.
Andrew Lanxon/CNET
I also found that the Pixel 7 Pro is particularly susceptible to lens flare at night when shooting towards bright light sources like the street lamp shown in the pictures above. While both cameras suffer from lens flare, the Pixel’s is particularly problematic since most of the night sky is filled with red-pink flares surrounding the light. It’s a shame because this would otherwise have been a nice night-time scene.
Which phone takes better pictures?
Both phones took some truly superb photos during this test, and it’s not easy to give either one the definitive win. Some elements of what makes a “better” photo will come down to personal preference. In well-lit outdoor shots, I found that the Pixel 7 Pro achieved a more natural color tone from its main lens than the iPhone managed. But its colors weren’t as good in some wider-angle shots. Of course, you can set up different photographic styles on the iPhone to customize how the camera captures photos and make them look more natural if that’s your preference.
At night the iPhone is the clear winner though, with better colors, crisper detail and a superior ability to handle bright light sources — both in terms of exposure and lens flare. However, the Pixel 7 Pro absolutely takes the win with its superior zoom skills, with its 5x zoom letting you snag beautiful, crystal-clear images that are simply out of reach of the iPhone’s 3x zoom. I also preferred the look of the Pixel’s macro images in all of the tests I shot.
Now playing:
Watch this:
Pixel 7 Pro Review: Google’s Best Phone Gets Better
10:14
So which is “best” will come down to what you want most from your phone camera. If night photography is important, then go for the iPhone 14 Pro. If you want zoom skills to find creative compositions in your landscapes and street photography, then the Pixel 7 Pro is for you.
If you just want a great all around camera to snap vibrant shots of your kids at the beach, your friend’s food at a local market or some stunning woodland scenes on your next hike, then either phone will suit you incredibly well. Your bigger decision will instead come down to whether you want to go with iOS or Android as your operating system and whether spending the extra hundred bucks or so on the iPhone 14 Pro is worth it.
Pixel 7 Pro: Subtle Tweaks Improve Google’s Best Phone
+16 more
The post Pixel 7 Pro vs. iPhone 14 Pro: Which Phone Camera Is Better? first appeared on Joggingvideo.com.
]]>The post NASA Enhances Webb Space Telescope Images With X first appeared on Joggingvideo.com.
]]>
NASA’s multibillion-dollar James Webb Space Telescope reached its gravitational safe space a million miles from Earth in January. It began taking our breath away in July.
One by one, astonishing vignettes of a glimmering universe started decking our screens, each image somehow more thought-provoking and beautiful than the last. However, I’d argue the telescope’s seminal masterpieces will always occupy a special corner of our hearts.
Toffee-hued cliffs of the Carina Nebula and fairy-dusted galaxies of Stephan’s Quintet are ever ingrained as the JWST’s first dance with deep space, and our first dance with the JWST. That said, thanks to data collected by NASA’s Chandra X-ray Observatory, the agency managed to enhance some of those brilliant JWST starter pics.
With positively electrifying results.
Behold, a new and improved version of the JWST’s Carina Nebula, Stephan’s Quintet, and deep field SMACS 0723.3–7327 from image set No. 1, as well as an updated iteration of the slightly more recent Cartwheel Galaxy portrait.

These are the four composite images NASA created with both JWST and Chandra X-ray data.
NASA/CXC/SAO/ESA/CSA/STScI/JPL-Caltech
Breaking down JWST pics 2.0
On July 11, President Joe Biden presented humanity with its first JWST treasure, informally dubbed Webb’s First Deep Field (and formally known by its robot name, SMACS 0723.3-7327).
Let’s zoom in to the 2.0 of this sparkly exhibition first.

A composite image of SMACS 0723.3-7327.
NASA/CXC/SAO/ESA/CSA/STScI
 Enlarge Image
Webb’s First Deep Field with only JWST observations.
NASA, ESA, CSA, and STScI
When I laid eyes on this deep field for the first time — after NASA’s obscenely long delay in unveiling it, a wait weirdly scored by ambient chillhouse music — my jaw dropped like one of those comic book cartoon animals.
These aren’t stars you’re looking at; they’re galaxies located about 4.2 billion light-years away.
 Enlarge Image
The same deep field with just Chandra observations.
NASA/CXC/SAO
Warped streaks at the center of the image are the result of extensive gravitational lensing, a phenomena predicted by Einstein’s general relativity and therefore visual proof of the mind-bending principle.
Shown as a blue haze diffusing from the middle of the image, this gas reaches tens of millions of degrees Celsius and has a staggering mass of about 100 trillion times that of the sun. NASA even estimates the gas reservoir to be several times more massive than every galaxy in this cluster.
In a way, realizing the size of this region forces you to think about how deep this deep field really goes.
Next up is Stephan’s Quintet, a gaggle of five galactic realms, four strung together by their gravitational auras.

A composite image of Stephan’s Quintet, made with both JWST infrared and Chandra X-ray data.
NASA/CXC/SAO/ESA/CSA/STScI
 Enlarge Image
Stephan’s Quintet with only JWST observations.
NASA/ESA/CSA/STScI
JWST data shows up in this picture as red, orange, yellow, green and blue streaks, NASA said. Coded in these shades, you can see galactic trails of gas and growing baby stars speckling the dark background of space.
But the piercing baby blue highlight at the galactic intersection, right at the center of this image, comes from Chandra X-ray data.
 Enlarge Image
Stephan’s Quintet with only Chandra observations.
NASA/CXC/SAO
The observatory found a shockwave that heats gas to tens of millions of degrees, NASA explains, exuded as one of the galaxies passes through another with a speed of 2 million miles per hour. The agency also points out some data taken by NASA’s now-retired Spitzer Space Telescope in red, green and blue — infrared information like the kind the JWST works with.
Next, the Carina Nebula.

A composite image of the Carina Nebula, made with JWST and Chandra data.
NASA/CXC/SAO/ESA/CSA/STScI
 Enlarge Image
Carina Nebula with only the JWST’s infrared lens.
NASA/ESA/CSA/STScI
As a science writer, it never ceases to make me smile when I tell someone about my job in our post-JWST-launch world and they immediately reach to show me their JWST iPhone background. Or, at least a saved picture from the ‘scope in their camera roll. Some choose the deep-field drama for phone wallpaper (like me) but I’d say the favorite is JWST’s Carina Nebula masterpiece.
 Enlarge Image
Carina Nebula with only Chandra X-ray observations.
NASA/CXC/SAO
The Carina Nebula is a star factory, basically, where flaming balls of gas are either being born or waiting to die, and this image is a zoomed-in section of it. Data from the JWST pretty much makes up the backbone of this portrait — the melty-looking, red-orange landscape and indigo region that looks like a “sky.” It’s not a sky, to be clear. It’s not even blue in real life — space images are typically colorized for science reasons.
“These are mostly stars located in the outer region of a star cluster in the Carina Nebula with ages between 1 and 2 million years old, which is very young in stellar terms,” NASA said.
And Chandra’s contribution here is how bright each star looks, NASA said.
Young stars, per the agency, are much brighter in X-rays than old stars. This also means X-rays can help us tell whether there are any Milky Way galaxy stars present in this picture, simply because they fall along the line of the JWST’s vision.
“The diffuse X-ray emission in the top half of the image likely comes from hot gas from the three hottest, most massive stars in the star cluster. They are all outside the field of view of the Webb image,” NASA said.
Last but not least, the Cartwheel Galaxy.

A composite image of the Cartwheel Galaxy made with both JWST infrared and Chandra X-ray observations.
NASA/CXC/SAO/ESA/CSA/STScI
 Enlarge Image
A purely JWST view of the Cartwheel Galaxy.
NASA/ESA/CSA/STScI
The JWST’s Cartwheel Galaxy’s image came out just under a month after the other three we’ve discussed, but its reception was just as spritely. It’s easy to see why. I mean, it looks like a cosmic, glow-in-the-dark ferris wheel. That shape, per NASA, is thanks to a collision it had some 100 million years ago with a smaller galaxy, serendipitously the same crash that spurred this realm to begin forming stars.
Again, the JWST’s original image serves as the structure of this image, the blue and purple areas come from Chandra observations of superheated gas, individual exploded stars, neutron stars and even black holes pulling material from companion stars.
 Enlarge Image
Cartwheel Galaxy, as seen through the lens of the Chandra X-ray Observatory.
NASA/CXC/SAO
But beyond offering us yet another stunning lens on the universe, the collaboration between NASA’s JWST and Chandra Observatory sets an important message in stone.
“Webb … will not pursue its exploration of the universe on its own,” NASA said. “It is designed to work in concert with NASA’s many other telescopes as well as facilities both in space and on the ground.”
In fact, elsewhere in the higher dimension of telescope collabs, the JWST worked with Hubble to present us with an ethereal view of a dusty galactic pair.
Perhaps one day, all our powerful telescopes’ images will be overlain to show us the universe in its purest form.
The post NASA Enhances Webb Space Telescope Images With X first appeared on Joggingvideo.com.
]]>The post Purported Apple Watch Pro Renderings Suggest Extra Button first appeared on Joggingvideo.com.
]]>
Purported renderings of the forthcoming Apple Watch Pro were published on the internet Monday, offering credence to rumors that the device will add a new button.
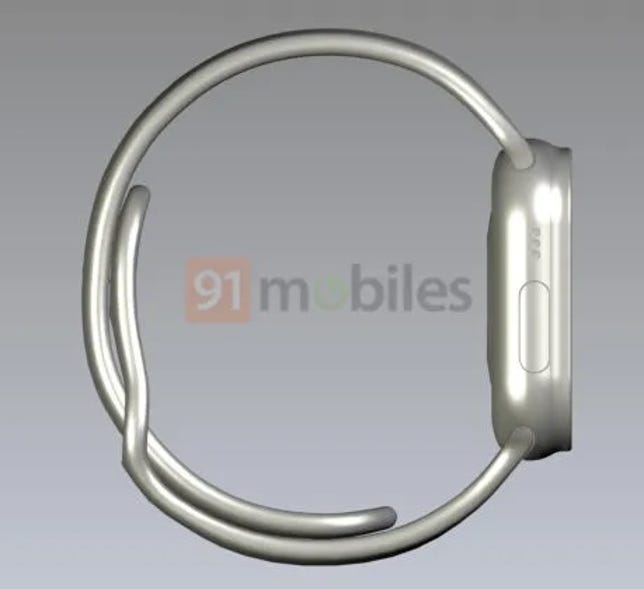
There seems to be an extra button her, but for what?
91Mobiles
The renders, obtained by notable leaker 91Mobiles, appear to show an extra button on the left side of the frame near a speaker vent, although the purpose of the extra button isn’t known. The renders also show a large, flat display with slim bezels, perhaps confirming reports that the device will have a larger 1.99-inch display and a larger 47mm casing.
Apple didn’t immediately respond to a request for comment.
Reports have circulated that Apple will launch a high-end Apple Watch marketed toward athletes with a larger display, sturdier design and longer battery life.
If Apple does plan to release an Apple Watch Pro this year, we’ll likely find out about it at the company’s “Far Out” launch event, which is scheduled for Wednesday.
The post Purported Apple Watch Pro Renderings Suggest Extra Button first appeared on Joggingvideo.com.
]]>The post You Now Can Tell DALL first appeared on Joggingvideo.com.
]]>
DALL-E, OpenAI’s online service that uses artificial intelligence to generate images from text you type in, now can make bigger images for more creative noodling.
When DALL-E first arrived in April, it could turn a text prompt like “portrait of a blue alien that is singing opera,” “3D rendering of a bouldering wall made of Swiss cheese” or “steampunk elephant” into images measuring 1024×1024 pixels. On Wednesday, the company added a new feature called outpainting that lets you extend the borders of the image. The expanded image is based on the text prompt and the existing imagery, said OpenAI engineer David Schnurr.
DALL-E users “wanted different aspect ratios or just wanted to be able to like take a concept that was produced and expand it into a larger image,” Schnurr said. Processing power limits means DALL-E can only expand existing imagery, not generate a higher-resolution image to start with, he added.
DALL-E, whose name is a mashup of Pixar’s WALL-E robot and surrealist painter Salvador Dalí, is a remarkable illustration of what’s possible with AI technology today. OpenAI trained its system on 650 million images, each labeled with text. It’s able to blend elements to create interpretations of your text prompt.
The service is free for generating up to 60 images per month, but you have to sign up and get through a waiting list to use it. More than 1 million people have signed up for DALL-E, said product manager Joanne Jang.
Judging by all the DALL-E tweets, people enjoy noodling around with the AI system to create fanciful images. But there are serious uses, too, like creating storyboards for movies, illustrating children’s books and exploring concept art for videogames, Jang said.
The post You Now Can Tell DALL first appeared on Joggingvideo.com.
]]>The post Google Maps’ Historical Street View Is Coming to iOS and Android first appeared on Joggingvideo.com.
]]>
Google Maps’ Street View has been around for 15 years. To mark the occasion, the tech giant on Tuesday unveiled a new camera and announced it’s bringing historical Street View to Android and iOS.
Historical Street View allows you to view historic imagery from a location and see how a place has changed over time, dating back to 2007 when Street View first launched. The feature has been available on desktop since 2014, but you can now use it on iOS and Android devices.
To try out historical Street View, tap anywhere on an image, then tap See more dates. You can then scroll through a carousel of images showing the location at various points in the past.
Historical Street View can show how buildings and other landmarks have changed over time, like the Vessel in New York City.
As for the newly announced camera system, Google says it’s roughly the size of a house cat and, weighing only 15 pounds, is designed to be “ultra-transportable” — while including all the power, resolution and processing capabilities of an entire Street View car. Though the new camera is still being piloted, Google expects to fully roll it out next year to help map and capture imagery from remote corners of the world, including the Amazon jungle.
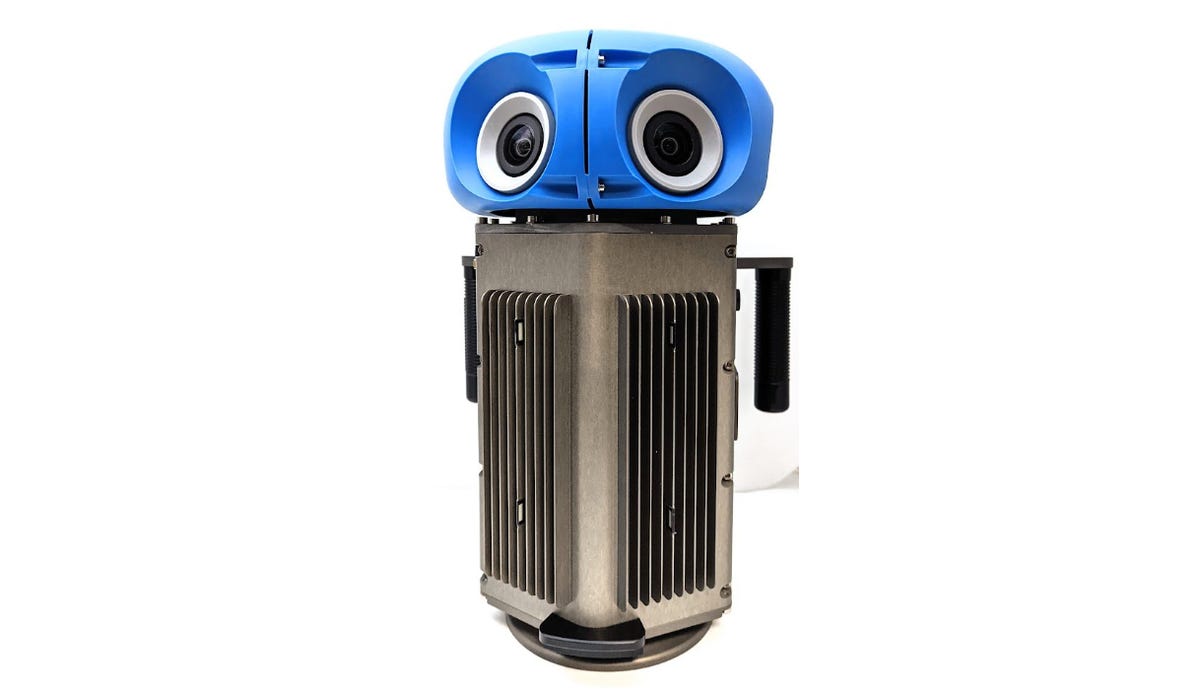
Google’s new Street View camera is about the size of a house cat and weighs 15 pounds.
Google/Screenshot by CNET
See Also
- 8 Google Travel Tips You Should Try Today
- Google I/O 2022: Every New Device and Announcement
- No Joke: Google’s AI Is Smart Enough to Understand Your Humor
The post Google Maps’ Historical Street View Is Coming to iOS and Android first appeared on Joggingvideo.com.
]]>The post Next Motorola Razr, Code first appeared on Joggingvideo.com.
]]>
More than two years after the phone’s sophomore launch, new leaked images suggest that a third-generation Motorola Razr is in the works with a design that takes some influence from the original Samsung Galaxy Z Flip.
The new Razr is supposedly code-named Maven, according to reliable tipster Evan Blass and 91mobiles. The design seems to ax the single circular camera bump from the first-generation Razr from 2019 and instead may opt for a pill-shaped dual-camera cutout. The 2020 Razr didn’t change the design much, but sloped the chassis and moved the flash.
Motorola didn’t immediately respond to a request for comment.
As for specs, this foldable may sport a 50-megapixel, f/1.8 primary camera along with a wide-angle lens that would combo as a macro with a resolution of 13 megapixels, according to Blass. The selfie cam will supposedly be a 32-megapixel hole punch surrounded by an FHD+ display. According to Blass, Motorola had planned on launching two variants with different processors: the Qualcomm Snapdragon 8 Gen 1 and the Snapdragon SM8475 for a Plus version. Motorola has apparently changed those plans due to delays on acquiring the SM8475. Blass also reports that memory configurations will include 8GB or 12GB of RAM and 256GB or 512GB of internal storage.
See Also: Top Foldable Phones for 2022
As for colors, Blass’ sources point to Quartz Black and Tranquil Blue. Sources also tell Blass that the phone will launch first in China in late July or early August, followed by a global rollout. Pricing remains uncertain, but will likely rival other premium foldable devices. The Samsung Galaxy Z Flip 3 launched last August with a $999 price.
The post Next Motorola Razr, Code first appeared on Joggingvideo.com.
]]>The post Rumored Pixel Watch Appears on Wrist in Leaked Photos first appeared on Joggingvideo.com.
]]>
Photos from a Reddit leaker appear to show the long-rumored Google Pixel Watch strapped to a wrist. Reddit user u/tagtech414, who says they’re the one who previously submitted alleged images of the watch to Android Central after finding it left in a restaurant, posted a photo on Tuesday depicting them wearing it.
The user wrote that the band is made of soft silicone, and called it the most comfortable watch they’ve ever worn.
“Well done Google, well done! (please don’t sue me),” they wrote.

Now playing:
Watch this:
What to Expect at Google I/O 2022
8:33
Although Google makes software for Android smartwatches and owns Fitbit, this would be the company’s first Google Pixel-branded watch. Rumors point to a launch date at next month’s Google I/O or later in the fall.
Google didn’t immediately respond to a request for comment.
The post Rumored Pixel Watch Appears on Wrist in Leaked Photos first appeared on Joggingvideo.com.
]]>The post Leaked Pixel Watch Images Appear to Show Google’s New Smartwatch first appeared on Joggingvideo.com.
]]>
After many months of speculation about its potential release, design and features, we may have gotten a good look at the rumored Google Pixel Watch. On Monday, Android Central published nine photos of what seems to be Google’s upcoming smartwatch.
While not confirmed until Google officially announces the Pixel Watch, the leaked images line up with previous reports, including rumors about the minimalist design, the crown and the potential hidden button. CNET’s been following the rumors surrounding the smartwatch, compiling a full list of clues you can find here.
The images were reportedly taken and leaked under somewhat strange circumstances: Someone allegedly found the smartwatch at a restaurant in the US. The finder, who asked to remain anonymous, didn’t share the location with Android Central.
The person who is allegedly in possession of the watch posted more details to an Ask Me Anything (AMA) post on Reddit under the username u/tagtech414. After posting a photo to confirm they indeed have the watch, the details began to unfold: A co-worker found the watch at the restaurant where they work and kept it “a few weeks” in case the owners came to pick up the watch. After a few weeks with no one claiming the watch, u/tagtech414 took it to investigate.

A white Google logo appeared when the source tried turning it on.
Android Central
Here’s what u/tagtech414 posted about the watch:
- The source wasn’t able to see the user interface but did see a white Google logo appear when attempting to turn it on.
- A physical crown sits between two buttons on the side.
- The bezel is actually quite large.
- The watch face is about 1.5 inches in diameter and half an inch thick.
- The watch’s band is a proprietary Google band, looking similar to the bendable Apple Watch Sport bands.
- The watch comes in a rumored black color.
- The bottom seems to be coated in glass like the Apple Watch.

The leaked straps in blue.
Android Central
The source didn’t find a charger and the battery is now dead, so we won’t have any more details on what the watch can do until the release, which could be announced or at least teased during Google I/O in May. A previous report from Insider stated the device may debut in the spring, but that’s subject to change based on how internal testing goes.
While we still don’t know when it will be launched, how much it will cost or the regions in which Google plans to release the watch, it’s likely the watch will come this spring or fall and will run on the new Wear OS software.
Google didn’t immediately respond to a request for comment.
Now playing:
Watch this:
The Next Pixels: What You Should Know
10:10
More on Google Pixel Watch
- Google Pixel Watch Rumors: Will It Have a Familiar Rounded Design?
- Google’s Rumored Smartwatch Should Take a Page From Its Pixel Phones
- Google Pixel Watch and 6a Phone Reportedly Leak Online
The post Leaked Pixel Watch Images Appear to Show Google’s New Smartwatch first appeared on Joggingvideo.com.
]]>The post Sony’s Upcoming WH first appeared on Joggingvideo.com.
]]>
German blog site TechnikNews has published what it says are images and specs of Sony’s anticipated WH-1000XM5 headphones. The next iteration of Sony’s top noise-canceling headphones will launch very soon, TechnikNews reported, citing an unnamed retail source.
A follow-up to Sony’s WH-1000XM4 headphones, which came out in 2020, the WH-1000XM5 headphones will reportedly come in black and silver versions, have a 40-hour battery life and take 3.5 hours to charge via USB-C. They’ll also have active noise cancellation, three microphones and two processors, according to the unconfirmed report.
Sony didn’t respond to a request for comment. You can see the photos in the TechnikNews report.
Read also: Best Headphones for 2022
The post Sony’s Upcoming WH first appeared on Joggingvideo.com.
]]>The post How We Test Projectors first appeared on Joggingvideo.com.
]]>
One of the most difficult aspects of shopping for projectors is trying to compare specifications. Does Projector A’s 5,000:1 contrast ratio actually look better than Projector B’s 4,500:1? How much brighter is Projector C’s 1,000 lumens compared to Projector D’s 800? Let me tell you a little secret: These specs are largely meaningless.
In broad strokes, sure, a 3,000-lumen projector is going to be significantly brighter than a 500 lumen projector. But if you’re comparing projectors with similar technologies and price ranges, in most cases you’ll see specifications that are a lot closer to one another. And the bigger issue is that even with similar measurements for color, brightness and contrast, projectors can look different in person.
In my years of reviewing projectors I’ve learned to pay less attention to spec sheets and more attention to how a projector actually measures and looks in person. That’s why I test every projector I review with objective and subjective methods using my own eyes, my own instruments and side-by-side comparisons. Here’s how that works.
Warning: This info can get a bit “into the weeds,” but hopefully it will give you an idea about the behind-the-scenes work that goes into my reviews.
Initial setup and picture modes
First-time setup is important for any TV or projector. The out-of-the box picture settings almost never let the display look as good as it can. With projectors the ability to tweak is especially crucial since there’s a picture element the manufacturer can’t control: the screen.
One of the first things I do after warming up a new projector is adjust the contrast and brightness using test patterns. Sometimes color too, but this usually tends to be correct out of the box. I start in movie or cinema mode, although with some projectors changing anything flips you automatically to the “user” mode. Color temperature is usually the most accurate in movie mode as well, but if the image is noticeably cool or warm in color tone, I’ll adjust that too.
Once the projector is set up, I’ll watch a variety of content to see if I notice any issues that I should further check with test patterns.
Measuring brightness, aka light output

Geoffrey Morrison/CNET
A projector’s brightness, generally measured in lumens, is one of the most important aspects of its overall performance. Unfortunately, as mentioned above, the specs claimed by a manufacturer are rarely remotely accurate.
The issue is how projectors create light. It’s easier for a projector to be bright if its color temperature — the color of white and gray — is way off. If grays are actually bluish or greenish, the image is probably a lot brighter than in a mode where the colors are more accurate, such as movie mode or the medium or warm color temperature. You lose light with accurate colors, but in my opinion that’s a worthy trade-off for better color overall.
If a projector is capable of some extreme light outputs but its colors look wonky, I’ll note that. For comparison purposes, I measure and compare projectors in their most accurate modes.

Geoffrey Morrison/CNET
When I say “measure,” I’m not talking about a ruler. I use Minolta and Photo Research test equipment to objectively measure a projector’s output. In this case, the Minolta LS-100 meter gives me the projector’s luminance in candelas per square meter (cd/m2). Then, if you know the size and gain of the screen, you can do a bit of math to find the estimated lumens. Since I always use the same screen for testing, this is easy.
The number listed in a projector’s Geek Box is the brightest image the projector can produce given the settings and methodology listed above. This is almost always lower than a manufacturer’s rating since their rating is usually in an extremely inaccurate, but brighter, mode. There’s no regulatory body that oversees projector luminance claims. The American National Standards Institute has a standard for measuring luminance, but not every manufacturer complies with it.
Contrast ratio methodology

On the right, an example of what a projector with a bad contrast ratio can look like.
Geoffrey Morrison
Just like with TVs, contrast ratio is easily the most important aspect of a projector’s overall image quality. A projector with low contrast will look washed out, with grayish blacks and/or dimmer whites. Contrast can be challenging to measure correctly. I’ll explain my methodology and then explain why I do it that way, as it seems convoluted at first.
Using the settings listed above and a Minolta LS-100 light meter, I measure a full black image and then a white window (100% white, but just in a small portion of the screen). I do this using whatever lamp and iris modes are available, though not with auto-iris or lamp-adjusting modes (more on those in a moment). Then, in whatever mode seems best, I measure again using an AEMC CA813 illuminance meter. I average all these measurements together for the overall contrast ratio.
This method is a slightly modified version of the one I learned at the Display Metrology Course at the National Institute of Standards and Technology, one which is sadly no longer offered. The main issue with contrast ratio measurements is that small variations can drastically change the overall measurement. For instance, if I measure 0.002 cd/m2 instead of 0.001, that changes the contrast ratio by half. What kind of small changes? Reflections in the room, for instance: light bouncing from the ceiling or furniture, back off the screen, and then into the light meter. So for consistency I keep everything the same. The CA813, which measures the light directly from the lens, eliminates the room from the measurement, and acts as a sort of check against the luminance measurements from the LS-100.

AEMC CA813 illuminance and Minolta LS-100 luminance meters I use for projector measurements.
There are other methods to improve accuracy, like subtracting the room’s ambient light from the measurements. Most of these additional methods are extremely time intensive. In my testing, averaging multiple measurements and using the two types of meters, the final result ends up being extremely close. More importantly, it’s internally consistent.
That consistency is key since I want you to be able to compare the different projectors I’ve reviewed with as much accuracy as possible. As I’ve mentioned, you can’t do this with any accuracy using manufacturers specs alone. It’d be great if you were able to do this across different websites, too, but getting video reviewers to agree on a standard of reviewing is far beyond my purview. So I aim to be as internally consistent as possible.

An auto-iris in action.
BenQ
The method listed above gets us the projector’s “native” contrast ratio, which is what you see at any given moment on-screen. Many projectors also have the ability to adjust the contrast ratio dynamically. They can use an iris on the lens or adjustable lamp that looks at the incoming video signal and basically decreases the light output of the projector during darker scenes. The result is darker, better black levels at the expense of making the whole image, including bright areas, darker overall.
Done well, dynamic contrast can help improve the projector’s overall image quality, but it’s less helpful than native contrast ratio for comparisons. I still measure both, however.
Read more: What Is TV Contrast Ratio?
Color and color temperature

Note the color differences between the three images.
Screenshot: Geoffrey Morrison – Image: Touchstone
Compared to brightness and contrast ratio, measuring color and color temperature is relatively easy. Using a Photo Research spectroradiometer I measure the exact colors produced by the projector. How red is the red, how green is the green, and so on. This is more accurate IMO than just saying “well, the grass looks very grassy.”
Beyond the red, green and blue primary colors — and the cyan, magenta and yellow secondary colors — the Portrait Displays Calman software also lets me test for a variety of in-between colors and shades, to get a broader idea how well the projector creates color.
For the most part, modern home theater projectors in their movie or cinema mode are able to produce fairly accurate colors. Portable projectors tend to be more of a mixed bag, usually in an attempt to squeeze out as much light as possible.
Read more: Ultra HD 4K TV Color, Part I: Red, Green, Blue and Beyond
Comparison tests

Block opposite sides of each projector’s lens and bam! Easy side-by-side comparison.
Geoffrey Morrison/CNET
Objective measurements go a long way to telling me about a projector, but they have limits. Many projectors use the same internal components and could measure similarly, yet look different from each other in person. This can be due to a variety of factors, including specific settings chosen by the manufacturer, their video processing choices and more. That’s why I side-by-side compare every projector I review for CNET with other, similar projectors.
To do this, I connect two or more projectors to an HDMI splitter. A splitter takes a single HDMI source, like a streaming device or Ultra HD Blu-ray player, and splits it into multiple, identical signals. I then view the projectors side-by-side on my 12-foot-wide, 2.35:1, 1.0-gain screen. Depending on the projectors, this might be a full image, shrunk so each fits on one screen, or I might block off part of each projector’s image so I can look at one “sliver” of each projector’s image adjacent to each other.

Geoffrey Morrison/CNET
I then watch a mix of content, but always a few key selections that I watch on everything. For years I used the opening of The Fifth Element on DVD (Aziz, LIGHT!), which should amuse anyone who remembers me from Home Theater Magazine. These days my go-to clip is Thor and Loki meeting with Odin on the cliffside in Thor: Ragnarok. Lots of real and fantastical colors in this and the following scenes. I also like the test clips on the Spears & Munsil UHD HDR Benchmark. Because what would a video test be without slow-moving clips of nature.
Related on CNET
- Best Home Theater Projector for 2022
- Backyard Movie Night: Everything You Need for a Private Outdoor Cinema
- TV Settings: Change These Picture Controls Now for Better Images
- Best 4K Projectors for 2022
Input lag for gaming
This is an easy test thanks to the Leo Bodnar Video Signal Input Lag Tester. This handy device tests how long it takes for the projector to create an image, measured in milliseconds. This measurement is of importance to gamers.
Read more: Game Mode On: CNET Tests TVs for Input Lag.
What about calibration?
One thing you might notice that’s missing from my tests is calibrating the projector. Calibration is the process of fine tuning the color and color temperature to get the projector looking as good as possible. It goes far beyond the simple user-menu setup, and requires specialized gear. I certainly have that gear, as well as the know-how. I’m ISF trained and have been calibrating displays for more than 20 years.
While calibrating a display can definitely improve how it looks, its use in a review is limited. If I find out a $1,000 projector looks better if you spend $400 or more on a calibration, what value is that? I can’t assume most people would be willing to spend that money. Also, the only things calibration can improve are color and color temperature. While those are definitely important factors in a display’s overall performance, they not nearly as important as brightness and contrast ratio.

Geoffrey Morrison/CNET
Since the vast majority of people reading my reviews will never get their projectors calibrated, it’s far more useful to judge them as you’ll see them (i.e., out of the box with the setup possible with your eye or hopefully a setup disc).
So if you want to get your projector calibrated, it can improve the image. Nearly every modern home theater projector can be calibrated. It’s not going to make a $1,000 projector look like a $3,000 projector, however. If you want to eke out every drop of performance and accuracy from your projector, and you don’t mind paying for it, it’s worth considering.
Read more: TV Calibration: When to Bring In a Pro to Change Your TV Settings
Geek Box info
 Enlarge Image
An example of a Geek Box from a projector review on CNET.
Most of what I learn via objective measurements ends up in the Geek Box at the end of the article. Here’s a bit more info about some of those specific numbers:
Average grayscale error: The average color temperature across the grayscale range. Correct is 6500.
Dark gray/bright gray error: how far off dark gray images (20% of maximum brightness) and bright gray (70% brightness) are. Correct is 6500.
Average color error: a rating of how accurate/inaccurate colors are. Lower is better.
Average saturations error: a separate test in ColorFacts, how accurate/inaccurate different saturations of colors are. How pink is pink, basically. Lower is better.
Average color checker error: similar to above, just with specific colors. These are predominantly shades of beige and brown, similar to a variety of skin tones.
In sum, I measure and look at a lot of different aspects of picture quality to figure out which projectors perform best and why. If you’re interested in finding out more about how to shop for a projector, here’s 6 things to know before you buy. Or you can just go straight to my lists of best home theater projectors, best 4K projectors and best portable projectors.
The post How We Test Projectors first appeared on Joggingvideo.com.
]]>