The post iPhone’s Lock Screen at Your Command: Try iOS 16’s Best New Widgets Now first appeared on Joggingvideo.com.
]]>This story is part of Focal Point iPhone 2022, CNET’s collection of news, tips and advice around Apple’s most popular product.
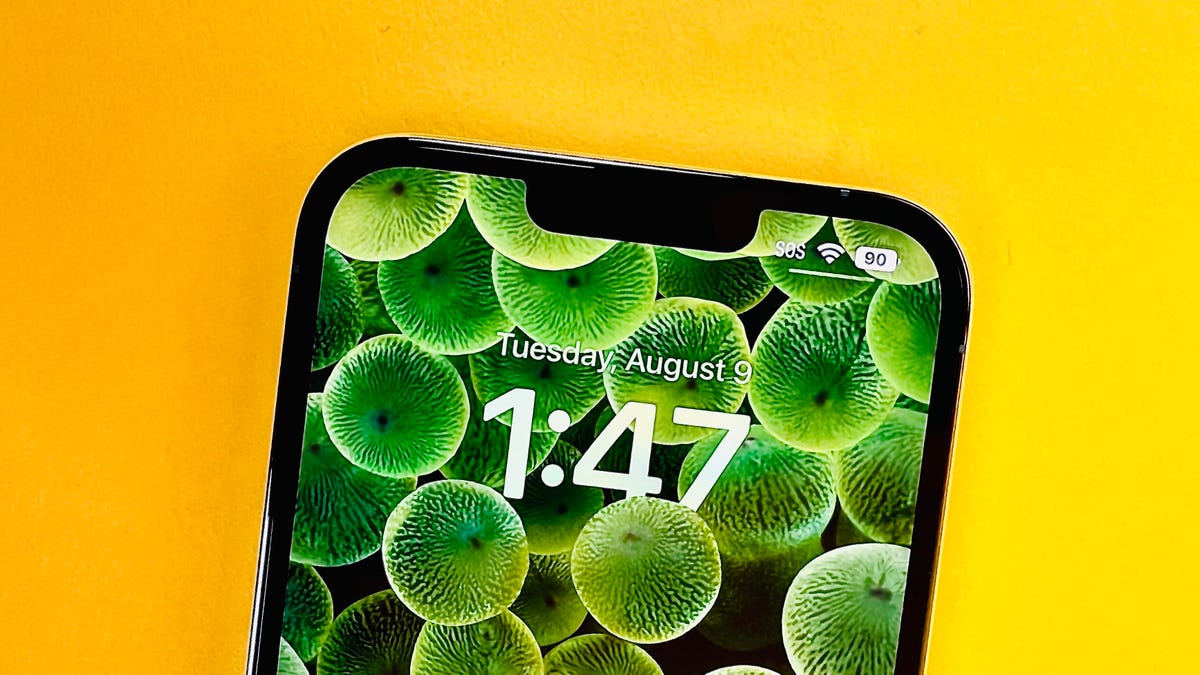
The latest operating system for Apple iPhones — iOS 16 — was released last week, and third-party apps were right behind it, with many launching new versions on the same day. The biggest feature addition for apps in iOS 16 is the ability to provide information or functionality from the iPhone’s new customizable lock screen.
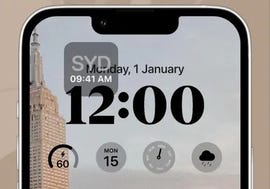
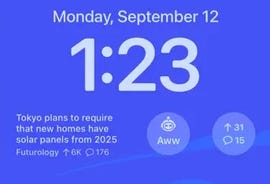
With the new iPhone lock screen, you can tweak the background, change colors and fonts and add new widgets that stay on your screen when your iPhone is locked. Two types of widgets — circular and rectangular — sit below the displayed time, while a third type — inline — appears as a bar above the clock.
You can add built-in Apple widgets from apps like Weather, Calendar or News, or tons of third-party widgets from your favorite apps, even Google (soon). Check out some of the coolest apps with widgets for the new iPhone lock screen with iOS 16 below. For more on iOS 16, here are the first things to do after you get up and running and why your iPhone may not have all of the cool iOS 16 features.
iOS 16 apps for designing your own widgets
Widgetsmith

Widgetsmith
Widgetsmith — a robust iPhone app for creating and editing your own widgets — debuted back in 2020 when iOS 14 added widgets to its home screen. Now, the app is adding its widget customization tricks to iPhone lock screens.
With Widgetsmith, you can create and customize all three types of lock screen widgets to add calendar items, text, weather updates, photos and much more.
ScreenKit
Screenkit
ScreenKit is another widget customization app that takes the plunge into lock screens with iOS 16. The app includes tons of custom icons and other aesthetic features.
ScreenKit makes it easy to create your own lock screen widget from scratch, and then customize it further by tweaking the background, colors or decorations.
iOS 16 apps that trigger functions or other apps
Launcher
Launcher
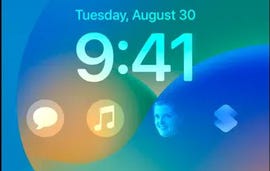
Widgets from Launcher have been available for the home screen and Today View for years. The app lets you create shortcuts for quickly accessing bookmarks, playing music, starting up other apps or communicating with your top contacts via phone, message or FaceTime.
Now you can get most of Launcher’s functions on your iPhone lock screen. Just tap the face of your favorite person to send them a message or phone call.
Launchify
Launchify/Screenshot by Peter Butler/CNET
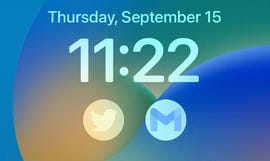
Add quick shortcuts on your lock screen that go to your favorite iPhone apps or bookmarks with Launchify, a new app released on the same day as iOS 16. The app lets you import your own custom icons or use thousands from its own library.
The free version of Launchify lets you add only two circular widgets to your lock screen — a subscription for $17 a year or $2 a month unlocks additional widgets and the ability to add apps not included in the Launchify database.
iOS 16 utilities, trackers and social media apps with lock-screen widgets
Flighty

Flighty
The popular flight-tracking app Flighty has already been updated to include support for lock screen widgets. Now you can just glance at your iPhone to get the latest updates on arrivals and departures.
You can also add lock screen widgets with a countdown to your trip, the weather in your destination, an in-flight progress bar or other detailed information about your flight, including gate number, seat assignment and baggage claim info.
The social media giant Facebook surprised users on the day of the iOS 16 launch by updating its iPhone app to include support for two lock screen widgets. You can add birthdays at a glance or top updates from your friends.
The birthdays widget comes in both circular and rectangular versions. The top updates widget is only available as a wider rectangular widget, and it includes your most recent Facebook notifications.
Dark Noise
Dark Noise
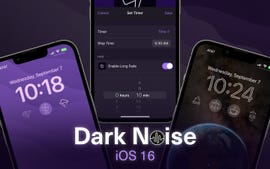
The ambient sounds app Dark Noise has become a popular tool for iPhone users who like to have background noise for sleeping or focusing. Now you can access white noise directly from the lock screen. Dark Noise has added all three types of widgets for the various sounds and noises included with the app.
Apollo for Reddit
Apollo for Reddit
Heavy Reddit users will appreciate the new lock screen widgets from this third-party app for tracking the popular message board site. Apollo for Reddit developer Christian Selig has already created several new lock screen widgets for monitoring Reddit activity at a glance while your iPhone is locked.
You can add widgets that show how your most recent post is doing, new messages in your inbox, your updated karma points, trending posts or bookmarks to your favorite subreddits, among many options.
WaterMinder
The health-focused iPhone app WaterMinder helps keep you hydrated, and now you can get reminders to drink more water — straight from your iPhone lock screen. The app recently updated to add eight styles of lock screen widgets.
You can now view your current water levels, see hourly and weekly graphs and log your drinks directly on your iPhone’s lock screen.
Things
Things
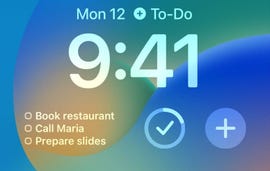
Things is a popular personal task manager for iPhone that lets you create to-do lists and track your progress in completing them. A new update for iOS 16 puts much of the power of Things directly into your iPhone lock screen.
Three new widgets from Things let you view the tasks on your to-do list, quickly add a new task or track your progress in completing your tasks. Things’ lock screen widget defaults to the tasks in your Today list, but you can customize it to show other items like your inbox, deadlines or shopping lists.
Parcel
Parcel
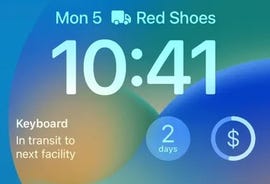
The useful package-tracking app Parcel lets you monitor the progress of your deliveries from 300 services, including UPS, FedEx, DHL and the US Postal Service. With its latest update for iOS 16, the app now adds the ability to track a specific package directly from your lock screen. Parcel’s lock screen widgets come in all three formats — circular, rectangular and inline.
More apps with new lock screen widgets for iPhones with iOS 16
Many more iPhone apps have updated or added lock screen widgets for use with iOS 16. Here’s a list of the programs we’ve found that have new lock screen widgets:
- Aviary 2 — Twitter app
- Calory — diet coach and nutrition tracker
- Calzy — calculator app
- CardioBot — heart health tracker
- Carrot Weather — humorous weather app
- Daily Dictionary — word of the day app
- Empirical Sleep — sleep tracker
- Fantastical — calendar app
- Flitsmeister — speed trap detector
- Foodlapse — diet tracker
- Gentler Streak — workout tracker
- GoodLinks — link aggregator
- Halide Mark II — camera app
- Home Widget for HomeKit — home automation app
- Lock Screen Shortcuts — lock screen widget app
- LookUp — dictionary app
- Lumy — sun tracker
- Mercury Weather — weather app
- MoneyCoach — budgeting app
- Motivation – Daily Quotes — inspirational daily quotes
- NapBot – sleep cycle monitor
- Overcast — podcast app
- Personal Best – Workouts — exercise tracker
- Pestle – grocery list and meal planner
- Pretty Progress — countdown timers
- QuickScan — OCR scanner app
- RainViewer – storm tracker and weather radar
- Scanner Pro — mobile scanning app
- Slopes: Ski & Snowboard — snow report and GPS tracker
- SmartGym — fitness app
- Soor — music player
- Speedy — quick access to contacts
- Steps — activity tracker
- Streaks — to-do list
- Tempo for Runners — running log
- Themify — home screen customization
- Todoist — task manager
- TripIt — travel planner
- Weather Strip — weather app
- Zones: Time Zone Conversion — global time tracker
For more on iOS 16 and the new iPhone 14, learn why your iPhone might not get all of the iOS 16 new features and how to remove the new search button from your home screen.
The post iPhone’s Lock Screen at Your Command: Try iOS 16’s Best New Widgets Now first appeared on Joggingvideo.com.
]]>The post iOS 16 on Your iPhone: All the Best New Features, Explained first appeared on Joggingvideo.com.
]]>This story is part of Focal Point iPhone 2022, CNET’s collection of news, tips and advice around Apple’s most popular product.
Have you downloaded iOS 16 yet? The iPhone update is available for anyone with a compatible device, and installing the software gives you access to loads of new features and settings.
iOS 16, which was first announced in the spring at Apple’s WWDC conference, has gone through several beta versions prior to its public launch alongside the iPhone 14. It comes with a slew of new features and upgrades that aim to improve how your iPhone works. This includes a more customizable lock screen, a way to edit sent messages and a magic photo editing tool. Plus, the battery percentage is back.
Read more: The Best iPhone 14 Cases So Far
If you’re curious about what else iOS 16 offers, read on as we break down the 11 best new features on your iPhone. Just make sure you’ve already completed these three steps first and check out the lesser-known features lurking in iOS 16, too. And here’s why you might want to wait a bit before updating to iOS 16.
Apple’s Newest Releases
- iPhone 14 Pro, Pro Max Review: Welcome to Apple’s Dynamic Island
- iPhone 14 Review: A Good Upgrade for Most People
- Apple Watch Series 8 Review: Improvement By Degrees
- Apple Watch SE Review: Almost Everything I Want
- Apple iOS 16 Released: New iPhone Features From the Update
The ability to edit and ‘unsend’ messages
“Embarrassing typos are a thing of the past,” Craig Federighi, Apple’s senior vice president of software engineering, said at WWDC as he introduced three of the most requested features for the Messages app.
First, in iOS 16 you’ll be able to edit sent messages. So if you notice a typo after a message, you’ll be able to edit the message after the fact. A tiny “edited” appears in the status under the message.

In Messages, you can edit previously sent messages.
Apple
Next, and this might be my favorite new feature, you can immediately recall a sent message. If you accidentally send an unfinished message, you can use the Undo Send tool to prevent it from being read and hopefully look less chaotic to your friends and family.
Last, you can mark messages and threads as unread. This could be an excellent tool for when you don’t have time to respond to a message in the moment, but want to make sure you come back to it later.

Now playing:
Watch this:
Testing iOS 16 (Edit/Delete Sent Messages, New Lock Screen…
16:22
A new customizable lock screen
One of the things you look at the most on your iPhone is the lock screen, especially if you have a Face ID-equipped iPhone. iOS 16 brings the most substantial update to the iPhone’s lock screen yet. Press and hold to edit your lock screen. You can swipe to try out several different styles. Each style changes the color filter for the background photo and the font on the lock screen so everything complements each other. This feels a bit like Apple’s take on Google’s Material You, which launched with Android 12.
You can also customize the fonts for the time and date, and add lock screen widgets like temperature, activity rings and a calendar. The widgets are akin to complications on the Apple Watch lock screen.
Your iPhone will become more customizable in iOS 16. You’ll be able to choose how your lock screen looks, down to the font and color.
Apple
You can even set up multiple customized lock screens with different widgets and easily swipe to switch between them. There’s also a photo shuffle option that automatically changes the pictures on your lock screen.
One feature we’d been hoping to see Apple add was an always-on display. It’s something nearly all Android phones have; even the Apple Watch does. Well, with the new iPhone 14 Pro and iPhone 14 Pro Max, the always-on display has finally arrived.
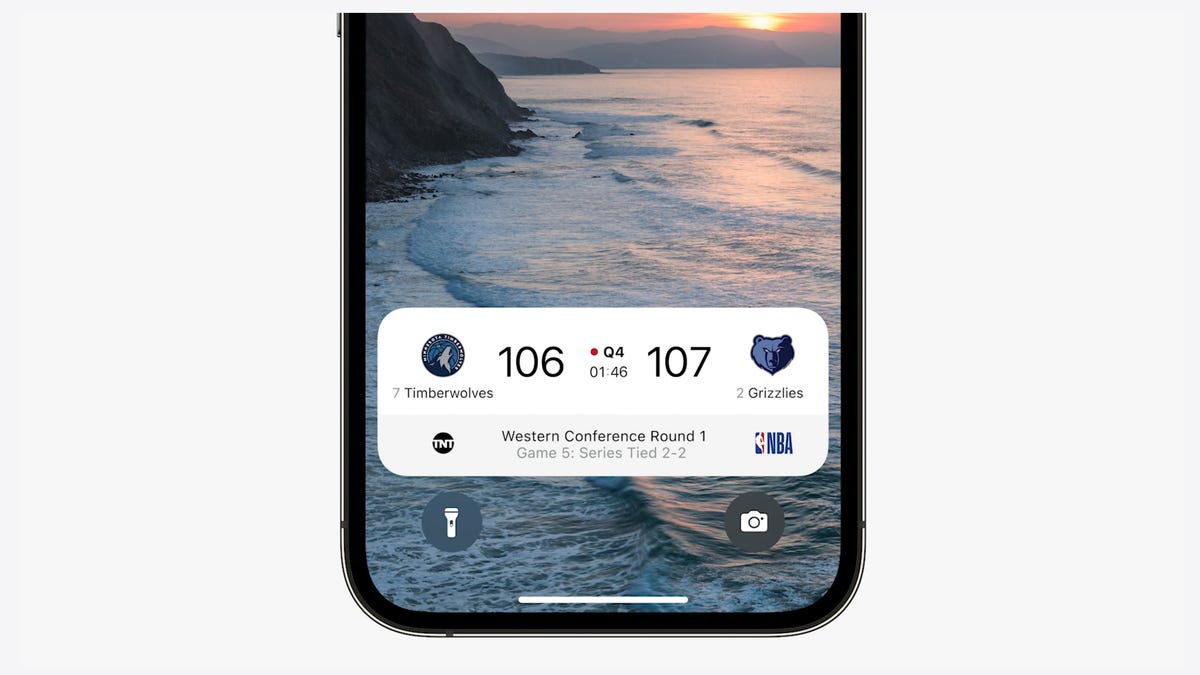
iOS 16 adds a feature that developers can use called Live Activities. This is essentially a mini view of the real-time progress of a workout, sporting event or Uber ride from your iPhone’s lock screen.
Apple
Notifications and live activities
Sometimes notifications can cover up your lock screen’s photo, so iOS 16 moves notifications to the bottom of your display. As you receive them, instead of being compiled into a list, they appear like a vertical carousel. This not only looks better but should be a big help for one-handed use of your iPhone.
iOS 16 also aims to solve another notification problem. Sometimes you get a bunch of notifications in a row from one app, like the score of a basketball game. A new tool for developers called Live Activities makes it easier to stay on top of things happening in real time from your lock screen, instead of getting a series of interruptions.
Live Activities should make it easier to follow sporting events, workouts or even the progress of an Uber ride.
Skip CAPTCHAs using Private Access Tokens
The CAPTCHA — which stands for Completely Automated Public Turing test to tell Computers and Humans Apart — has been a necessary evil across the internet. CAPTCHAs are designed to make sure that a person is accessing a website or service, and not a bot. I find them annoying, as they often involve reading strangely written letters or having to find all the images that have a truck. With iOS 16, Apple plans to start replacing these awkward interactions with Private Access Tokens.
According to a video on Apple’s website demonstrating Private Access Tokens, websites that support the token will essentially log in and authenticate that you are indeed a human without your having to play any of the usual CAPTCHA games. Apple says in the video that the company is working with other companies to roll out support for this feature, so we can’t say the CAPTCHA will be dead after iOS 16 rolls out to the public. But the concept could provide some relief if it gets adopted.
Wallet and Apple Pay Later
ID cards from more states will be available in your Wallet app along with more security and privacy features. In iOS 16 you can also protect your identity and age. So rather than showing your exact birth date, the Wallet app will display your ID and that you’re over 21.
iOS 16 makes sharing keys easier with apps like Mail and Messages. When your friend receives the key, they can add it to the Wallet app on their iPhone. Apple said it’s working to make sure that shared keys are an industry standard and free for others.
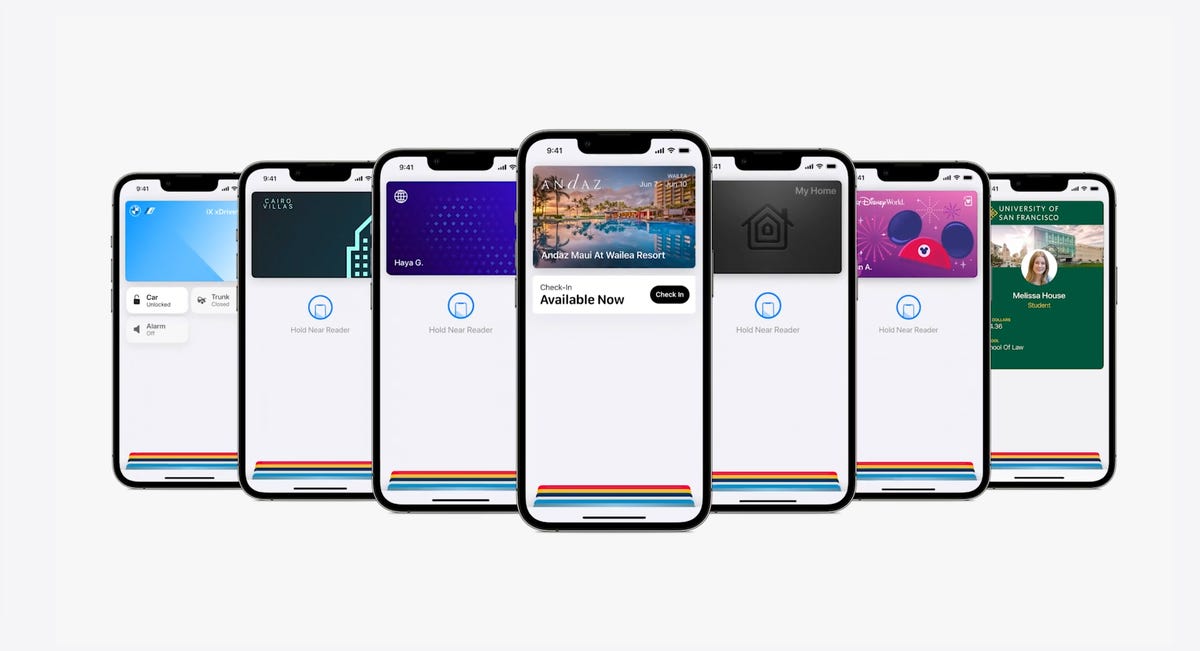
The Wallet app in iOS 16 gets a bunch of small but notable updates, including the Apple Pay Later payment plan.
Apple
Apple Pay will support new types of payments and adds a new feature called Apple Pay Later, a Klarna-like service that lets you split the cost of an Apple Pay purchase into four equal payments spread over six weeks, with zero interest and no fees. Upcoming payments are managed through the Wallet app, making it easy to keep track of dates and payments.
But Apple Pay doesn’t stop there. A new feature will also help you track Apple Pay orders and lets merchants deliver detailed receipts and tracking information. This should make it easier to stay up to date on the status of all your orders.
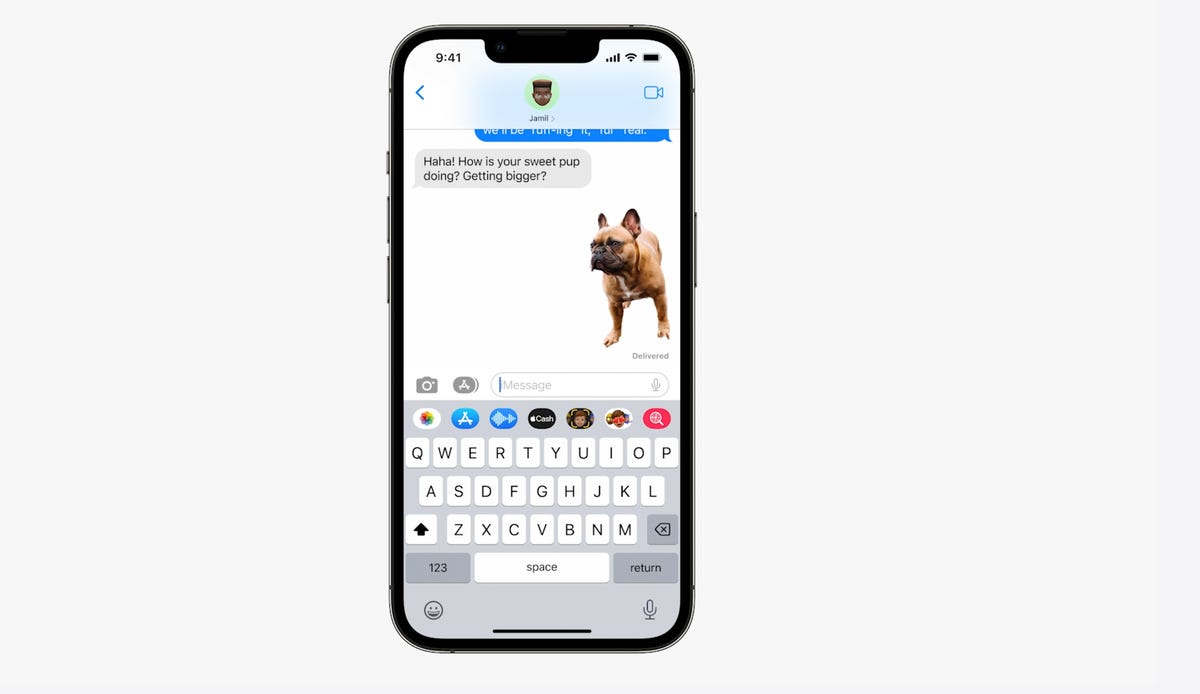
You can tap and hold on the subject of a photo and separate it from the background. Then you can drag it into another app like Messages to share it.
Apple
Visual Look Up’s tap and drag for photos
In iOS 15, Visual Look Up analyzes your photos and can identify objects like plants, landmarks and pets. iOS 16 takes this to the next level. When you touch a photo’s subject like the dog in the image above, you can lift it away from the background and add it to apps like Messages. Essentially it’s a tap-and-hold tool that removes a photo’s background.
Apple sometimes overuses the word “magic,” but this feature truly seems like it.

During the keynote for WWDC, Apple executive Craig Federighi introduces SharePlay for the Messages app.
Apple
SharePlay comes to Messages
SharePlay, which debuted in iOS 15, lets you have a shared experience while connecting with someone over FaceTime. You can watch TV shows, listen to music in sync and other things. iOS 16 adds the ability to discover more apps that support SharePlay from within FaceTime.
But perhaps one of the coolest things Apple did for SharePlay was to make it work within the Messages app. Apple said that this was one of the biggest requests from app developers. Now when you want to share a movie on Disney Plus, you can start SharePlay together with a friend while chatting in Messages.
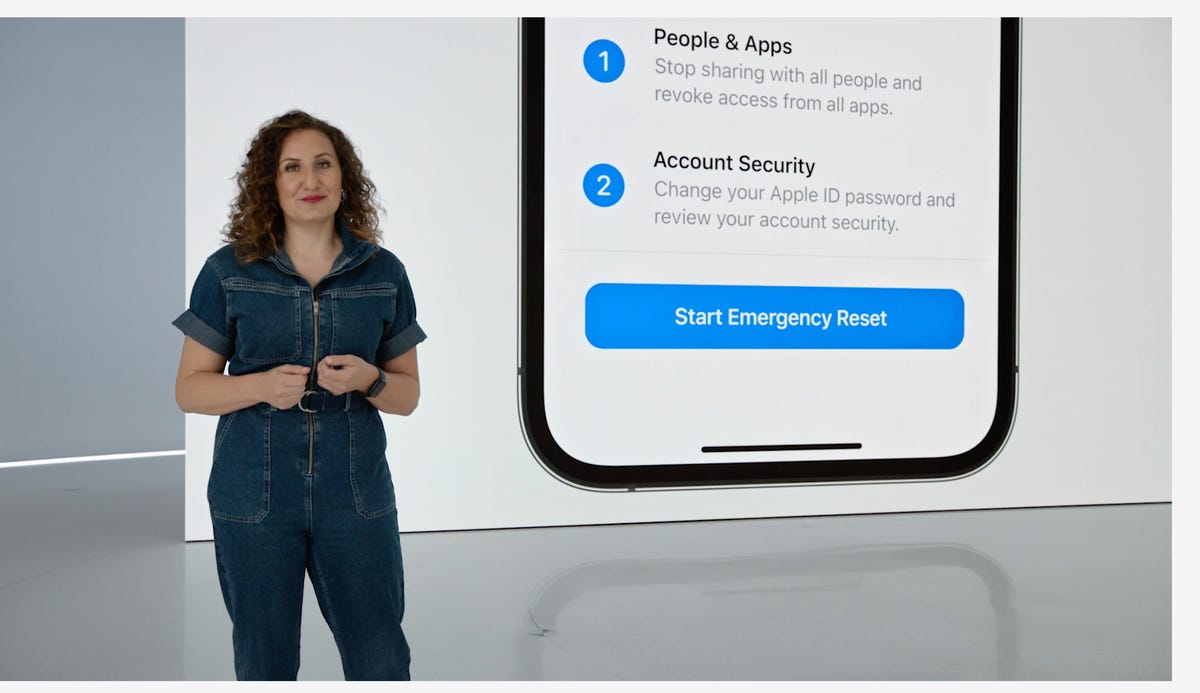
Safety Check lets you quickly reset location sharing and access to passwords. It’s intended to be helpful for people in abusive relationships.
Apple
Safety Check aims to help people in abusive relationships
Safety Check is a new feature intended to be helpful for people in abusive relationships. It lets you review and reset who has access to location information as well as passwords, messages and other apps on an iPhone.
Focus mode updates and Focus filters
Focus mode gets several updates. The first applies Focus behaviors to widgets and lock screen looks. So you could have one lock screen set for when your Work Focus is enabled and another for workouts.
Apple added specific Focus filters that apply your iPhone’s Focus mode within apps. For example, in Safari, you can limit what tabs are shown depending on what Focus mode you have active.
See also
- WWDC 2022 Recap: iOS 16 and Everything Else Apple Announced
- Apple M2 MacBook Air Hands-On: Bigger Screen, Higher Price
- iOS 16 Features iPhone Users Are Going to Love Most
Apple Maps adds transit fare cards
Maps gets several updates. You’ll be able to plan trips with up to 15 different stops along the way. If you start planning a trip with the Maps app on your Mac, you’ll be able to share that to your iPhone.
And in something similar to what Google announced for Google Wallet in Android 13, you’ll be able to see transit fare estimates as well as add more money to a fare card from within Apple Maps.

In iOS 16 you’ll be able to customize Quick Start with a specific child’s iCloud parental controls and settings.
Apple
iCloud family checklist
iCloud gets several new features. One of the more interesting ones is the option to quickly set up a new device for your child. When Quick Start appears, you have the option to pick a user for the new device and use all the existing parental controls you’ve previously selected and configured. However, this is not what many of us still want: the ability to set up separate users for the same device.
There’s a new family checklist with tips for updating settings for your kids as they get older, like a reminder to check location-sharing settings or share your iCloud Plus subscriptions.
For more, check out everything Apple announced at its Sept. 7 “Far Out” event. Plus, here’s how to download iOS 16.
The post iOS 16 on Your iPhone: All the Best New Features, Explained first appeared on Joggingvideo.com.
]]>The post iOS 16 Cheat Sheet: Your Complete Guide to the iPhone Update first appeared on Joggingvideo.com.
]]>This story is part of Focal Point iPhone 2022, CNET’s collection of news, tips and advice around Apple’s most popular product.
Apple released iOS 16 less than a week after its “Far Out” event, where the company announced the next line of iPhones, Apple Watches — including the Apple Watch Ultra — and the AirPods Pro. We put together this cheat sheet to help you learn about iOS 16 and how to use the new features it brings to your iPhone.
Getting started with iOS 16
- 4 Things to Know About iOS 16
- Will iOS 16 Run on Your iPhone?
- What to Do Before Downloading iOS 16
- How to Download iOS 16 Now
- Why You May Want to Want Before Updating to iOS 16
Using iOS 16
- Now That You’ve Installed iOS 16, Do These 3 Things First
- Everything New on Your iPhone with iOS 16
- 5 Hidden iOS 16 Features You Need to Know About
- How to Fix Annoying Features in iOS 16
- You Can Unsend and Edit Messages in iOS 16
- Get Rid of the Annoying Search Button in iOS 16
- Set Up iOS 16’s New Customizable Lock Screen
- iOS 16’s Photo Editing Tools Work Like Magic
- Get the Battery Status Bar Back in iOS 16
- 2 Major Updates iOS 16 Brings to Maps
- Apple Pay Later: How the iOS 16 Feature Works
- iOS 16’s Lockdown Mode Can Protect You From Cyberattacks
- Passkeys Arrive in iOS 16
- Why You Might Be Missing Some iOS 16 Features
iOS 16 updates
Other things to know about iOS 16
- iOS 16 Features We’re Still Waiting For
- Why You Might Be Getting a ‘Cannot Verify AirPods’ Alert
- You Can Use Your Switch Joy-Cons on iOS 16
Check back periodically for more iOS 16 tips and how to use new iOS 16 features as Apple releases more updates.
Now playing:
Watch this:
Testing iOS 16 (Edit/Delete Sent Messages, New Lock Screen…
16:22
The post iOS 16 Cheat Sheet: Your Complete Guide to the iPhone Update first appeared on Joggingvideo.com.
]]>The post Best VPN Service for Amazon Fire TV Stick in 2022 first appeared on Joggingvideo.com.
]]>Sure, Amazon can view all your streaming data while you’re using an Amazon Fire TV Stick, but that doesn’t mean you want your internet service provider to see what you’re watching. A solid VPN, short for “virtual private network,” is the best way to keep your viewing habits hidden from your ISP. The best VPN for Fire Stick devices will offer you total privacy protection without costing an arm and a leg. A bonus is that a VPN also helps you unblock geo-restricted content, letting you view streaming content that otherwise might have been restricted wherever you are.
Thanks to the rise of the smart TV, we’re now in the age of smart surveillance. Long gone are the days of viewer anonymity we once enjoyed with the now-obsolete, fuzzy-pictured TVs. And as with any internet-connected device in your home, your media habits are subject to monitoring by your internet service provider, malicious snoops and your government (where applicable). But with the help of our top VPN recommendations for Amazon Fire Stick users, you can draw the encryption curtains on would-be peepers. A Fire TV Stick VPN can protect your online identity, help you avoid online surveillance by your ISP, and offer you total privacy. It can also prevent your internet service provider from throttling your internet speeds.
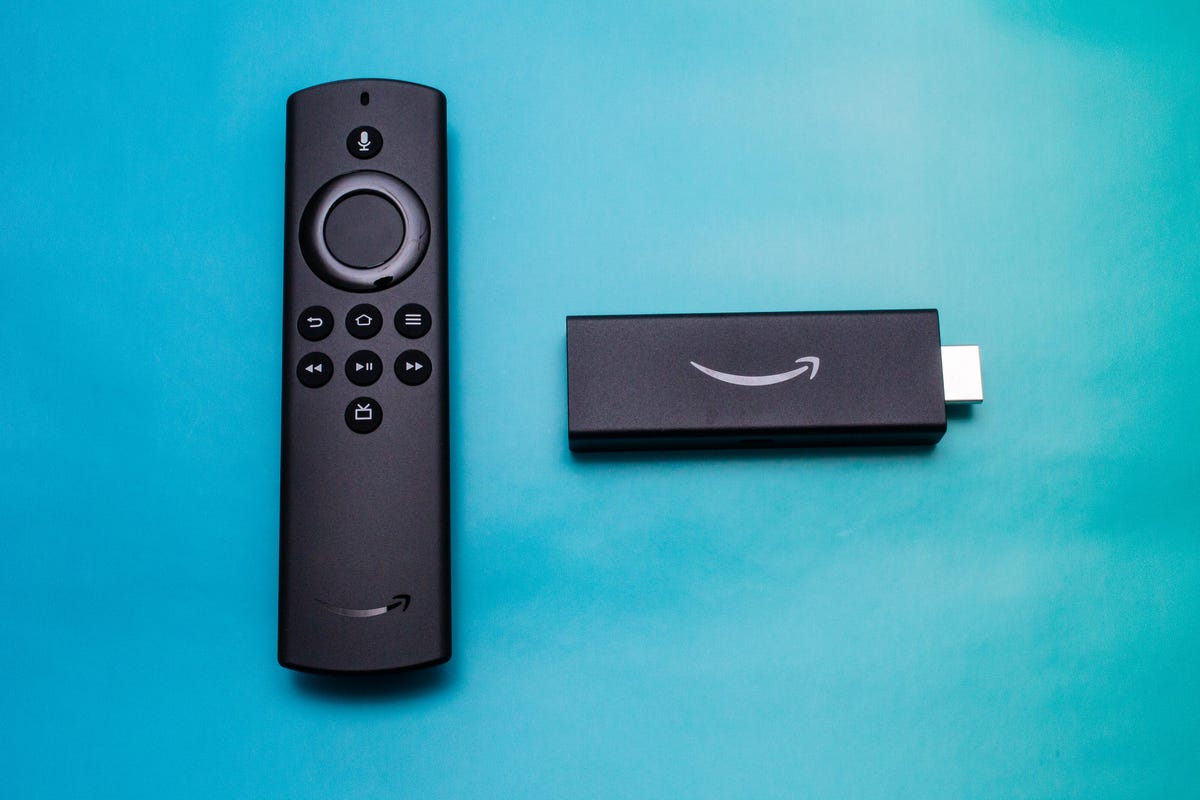
You can use a VPN with your Amazon Fire TV Stick to protect your privacy and get past streaming geoblocking.
Sarah Tew/CNET
Two key callouts for this list: First, each of these is available as an app on current versions of the Fire Stick. Simply search the store for the VPN app as you would for any other streaming app, such as Showtime or Hulu. Second, you’ll see that all my recommendations are drawn from the top three performers in CNET’s directory of the best overall VPNs to use in 2022. That’s due to the obstacle course CNET puts VPN services through during our testing and evaluation process. One of the primary factors in securing a top spot on our best VPN list is a VPN’s platform compatibility, so it’s little surprise that my top three picks are VPN services that work on a wide range of devices and systems.
But when we evaluate VPNs for Fire TV Stick use, the priorities are straightforward. We’re looking for the fastest
, most streaming-friendly services with strong-enough security to keep your ISP blind to your content choices and your service provider blind to your whereabouts. As always, I strongly recommend you avoid free VPNs and instead use a tried-and-true paid VPN that offers the cheapest deals. Here are our recommendations for the best Amazon Fire Stick VPN.

ExpressVPN
ExpressVPN
The speed leader with Fire TV flexibility
When it comes to speed, security and unblocking capabilities, ExpressVPN is tough to beat. After a set-back in 2020, ExpressVPN is again currently in first place as the fastest VPN we’ve tested. ExpressVPN caused us to lose just 2% of speeds in our 2022 speed tests, so you shouldn’t have any issues achieving enough speeds for a smooth streaming experience whether you’re streaming in 720p or 4K UHD.
Normally, if you’re using ExpressVPN on a smart TV or gaming console, you’re going to need to install the VPN’s router app and setup your connection to cover multiple devices. But if you have a Fire TV or a Google TV, you can bypass ExpressVPN’s custom router setup altogether and install the ExpressVPN app right onto your smart TV.
The VPN also unblocks Netflix and other streaming services more reliably than most other VPNs, has servers in 94 countries around the world — so basically any geographic region you’d want access to is available in its extensive global network of VPN servers. ExpressVPN’s collection of setup guides, detailed FAQs and troubleshooting articles give it a clear advantage for Smart TV users, even if you’re connecting your TV to several other consoles and devices. That’s also where ExpressVPN’s 24/7 customer support, and its no-questions-asked, 30-day money back guarantee come in handy.
ExpressVPN’s included Media Streamer smart DNS feature is also simple to set up on any smart TV. Just keep in mind that while smart DNS can help you unblock geo-restricted content, your connection won’t be encrypted, so you won’t have the same privacy protections as you would via your VPN connection. But if you’re a casual user and streaming is your only objective here, then Media Streamer could be a good option for you.
All this comes at a price, however. ExpressVPN may be the best VPN for smart TVs, but it is also one of the most expensive. ExpressVPN’s best plan offers five simultaneous connections for $100 a year (which includes three extra months, for a limited-time deal totaling 15 months of service). You can also opt for a $13 per-month plan, or pay $60 for six months. While you can get a better month-to-dollar bargain with ExpressVPN’s two-year subscription, we don’t recommend anyone purchase any two-year VPN subscriptions at this time due to overall market volatility.
ExpressVPN
- Competitive speeds
- Solid security suite
- Company is based in privacy-friendly jurisdiction
49% off with 12-mo plan (+3 free months)
$6.67/mo at ExpressVPN
Surfshark
Surfshark
High speed on a budget
Surfshark’s network of servers may be smaller than some of its competitors, but this service is tall on speed and features. Its most obvious win, particularly if you have a penchant for connected smart home devices, is its support for unlimited devices. That means you can install Surfshark on your Fire TV Stick without sacrificing one of a limited number of connection choices, as you would with either of the two providers below.
With more than 3,200 servers in 65 countries, I lost less than 17% of average internet speeds during my most recent Surfshark speed tests. That’s faster than the 27% speed loss I saw in previous tests, and pushes the VPN service ahead of ExpressVPN to be the current front-runner in CNET’s speed comparisons.
If you’re a Brit abroad, for instance, and want to use your usual broadcast news app, then you’re going to need a VPN fast enough to deliver high-quality live streaming content at maximum resolution without lagging, even after you’ve encrypted and obfuscated your data, bounced your connection through servers in other countries, and funneled back to your location. Whew. Long trip, no? Surfshark — the fastest-performing VPN I’ve tested so far — can handle it without breaking a sweat.
In terms of security, Surfshark received generally high marks when its Chrome and Firefox extensions were audited for privacy by German security firm Cure 53 (PDF link of full report), and its encryption options are on par with its peers. While its Fire TV Stick app offers multiple protocol options, its general encryption default is IKEv2 — not the strongest, but the one you’d expect to see used by most VPNs to ensure platform compatibility on your smart TV. You can also enable its kill switch on your Fire TV device, which prevents network data from leaking outside of its secure VPN tunnel in the event the VPN connection fails.
Surfshark’s ability to hop over geoblocking on a streaming platform like Netflix is likewise renowned. Its normal desktop Multihop option, which jumps your connection through multiple countries to hide your trail, is also available on its Amazon Fire TV app.
The best part about the Surfshark VPN? Not only is it the fastest VPN I’ve reviewed so far, and not only does it have an excellent suite of privacy features, but it remains the least expensive VPN subscription you can buy.
Unlike many of the other VPN providers, Surfshark doesn’t offer a one-year plan. Its best offer is currently $2.30 a month, for its two-year plan (you pay about $60 up front). A six-month plan is $6.49 a month (about $40 up front), and month-by-month plans are $13 a month. Definitely take advantage of its generous 30-day trial to decide if you like this service (and if you choose the two-year plan, maybe set a reminder in 23 months to see if you can talk it into a continued discount rate).
Surfshark VPN
- Market-leading speeds
- Doorbuster pricing
- Multihop VPN
83% off with 24-mo plan (+3 free months)
$2.21/mo at Surfshark

NordVPN
NordVPN
The VPN juggernaut
NordVPN is like the final boss you have to fight if you’re a VPN industry newcomer. Why? Because it’s got an answer to every advantage you might bring to the table. Your VPN is faster this year? Watch how fast Nord can get when it expands its fleet again. You’ve beefed up your VPN’s security? That’s great, but Nord’s gone 100% RAM-disk and offers co-located and bare metal servers after its 2019 scare. Even if you’re an established contender like ExpressVPN, you’ve still got to constantly deal with NordVPN’s advertising war chest and willingness to slash prices at the drop of a hat to dominate the market.
In CNET’s list of overall best VPNs, ExpressVPN currently outranks NordVPN. The key here that puts NordVPN ahead of ExpressVPN for Fire TV Stick is Nord’s consistency. I found NordVPN’s speeds were reliable. There were never any sudden dips or service interruptions, and where I expected the VPN to underperform, it proved itself up to the task. That reliability is what you’re going to need most when it comes to streaming data-heavy media content from providers like HBO Max.
NordVPN offers a generous simultaneous connection count, with six simultaneous connections through its network, where nearly all other providers offer five or fewer. It also offers a dedicated IP option, for those looking for a different level of VPN connection. NordVPN offers a kill switch feature and the ability to VPN into Tor. I detected no privacy leaks during my tests.
In my most recent speed tests, NordVPN’s performance was on par with many of its competitors, reducing my speeds by 53% on average (which is slower than the 32% loss measured in previous speed tests). Like ExpressVPN however, NordVPN has been prepping for its next round of races and aiming for the trophy.
The company’s two-year VPN subscription plan costs $3.29 a month ($78.96 billed at once). That price is lower than most contenders, but creeps up for the one-year plan ($4.99 a month or $59.88 total) and the monthly plan ($12 a month). But it does have a full 30-day refund policy.
NordVPN
- Reliable, competitive speeds
- RAM-disk servers
- Feature-rich software
62% off with 24-mo plan
$3.99/mo at NordVPN
Other VPNs available on Fire TV Stick
The three services above are my favorites, whether you’re using an Amazon Fire TV device or some other device. But note that these other services are also available as downloadable apps on the Fire TV platform:
- Hotspot Shield VPN (read CNET’s Hotspot Shield review)
- CyberGhost VPN (read CNET’s CyberGhost review)
- IPVanish VPN (read CNET’s IPVanish review)
More VPN recommendations
- Best Android VPN of 2022
- Best iPhone VPN of 2022
- 3 Great VPNs for Xbox in 2022
- Surfshark vs. IPVanish: Which Cheap VPN Is Best?
- Fastest VPN of 2022
- Best VPN for Chrome
The post Best VPN Service for Amazon Fire TV Stick in 2022 first appeared on Joggingvideo.com.
]]>The post Got a Streaming Device? You Need to Change These Settings ASAP first appeared on Joggingvideo.com.
]]>
People stream content on their TV all the time. It’s one of the best ways for the whole family to watch shows and movies from your favorite streaming services, such as Netflix, Hulu and HBO Max. But streaming devices from Roku, Google Chromecast, Amazon and Apple have a downside: Their software platforms are often tracking what you watch behind the scenes.
Every major smart TV streaming platform captures your viewing data. Makers of software and hardware — from your new streaming stick to your TV itself — use that data to “improve” the products and services they offer, by tailoring show recommendations and the ads they show you, for example. While that’s potentially frustrating, ads do help keep the price down when you’re buying a new streaming stick.
While we’ve previously covered privacy settings for the TVs themselves, for this story we checked out all of the latest software on streaming devices from Amazon, Roku, Google and Apple.
Here’s what we found and what you can do about it on your respective new streaming players.
Sarah Lord/CNET
Amazon Fire TV Stick
Amazon told CNET that it collects limited information about customers’ use of third-party apps on Fire TV. “We collect data on the frequency and duration of use of apps on Fire TV (i.e., when a customer opens or closes an app), which helps with service and device improvements. We don’t collect information about what customers watch in third-party apps on Fire TV.”
Amazon’s privacy policy says that your Amazon device also “collects data about your use of the device and its features, such as your navigation of the home screen [and] selection of device settings (such as device language, display size, Wi-Fi and Bluetooth options).”
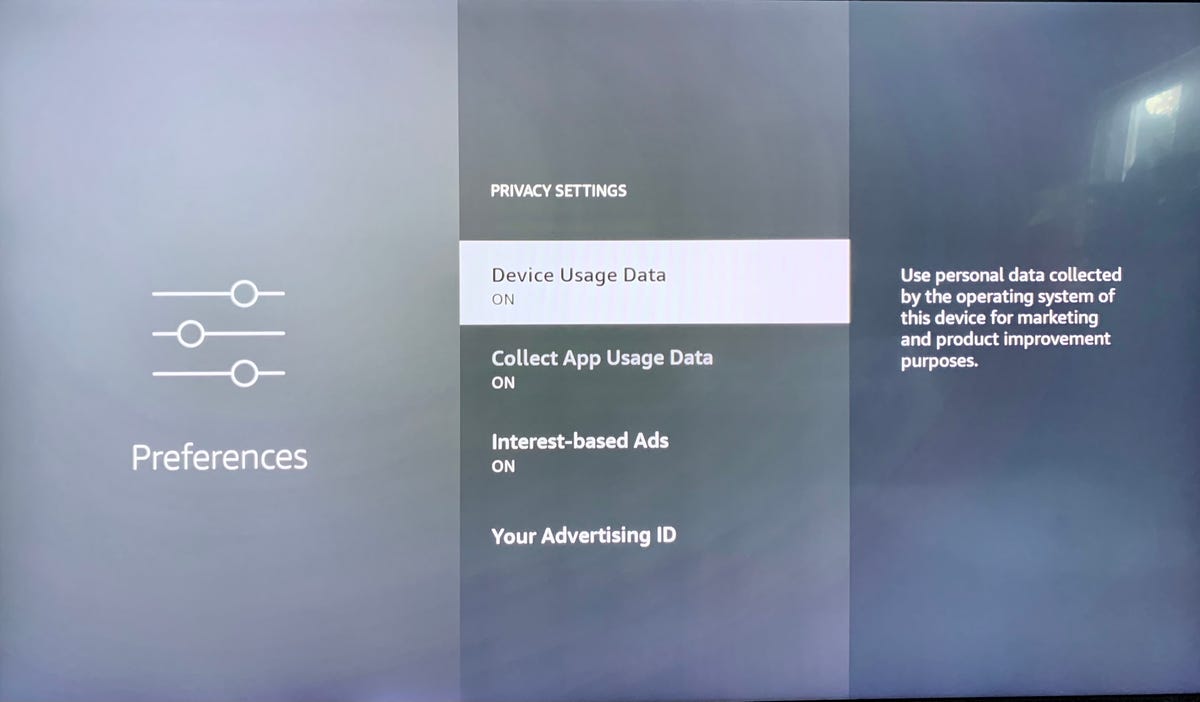
Here’s how you limit the amount of data Fire TV collects. All settings can be found by going to Settings, then Preferences, then Privacy Settings.
- Choose Device Usage Data and turn this setting off.
- Go to Collect App Usage Data and turn this setting off.
- Select Interest-based Ads and turn this setting off.
Now, your Amazon Fire TV device will not be able to track your data for marketing purposes or be able to look at the frequency and duration of your usage of downloaded apps. It will also not give you targeted advertising, but it will still have ads. For more details check out Amazon’s privacy settings FAQ.
More Tech Tips
- Get Your TV Ready for Binge-Watching
- How to Set Up Your New TV: Connections, HDMI Cables, Picture Settings and More
- Make Watching TV Even Better. Change These Picture Settings Today
Sarah Lord/CNET
Google Chromecast with Google TV
Google has one privacy policy across the company’s products, which details the data it collects to sell ads or recommend other content such as YouTube videos.
The data collected includes terms you search for, videos you watch, views and interactions with content and ads, voice and audio information when you use audio features, purchase activity, people with whom you communicate or share content, activity on third-party sites and apps that use our services.
Google says that Google Chromecast as a platform does not perform ACR or monitor what specific content users are watching.
Here’s how to control data on the Google Chromecast with Google TV.
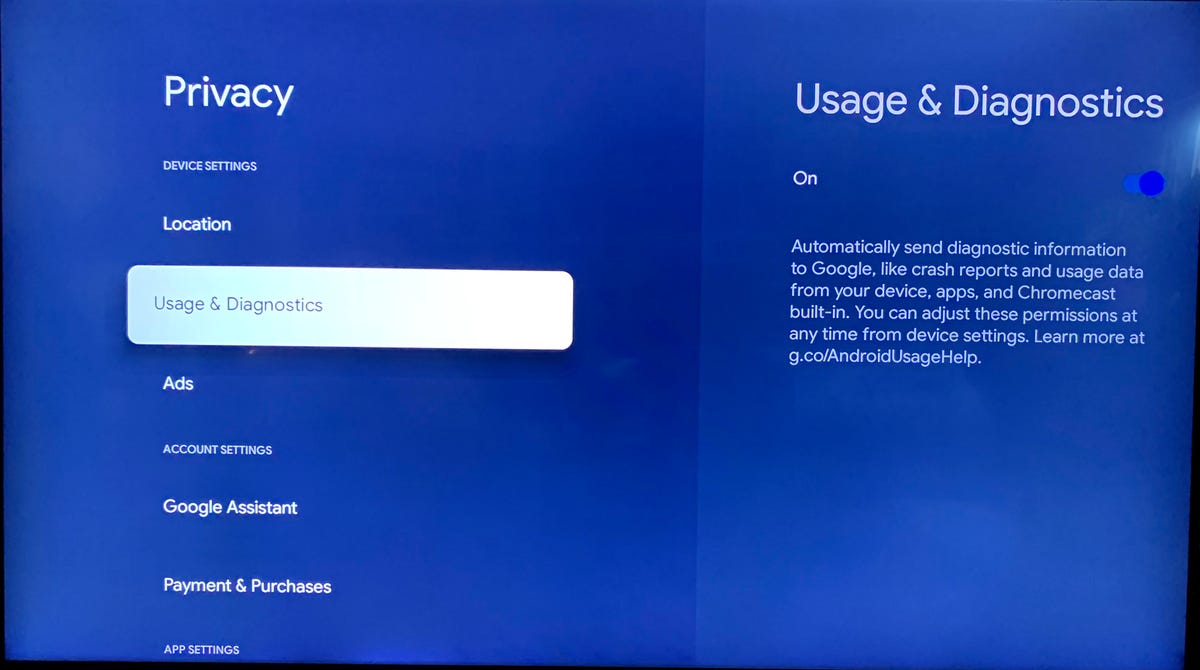
- Head to Settings and scroll down to the section labeled Privacy. There you can access settings for Location, Usage and Diagnostics and Ads. There are also sections for account settings that feature Google Assistant as well as Payment and Purchases. Finally, the section has app settings where you can control App Permissions, Special App Access and Security and Restrictions.
- Click Usage and diagnostics and make sure that tab is switched off. This means that you are no longer sending diagnostic info to Google.
- Click Ads, and Opt Out of Ads Personalization, to keep apps from using your ID to build personalized ad profiles.
- To manage other data Google has on you, such as YouTube and search histories and web and activity data, head to myactivity.google.com.
Sarah Lord/CNET
Roku
Roku’s privacy policy states that the company will collect “your search history, search results, audio information when you use voice-enabled features, channels you access (including usage statistics such as what channels you access, the time you access them and how long you spend viewing them), interactions with content and advertisements, and settings and preferences.”
Roku says that it shares data with advertisers “including ads that you view within Roku’s Channels and Third-Party Channels, as well as ads included in content that you view through your Roku TV’s antenna and connected devices.”
Here’s what you need to do to limit or disable some of the tracking.
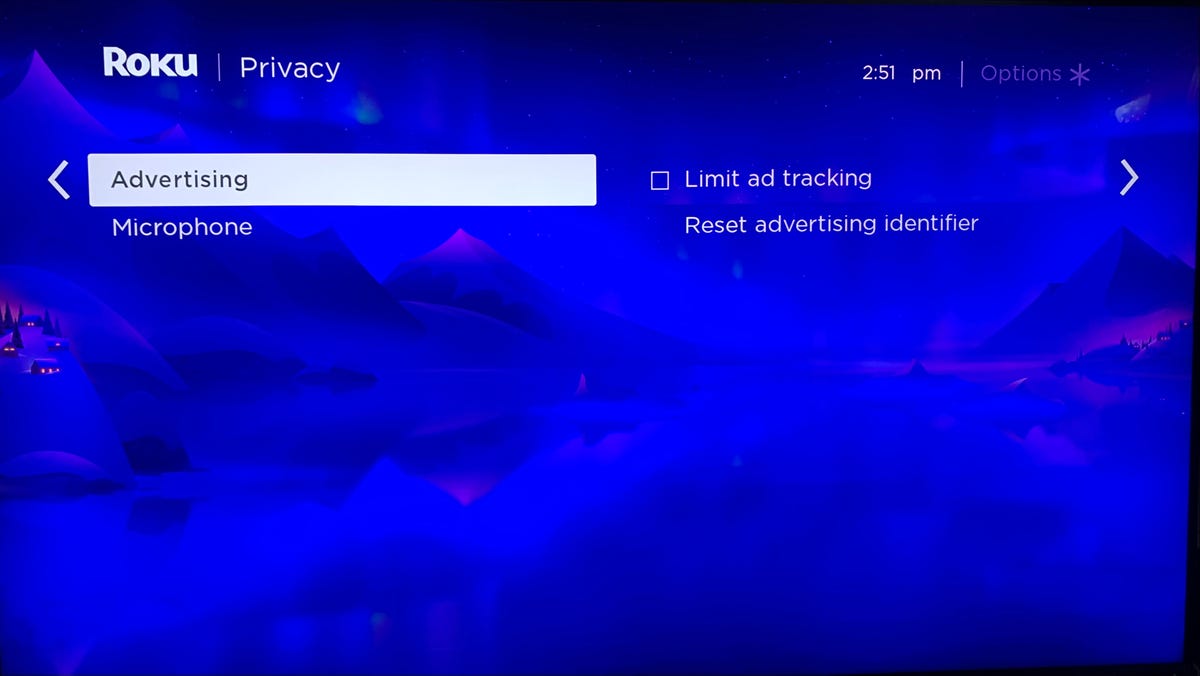
- From the main Roku menu, open Settings and head to Privacy.
- For Advertising, make sure that the box Limit ad tracking is checked. This stops Roku from personalizing ads and sharing viewing data from streaming channels for the purpose of measurement. Roku will let channel providers know that you prefer not to have personalized ads, but according to Roku, it is up to the providers if they honor your preference or not. Likewise, “Limit Ad Tracking” will not stop individual channels, like Hulu or Netflix, from collecting their own data on your usage or passing that info on to other parties.
- For those Roku devices that come with an embedded microphone in the remote, you can go to Microphone and then Channel Microphone Access to choose how a channel gains access to the microphone. You can always allow them access, never allow them access or have a prompt pop up and ask for permission to access the microphone. With the Channel Permissions button, you can manage the permissions for each individual channel.
Sarah Lord/CNET
Apple TV
Apple’s privacy policy says that the company collects information from your Apple ID mainly so that you can seamlessly pick up where you left off on other devices. The information that it tracks includes “what content you’re playing, when you played it, the device you played it from and where exactly in the content you paused or stopped watching. We also collect a detailed history of all playback activity for Apple TV channels and Apple TV Plus.”
It also states that the company does share some information with partners that “work with Apple to provide our products and services, help Apple market to customers and sell ads on Apple’s behalf to display in the App Store and Apple News and Stocks.”
But unlike the others on this list, Apple always asks if you want individual apps to track your usage the first time that you use them. You can prevent each app from seeing your data by clicking no every time this pops up.
And Apple has some more privacy settings that you can change. Here’s how to find them:
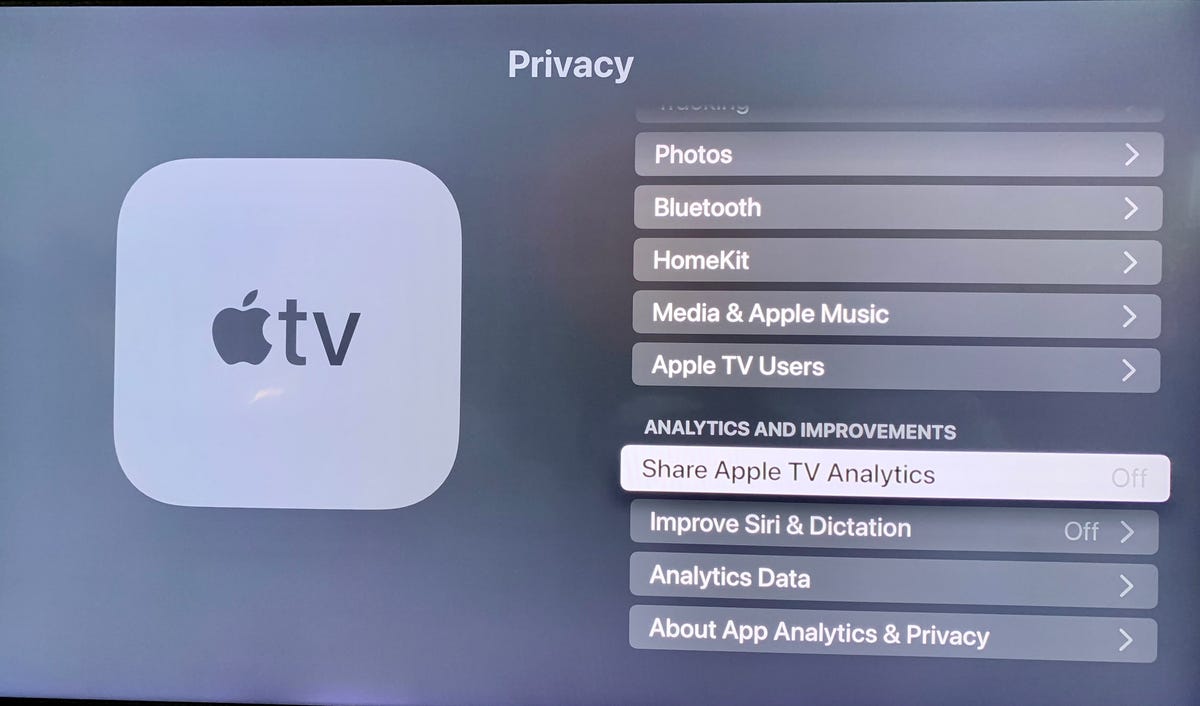
First, you’ll have to find and click on the settings icon. Hit the General tab, then scroll down to Privacy. The Privacy menu features Location Services, Tracking, Photos, Bluetooth, HomeKit, Media and Apple Music as well as Apple TV Users.
- Click on Tracking and make sure that Allow Apps to Ask to Track is On.
- Go back to the Privacy menu. You will see a separate section called Analytics and Improvements.
- Change Share Apple TV Analytics to Off.
- Change Improve Siri and Dictation to Off.
You’ve now limited Apple from tracking your analytics and using your data to improve Siri or dictation.
Correction, July 15: An earlier version of this story incorrectly stated that these streaming devices track what you watch with automatic content recognition, which is software that recognizes the images on your TV. None of these four platforms uses ACR on streaming devices, although some smart TVs that run these platforms do use ACR.
The post Got a Streaming Device? You Need to Change These Settings ASAP first appeared on Joggingvideo.com.
]]>The post Hidden iPhone Messages Let You Chat Secretly: How It Works first appeared on Joggingvideo.com.
]]>
It’s pretty easy to keep everything forever on your iPhone, but sometimes you don’t want your words to be saved for all time in an email or text message. That’s one reason why apps like Snapchat, which features self-destructing text messages, have gotten popular.
While iOS 16 adds the ability to unsend text messages that you want to rescind, it’s not quite the same thing. However, a built-in iPhone app has been allowing you to send temporary, secret messages with a collaborator since iOS 10.
The iPhone app Notes allows you to collaborate with others on notes, whether they’re grocery store lists or collections of dad jokes. Anyone who’s part of a collaborative note can edit in real time, which enables hidden conversations. You could have an incredibly long, personal conversation — without any lasting proof that it ever existed.
To learn how to turn a note into a hidden conversation on iOS, here’s what you need to know.
First, create a note in the Notes app
On your iPhone, launch the Notes app and tap the Compose button on the bottom right to create a new note. Next, type anything into the note to keep it, or else it’ll automatically be deleted when you exit from the note. You can also just go into an existing note, but it’s better to start fresh with a new one.
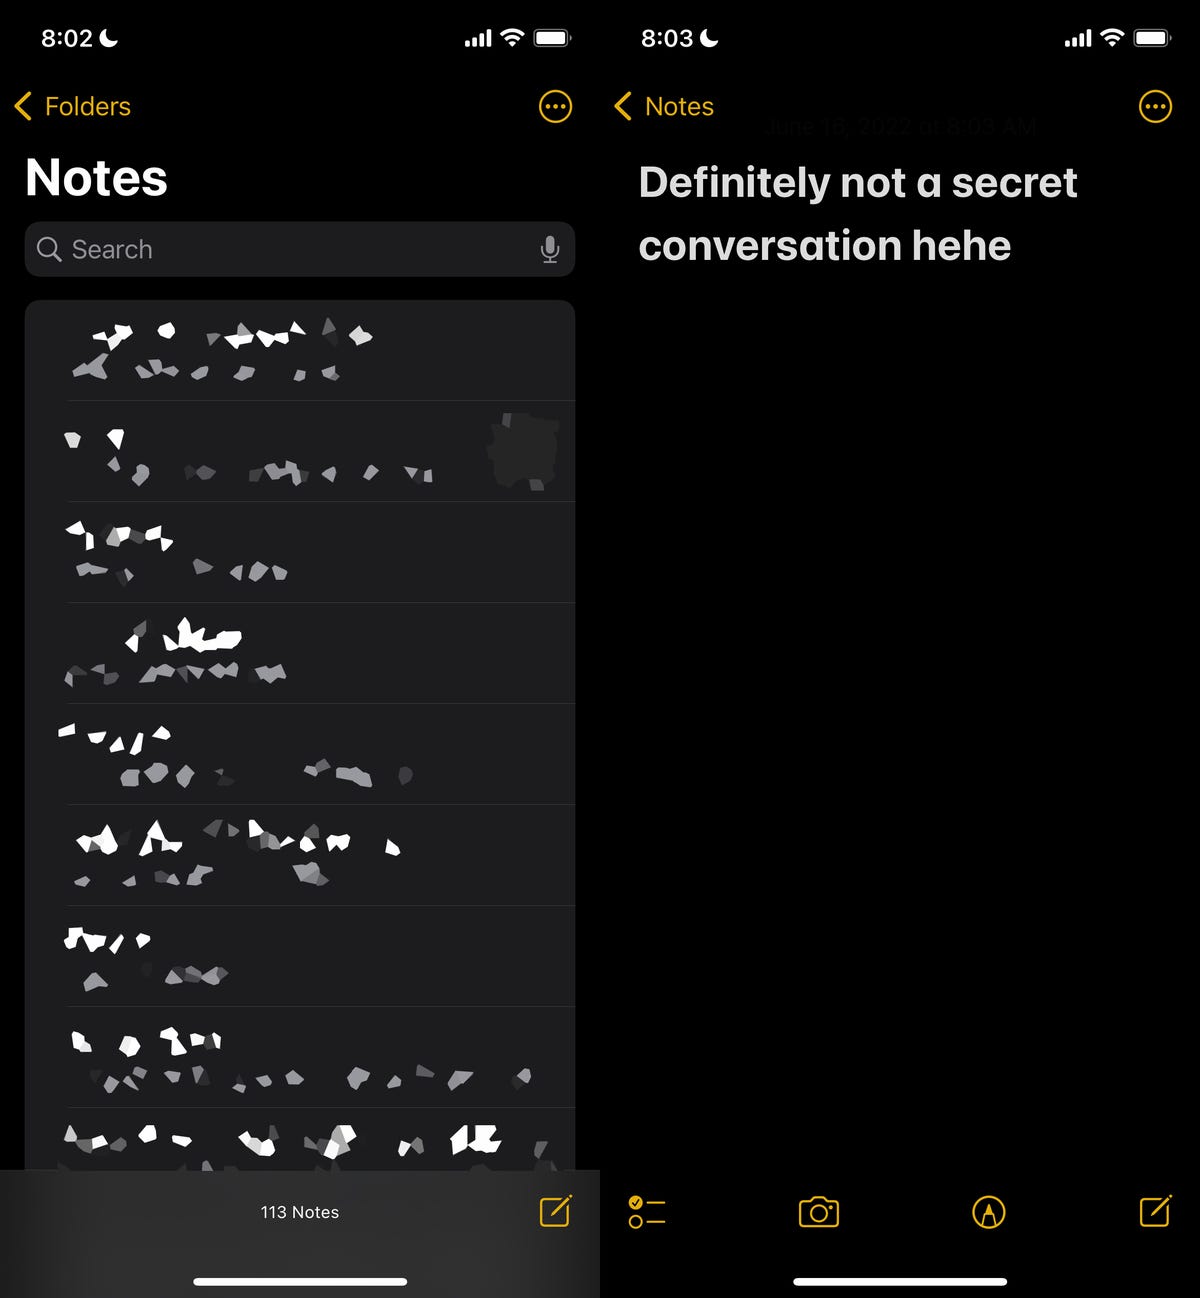
First, create a new note or go into an existing one.
Nelson Aguilar/CNET
Adjust your note’s share options to add collaborators
Once your note is up and ready to go, you can begin the process of adding another person as collaborator, which means they can read and edit whatever is in the note. To start, tap the More button on the top right, and then hit Share Note.
Now tap Share Options and make sure the Can make changes option is selected under Permission. You should also toggle off Anyone can add people in case you want to be the only person who can add collaborators to your note. Go back to the last page when you’re finished configuring these settings.
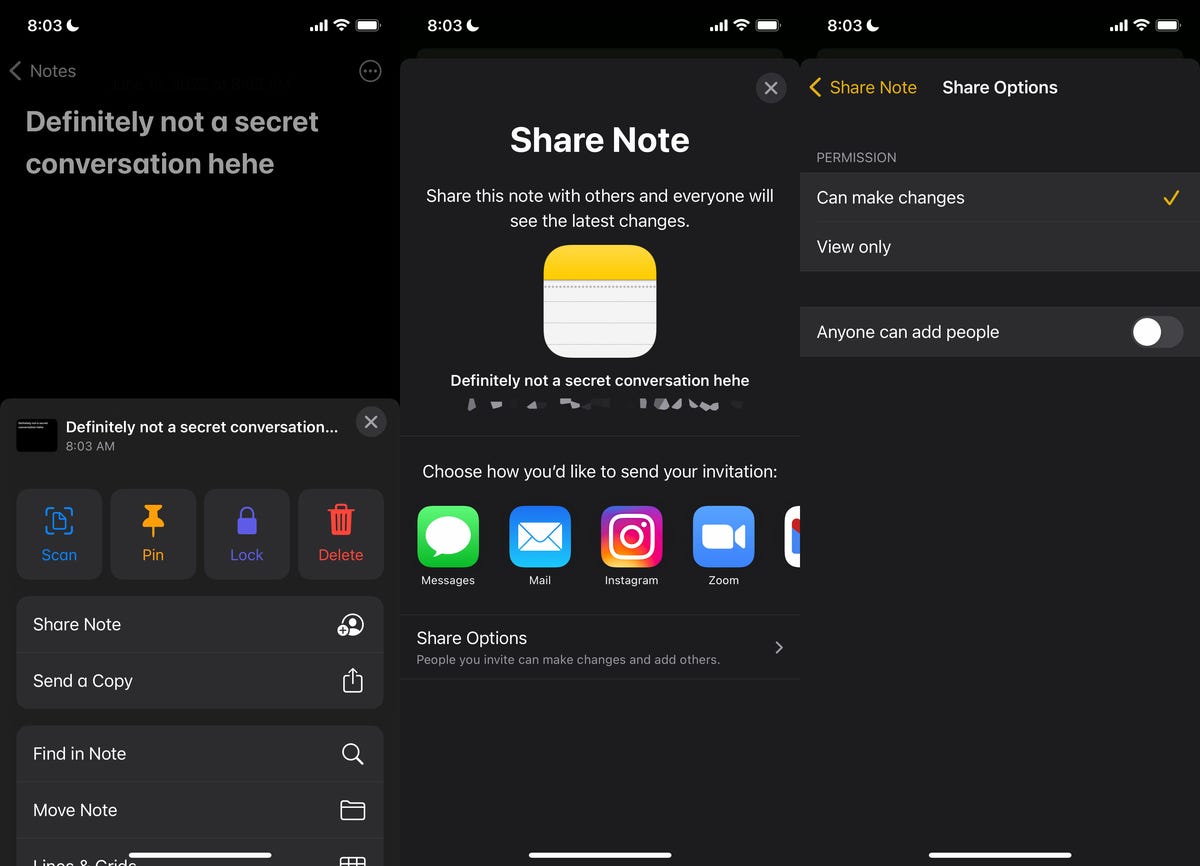
Second, manage what your collaborators can do.
Nelson Aguilar/CNET
Add friends you want to include and share the link
Next, choose a method to share the note: You can send it via text message, email, social media and more. If you swipe on the share options, you can also select Copy Link, which copies the note link to your clipboard and allows you to paste it wherever you want.
For this example, I’ll choose the Copy Link option to share the note.
At the top of the Copy Link page, enter the email address or phone number of the person you want to access the note. You can also tap the Add icon to search through your contacts. Adding a contact to the note is required — if you share the link without adding a contact, the other person won’t be able to see or edit the note, even with the link.
Lastly, hit Copy Link to copy the note link to your clipboard and share it with your collaborator.
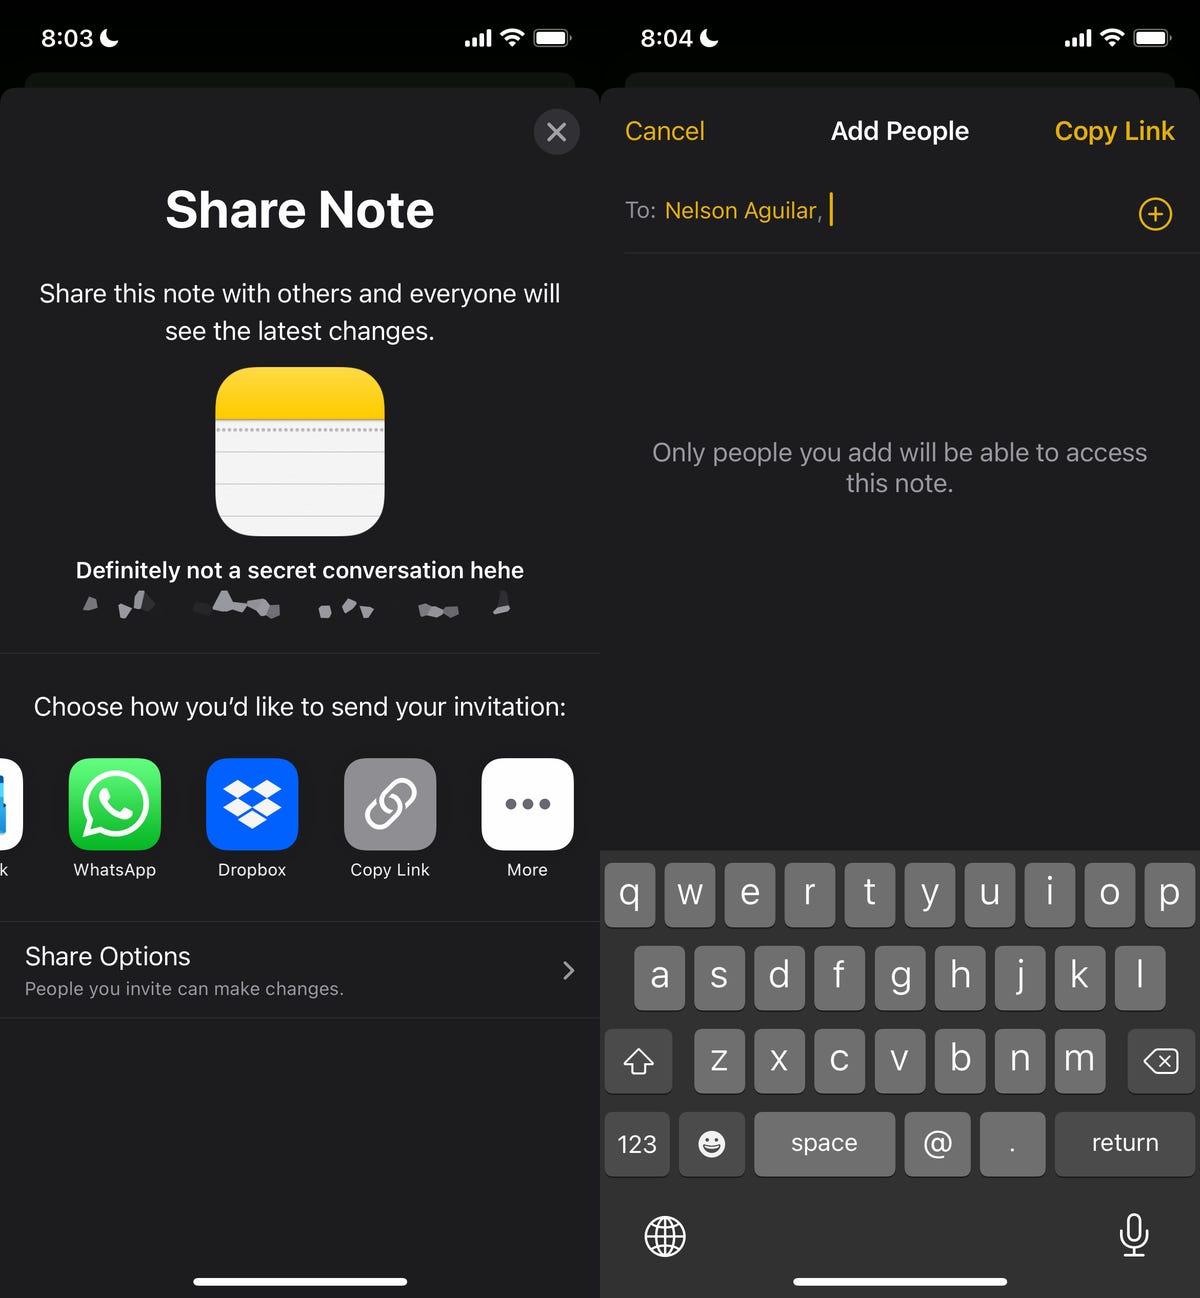
Next, add your collaborator(s).
Nelson Aguilar/CNET
Send secret messages using Notes
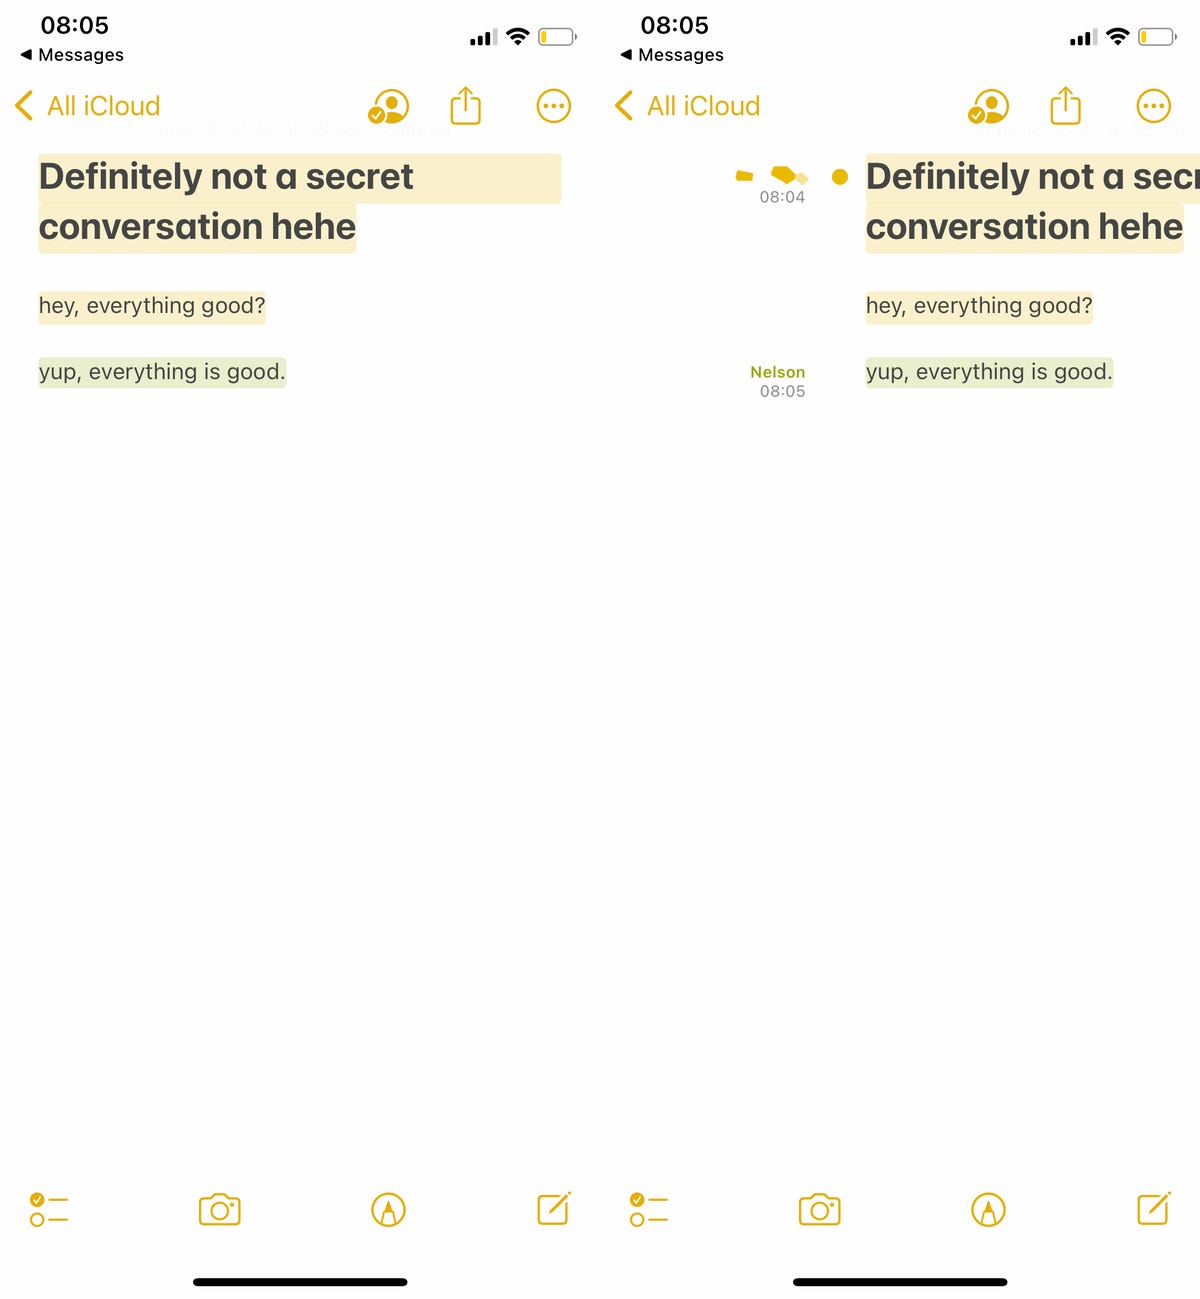
The other person, on the receiving end, must now open the note link and accept the invitation. If they accept, they’ll be redirected to the Notes app and to the collaborative note you just created.
To communicate, simply type something into the note, which the other person will be able to see in real-time, without you having to hit send. They’ll also receive a notification anytime the note is altered.
Each person in the note will have a corresponding color appear (only for a moment) so that everyone else knows who typed what. You can also swipe right from the middle of the note to see the name of who wrote the message, as well as a timestamp for when the message was written and any corresponding colors.
Now you can secretly communicate with your friends or family.
Nelson Aguilar/CNET
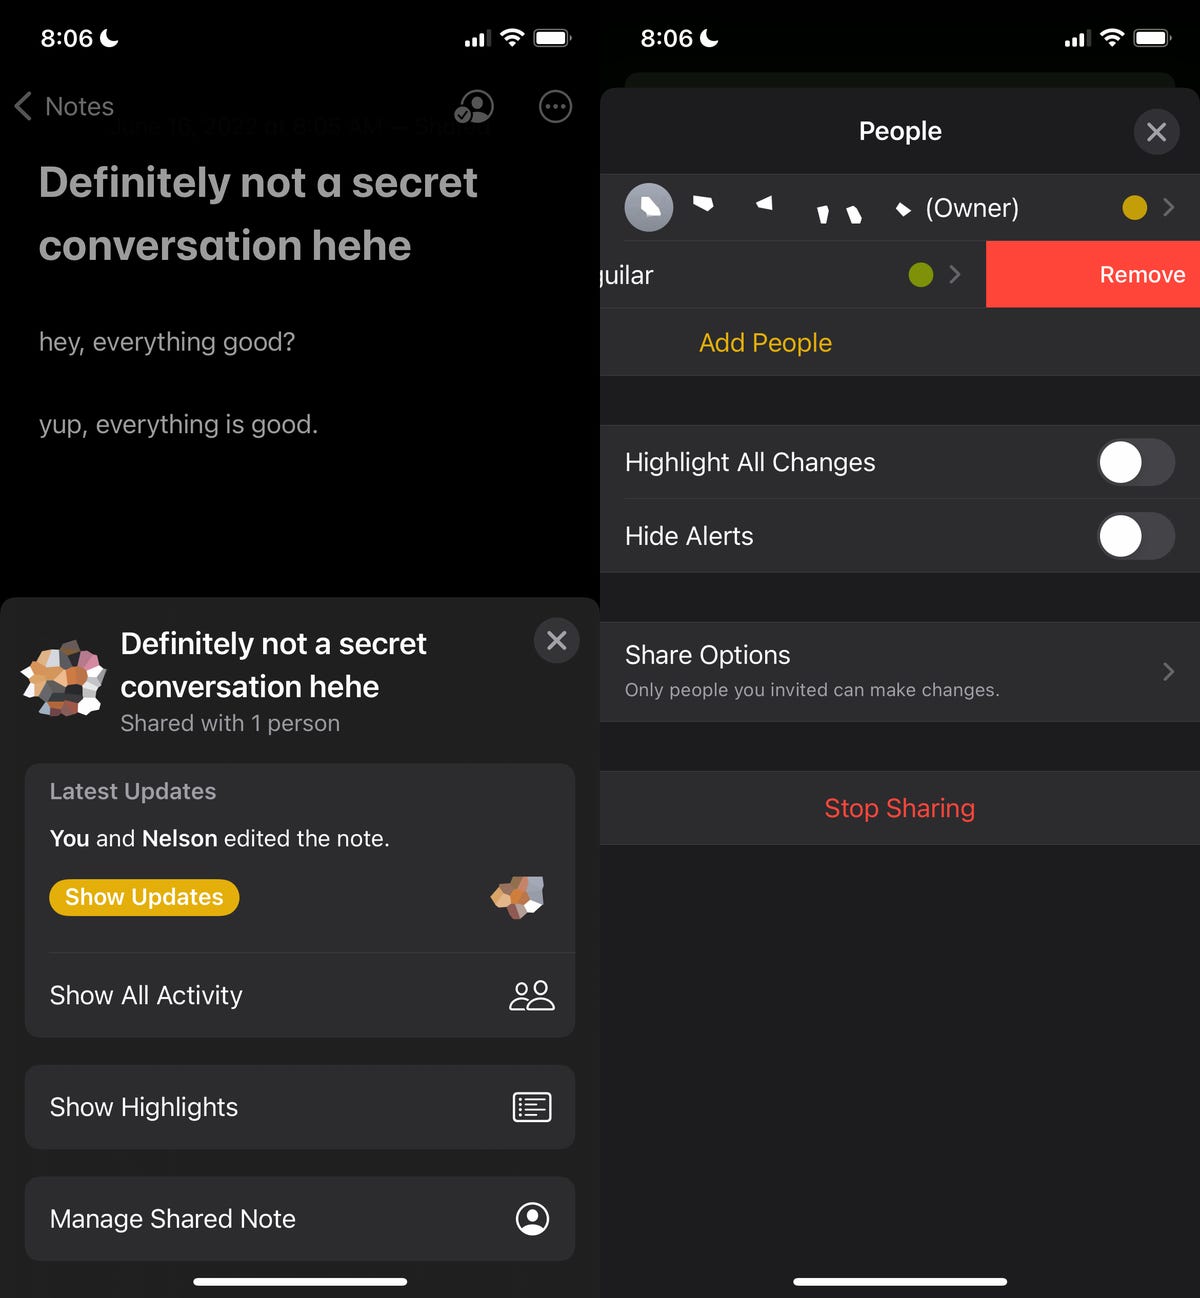
You can also tap the Share Note button (with the checkmark icon), go to Manage Shared Note and then toggle on Highlight All Changes. That way, all messages will stay permanently highlighted in their corresponding color, making it easier to read the conversation.
And if you want to keep your communications more low-key, delete your message or the other person’s message to strike it from the note. That way your conversation is more like it would be on Snapchat, with ephemeral or short-lived messages that outsiders can’t see if they snoop through your notes. You can do this with any text in the notes, as well as photos, videos, links, drawings or any other attachments you add to the note.
Permanently delete your secret chat
Not all secret conversations can go on forever, and so it’s time now to end it.
If you’re the owner of the note, and want to keep the note intact for everyone but prevent them from editing it, you can easily do so. On the top right, tap the View Participants button and then hit Manage Shared Note. To remove a participant, you can either swipe left on their name and then hit Remove or you can tap on their name and then tap Remove Access.
To end the notes conversation, remove any collaborators or stop sharing the note.
Nelson Aguilar/CNET
Additionally, you can tap the Stop Sharing option, which will not only remove participants from the note, but also delete the note from all of their devices.
If you’re not the owner of the note, you can just delete the note from the Notes application.
The post Hidden iPhone Messages Let You Chat Secretly: How It Works first appeared on Joggingvideo.com.
]]>The post Why You Shouldn’t Update Your iPhone to iOS 16 Just Yet first appeared on Joggingvideo.com.
]]>This story is part of Focal Point iPhone 2022, CNET’s collection of news, tips and advice around Apple’s most popular product.
It’s always exciting to update your iPhone to explore all the new features, especially with iOS 16. You’ve got lock screen customization (with widgets!), the ability to unsend and edit text messages, improved privacy and security features and so much more.
And that should be enough to get you to update to the latest iPhone OS from Apple, but there are always one or two reasons to hit the pause button for just a bit and stick with the OS you’re currently running. If you haven’t yet updated to iOS 16, here’s why you may want to wait — for now.
However, if and when you are ready to jump in, here’s how to download and install iOS 16 and the first things to do after you install iOS 16.
Your iPhone battery might drain faster than usual
There really isn’t a single general reason why battery drain occurs right after a major software update like iOS 16, but it happens to some people pretty much every year.
If your battery health level is already in bad shape (Settings > Battery > Battery Health), you might want to refrain from updating to iOS 16 for a bit.
Here are a couple reasons why iOS 16 may be draining your battery:
- Your phone is working overtime in the background. New features may need to index your files to work properly, such as the improved Search feature and the duplicates feature in the Photos app.
- Your apps don’t support iOS 16. Developers are given plenty of time to update their apps to the latest update, but if they don’t, the apps could drain more battery because they’re outdated.
And of course, there are always software bugs that could be using up your battery life in the background.
You may need to charge your phone more often because of new software.
Stephen Shankland/CNET
Even if you wait for future iOS 16 updates, you may still encounter some battery drain for the first few days, but that generally disappears once your iPhone gets settled with the software update.
You might encounter bugs that can cause other issues on your iPhone
No matter how polished a software update may seem, a few bugs are bound to slip through the cracks. It’s why Apple sometimes releases a “point update” shortly after a major update, to fix issues like:
- Battery drain
- Lag
- Apps force-closing
- Phone restarting
- Unusable features
There already seems to be an iOS 16.0.1 update for the iPhone 14 and 14 Pro to fix some activation and photo issues — even though the phone hasn’t even been officially released yet.
You can still preorder the iPhone 14 right now.
If you’re concerned about issues such as these, you may want to wait until most of the major bugs are squashed in subsequent iOS 16 updates.
You can prevent others from unsending text messages to you
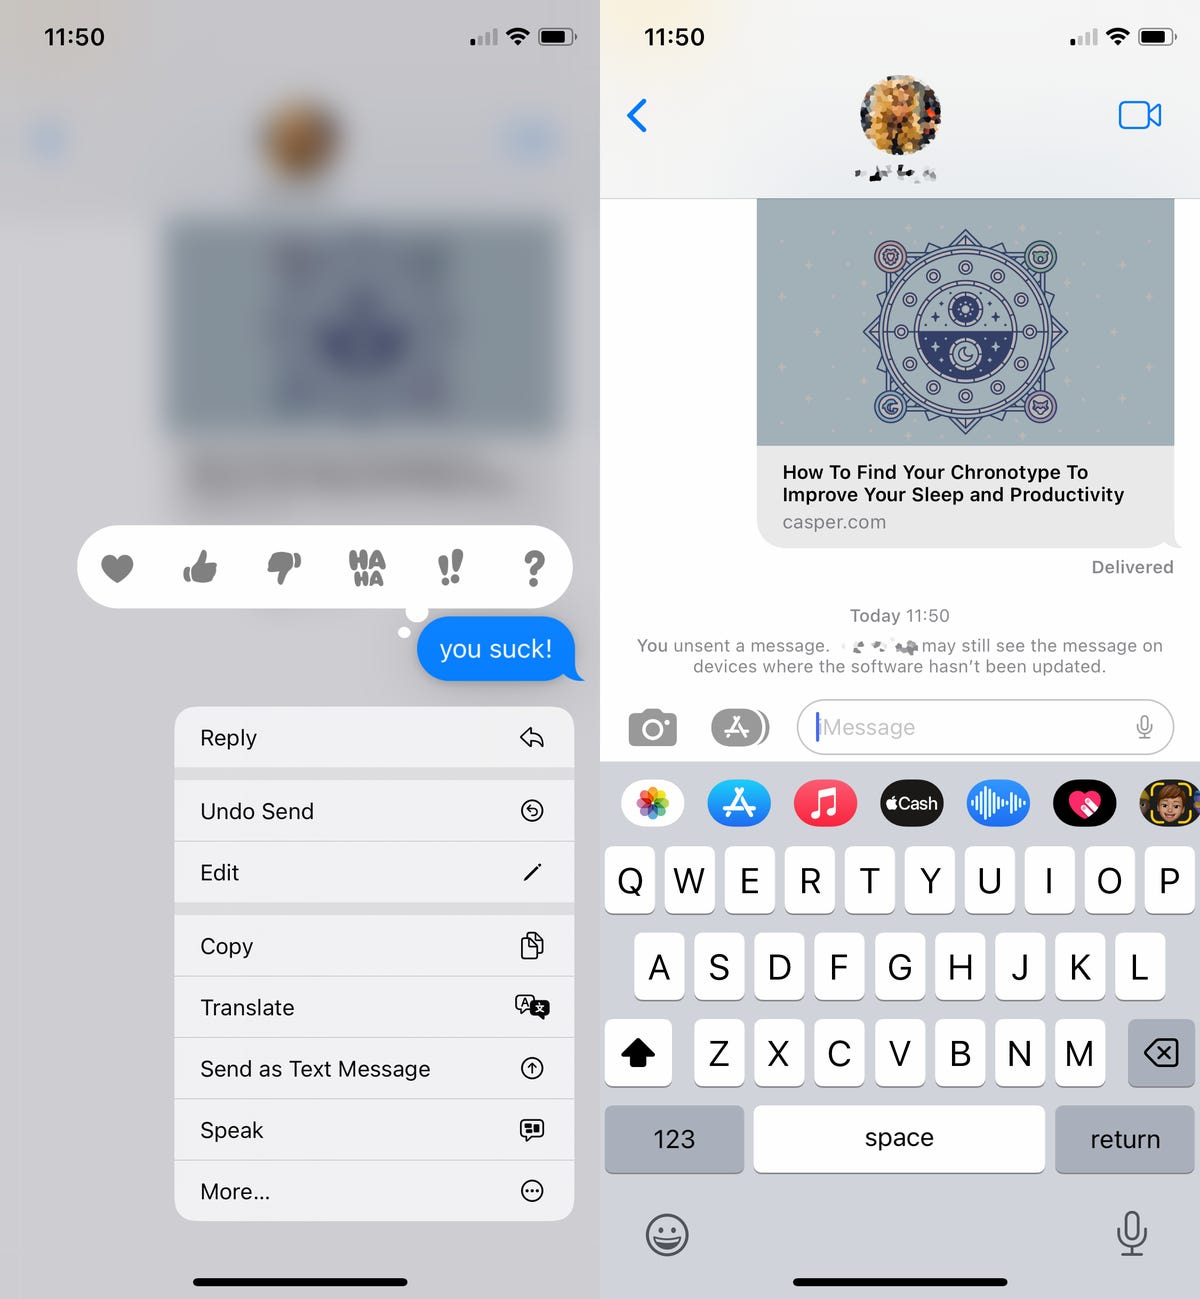
One of the biggest new features in iOS 16 is the ability to unsend and edit text messages. You have two minutes to recall a text message and 15 minutes to edit an already sent text message, but if you’re on iOS 15, the feature won’t work as expected, which might be a good thing for you if you’re not a fan of unsent and edited messages.
If you’re on iOS 15 and a person running iOS 16 attempts to recall a text message they sent to you, they won’t be able to. Instead, they’ll receive a message that says “You unsent a message. They may still see the message on devices where the software hasn’t been updated.”
Essentially, they won’t be able to unsend any text messages to you as long as you stay on iOS 15.
You can see what happens when you attempt to unsend a text message from someone who is running iOS 15.
Nelson Aguilar/CNET
Staying on iOS 15 also affects the editing text messages feature, although not by much. Instead of editing the message, it just sends additional texts for every single edit made.
You might not get all the new iOS 16 features you want
And not every iPhone running iOS 16 will get all the new features, like the battery percentage icon in the status bar or real-time captions for videos and FaceTime calls.
Unfortunately, older iPhone models, like the iPhone X, iPhone 8 and iPhone XR, will not receive every single new feature that’s available in iOS 16. If you want to check out the full list of features and unsupported devices, you can read more here.
Read more: The Much-Missed Battery Icon Has Returned in iOS 16. So Why Are iPhone Users Annoyed?
Apple has already released a developer version of iOS 16.1, which adds support for the battery percentage feature to the iPhone XR, iPhone 11, iPhone 12 Mini and iPhone 13 Mini. If that’s a feature you’re looking forward to, you might want to wait until iOS 16.1 is released to the general public.
You might not get the new battery icon, even if you update to iOS 16.
Patrick Holland/CNET
For the most part, you should probably update to iOS 16
Regardless of any hesitations you might have, if you do want to jump in, there are plenty of reasons to just go ahead and update to iOS 16. Aside from all the new features you may benefit from, Apple’s major software updates may fix bugs and other issues in previous iterations.
Note: Apple released iOS 15.7, which fixes several security issues without you having to update to iOS 16.
However, major updates don’t just fix issues, they also bring new privacy and security settings that improve your safety and better protect your personal information.
On iOS 16, you have a few major privacy and security features to look forward to:
- Safety Check: Helps people in domestic abuse situations by quickly restricting access that they’ve granted to others.
- Pasteboard permission: Apps must now request access to your clipboard when you copy and paste between apps.
- Rapid Security Response: Installs important security improvements faster.
- Lockdown Mode: Provides better protection to those who are targeted by mercenary spyware.
Apple’s taking a new approach to security with Lockdown Mode.
James Martin/CNET
And then there are all the new accessibility features, which can be incredibly beneficial to those with disabilities:
- Live Captions: Transcribes phone call conversations and provides real-time captions to those that may be hard of hearing.
- Door Detection in Magnifier: Helps those who are visually impaired by allowing them to use their camera to locate a door, read instructions or labels around the door and get instructions on how to open the door.
For more, here’s our take on the iPhone 14 Pro and Max and its shape-shifting cutout.
The post Why You Shouldn’t Update Your iPhone to iOS 16 Just Yet first appeared on Joggingvideo.com.
]]>The post Setting Up Your iPhone 14? Here’s How to Do It first appeared on Joggingvideo.com.
]]>This story is part of Focal Point iPhone 2022, CNET’s collection of news, tips and advice around Apple’s most popular product.
You’ve received your iPhone 14. Maybe you waited in line at an Apple Store or preordered it and received it in the mail — but at long last, Apple’s latest phone is in your hands — and now you need to set it up.
Whether you’re transferring over from an Android or you’ve been a longtime Apple user, you might still need some help. In this guide, we’ll walk you through all the steps of setting up your iPhone 14, iPhone 14 Plus, iPhone 14 Pro and iPhone 14 Pro Max, from turning on your device and connecting to Wi-Fi to activating your eSIM and transferring all your data.
For more on the new iPhone and iOS, here’s how to download and install the new iPhone OS, the first three things to do after you update your iPhone, and why you might want to wait before updating to iOS 16.
What to do before you start to set up your iPhone
Before you start setting up your iPhone, you’ll need the following things if you’re moving over from another phone or setting up an iPhone for your first time:
- Back up your old iPhone. If you’re moving over from an older iPhone, you’ll be transferring data from your existing phone to your new iPhone 14, so it’s best to have an up-to-date backup to restore from. If you don’t have enough storage, you can back up to your computer.
- Keep your old phone close by. No matter if it’s an Android or iPhone, it’s a good idea to have your previous phone ready. This can actually expedite the setup process.
- Make sure you’re connected to the Internet. You need to connect to a stable Wi-Fi network to set up your iPhone.
- Have your Apple ID credentials on hand. In case you need to sign in to your Apple account, to restore a backup and more, have your email and password ready. You can also create one during the setup process.
Ready? Let’s get started.
1. Turn on your iPhone 14
The first thing you need to do is turn on your iPhone. No matter which model you have, turning it on is the same: Press and hold the side button, on the right side of your iPhone, until you see the Apple logo appear. Wait a few seconds, and the Hello screen should appear. Swipe up to begin.
2. Follow the iPhone onscreen instructions
Now you’ll have to do a couple minor things on your iPhone to get through the first part of the setup, and luckily they’re both easy to do. To start, you’ll have to:
- Choose a language: If you’re in the US, you should see English listed directly at the top.
- Select your country or region. Again, if you’re in the US, you should see “United States” at the top.
3. Use Quick Start to set up your iPhone 14
On the next page you’ll see the Quick Start screen, which allows you to automatically set up your iPhone 14 with the help of your previous iPhone or even an iPad. If you go this route, you’ll need to turn on your old device, connect it to Wi-Fi or cellular and then bring it near the new iPhone 14
Next, you’ll be asked to authenticate or connect the two phones. You can either use the camera on your old iPhone to scan the pattern on the new iPhone or enter a verification code. Activation will then take a few minutes.
Note: If you want to do this manually, skip down to the next section.
You’ll then be prompted to do the following, among other things:
- Join your Wi-Fi network on your new iPhone.
- Set Up eSIM. You should see two options: Transfer from another iPhone (the best option) or Set Up Later in Settings. If you choose the first option, you’ll be asked to double-press the side button on your old iPhone.
- Set up Face ID or Touch ID.
- Choose how you want to transfer your data. You can either do it from iCloud or from your previous iPhone.
It’s a good idea to keep both devices connected to a power source while you do this, because depending on how many apps and how much data you have, it could take a while. Follow all the steps until you’re finished and have access to iOS 16 on your iPhone 14.
4. Set your iPhone 14 up manually
Now, if you’re coming from an Android or other phone or want to set up your iPhone manually, tap Set Up Manually on the Quick Start screen. If you decide to go this route, you’ll need to manually do the following things:
- Connect to a Wi-Fi network. Wait a few minutes for your phone to activate.
- Read the Data & Privacy prompt. Hit Continue when you’re finished.
- Set up Face or Touch ID. This will be how you can unlock your iPhone 14 with facial recognition or your fingerprint.
- Create a six-digit passcode to unlock your iPhone 14. This is your backup for unlocking your iPhone 14. Enter the passcode twice.
- Choose how to restore your apps and data. You can restore from iCloud backup, restore from Mac or PC, transfer directly from iPhone, move data from Android or don’t transfer apps and data.
Depending on your method of restoring your apps and data, you may be asked to enter your iCloud credentials to sign in to your Apple account. You then need to enter a verification code, which may appear on one of your other devices, to verify your identity.
Next, agree to the terms and conditions; customize your settings; update to the latest iOS; and set up Apple Pay, Siri and Screen Time, if necessary. You’ll also be asked whether you want to share your app analytics with developers, which helps developers improve their apps using your data (anonymously).
Finally, set up the True Tone display, choose light or dark mode and select a standard or zoomed view (for those that have impaired vision).
5. You can now use your iPhone 14 running iOS 16
Once you’re finished, you can swipe up to enter your iPhone. You may not see all your applications on your home screen or your photos and videos in your camera roll, so you’ll need to wait a bit while your phone slowly transfers all your apps and data to your new iPhone 14. Depending on how much there is to transfer, this can take as much as a few hours.

iPhone 14 running iOS 16.
James Martin/CNET
For more on setting up your iPhone, here’s how to get rid of the new search button, hidden iOS 16 features you’ll want to uncover, and all the new features you can check out once your iPhone is set up.
The post Setting Up Your iPhone 14? Here’s How to Do It first appeared on Joggingvideo.com.
]]>The post Bought the New iPhone 14? Here’s the Easiest Way to Transfer Your Data first appeared on Joggingvideo.com.
]]>
If you bought one of the new iPhone 14 models today, you’re probably ready to tear open the box and start experiencing all the new features of iOS 16. While getting a new phone is exciting, we don’t recommend rushing the setup process. Instead, take the time to make sure your new iPhone 14 is set up to your liking.
Apple has several options for transferring data from iPhone to iPhone, depending on your situation. For instance, you can set it up as brand new, but you’d be starting from scratch with no settings, messages, photos, apps or accounts transferred over. There’s also the option to move everything from your current phone to the iPhone 14 — even if you’re currently an Android user.
We’ll explain the four different methods for restoring your phone from a recent backup of your current iPhone.
1. Restore a recent iCloud backup to your new iPhone
The easiest and quickest method to set up your new iPhone is to restore from a recent iCloud backup. As you walk through the initial setup process, tap Restore from iCloud Backup, sign in with your Apple ID and then pick the most recent backup of your old iPhone.
If the backup is more than a day or two old, I suggest you take an extra few minutes to create a new backup. To do so, open the Settings app on your old phone and search iCloud Backup (click the icon), then select Back Up Now.
Once that finishes, go back to your new iPhone and select the backup you just created as what you want to use to restore from.
Your phone will then restore your settings and preferences, and you’ll be able to start using it in about 15 minutes while it finishes downloading your installed apps.
Once everything is restored, you’ll need to sign back into any accounts you added to your phone, as well as go through your apps and make sure you’re still signed in.
You’ve got several options when it comes to setting up your new iPhone.
James Martin/CNET
2. Use Apple’s direct transfer method
During the setup process, you’ll be asked if you want to directly transfer apps and information from your old iPhone to your new one. This feature was first rolled out with iOS 12.4, so if it’s been a few years since you’ve upgraded phones, it’ll be the first time you’ve seen the option.
The tool is straightforward to use. Make sure you have both phones, preferably plugged in and charging to ensure they don’t run out of battery, a Wi-Fi connection and enough time for the process to finish — it could take over an hour.
The more information you have on your phone, like photos in your camera roll, the longer it will take. When the transfer starts, the phones will show you a time estimate. Every time I’ve used this tool, that estimate has been accurate within a couple of minutes. It’s worth taking the time if you don’t use Apple’s iCloud service to back up your phone.
3. Use a Mac or PC to transfer your data to an iPhone
The method I personally use with every new iPhone is to restore from an encrypted backup using a Mac or PC. Not only does this process transfer all of your apps, settings and preferences, but it also means you don’t have to sign into the countless apps you have on your phone.
Before you can use this method, you’ll need to create an encrypted backup of your current iPhone. I know that may sound intimidating or overly complicated, but it only means you have to check an extra box and enter a password.
On a Mac, you’ll use Finder to back up your old iPhone. We outlined the steps when Apple killed iTunes. Just make sure to check the Encrypt backup box and enter a password you’ll remember when prompted. Let your Mac go to work, creating a backup file. It will let you know when it’s done.
On a PC, you’ll need to use iTunes (it’s not completely dead) to create a backup. That process is explained here. Again, you’ll need to make sure the Encrypt backup box is checked and enter a password.
To restore your new phone, open Finder or iTunes, and connect your phone to your computer. Click Trust when prompted, and then follow the prompts, selecting the backup you just created as what you want to use to restore the phone. You will need to enter the backup’s password before the process begins — so make sure you don’t forget it!
Once it’s done, your new phone will be an exact copy of your old phone and you won’t have to spend any time signing into apps or random accounts.

Apple made an Android app called Move To iOS that makes moving your messages, photos, videos and more from an Android phone to an iPhone easy.
Patrick Holland/CNET
4. Android user? This app is your answer
Apple doesn’t have many Android apps listed in Google’s Play Store, but Move to iOS is one of them. This free app will connect your Android phone to a new iPhone and allow you to transfer the most important information from one phone to the other.
Here’s the entire step-by-step process as well as some caveats, like the fact that it won’t transfer any locally stored music or PDF files.
No matter the process you used to set up your new phone, you’re sure to be giddy with excitement as you explore what it can do.
The post Bought the New iPhone 14? Here’s the Easiest Way to Transfer Your Data first appeared on Joggingvideo.com.
]]>The post How to Get Word, Excel and PowerPoint Without a Microsoft 365 Subscription first appeared on Joggingvideo.com.
]]>
Microsoft 365, the evolution of the old Microsoft Office suite, features a variety of apps that you may need for work, school or your personal life. You can access the full versions of those apps with a subscription, but that cost adds up over time, which could become an obstacle to using Word, Excel, PowerPoint or other programs. Fortunately, if you want Microsoft 365, there are ways to get the service for free.
Microsoft’s suite of productivity software consists of classics like Word, Excel, PowerPoint and Outlook, as well as newer apps like Microsoft Teams, OneDrive and SharePoint. The Microsoft 365 collection typically costs between $70 and $100 every year for subscription access across devices and family members. Microsoft also released a new stand-alone version of Microsoft Office for Windows and Mac, called Office Home and Student 2021, for a flat $150 — no subscription required.
Here are the versions of Office 365, Microsoft 365 and their apps that you can find online for free right now.
Get Microsoft Office 365 free if you’re a student or a teacher
If you’re a student, teacher or faculty member with an active school email address, you’re likely eligible to get access to Office 365 for free through Microsoft, with Word, Excel, PowerPoint, OneNote, Microsoft Teams and additional classroom tools.
All you have to do is enter your school email address on this page on Microsoft’s website: Get started with Office 365 for free. In many cases, you’ll be instantly granted access thanks to an automated verification process. If you attend an institution that needs to be verified, it might take up to a month to confirm your eligibility.
Recent graduates who want to stick with Office 365 can also get Microsoft 365 Personal for $12 for 12 months, with a valid school email address.

Now playing:
Watch this:
Use Microsoft 365 Apps for free right now
4:07
More Tech Tips
- The Best Windows 11 Features
- Ways to Help Your Old Laptop Last Longer
- 5 Ways to Make Your Chromebook More Secure
How to get Microsoft Office suite free if you’re anyone else
Anyone can get a one-month free trial of Microsoft 365. However, it does require you to enter a credit card number, and if you don’t cancel before the month is up, you’ll be charged $100 for a one-year subscription to Microsoft 365 Family (formerly called Office 365 Home).
The good news is if you don’t need the full suite of Microsoft 365 tools, you can access a number of its apps online for free — including Word, Excel, PowerPoint, OneDrive, Outlook, Calendar and Skype. Here’s how to get them:
1. Go to Office.com.
2. Click Sign up for the free version of Office under the “Sign in” button.
3. Log in to your Microsoft account or create one for free. If you already have a Windows, Skype or Xbox Live login, you have an active Microsoft account.
4. Select the app you want to use, and save your work in the cloud with OneDrive.
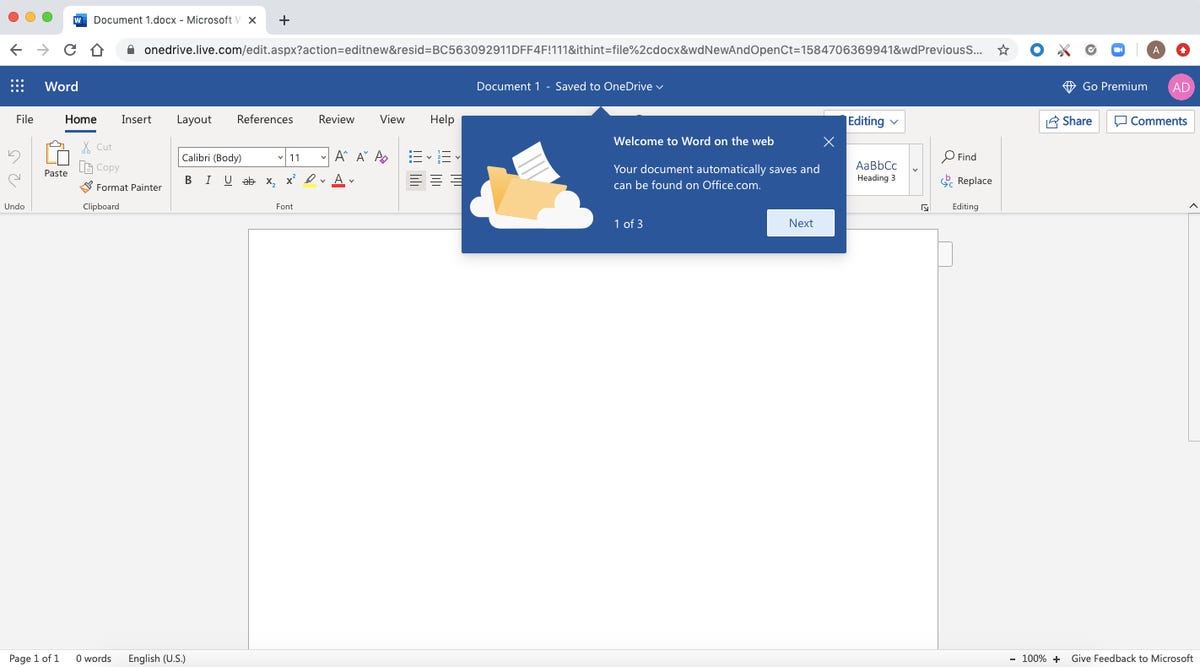
Use the browser-based version of the Microsoft Word app for free.
Screenshot by Alison DeNisco Rayome/CNET
So what’s the catch for the free version?
You may be saying, “Wait a minute, if I can get all of those apps for free, why pay for Microsoft 365 in the first place?” Well, the functionality of the free apps is limited: They only run in your web browser and you can only use them while you’re actively connected to the internet. They also have fewer features than the full Microsoft 365 versions.
There are still a number of benefits, however, including the ability to share links to your work and collaborate in real time, similar to what G Suite tools allow. If you’re looking for basic versions of each of these apps, the free version should work well for you.
For more, check out all of the best features in Windows 11, what you need to know about upgrading from Windows 10 to Windows 11 and how to download Windows 11 for free. You can also take a look at CNET’s list of the best Windows laptops.

Now playing:
Watch this:
Windows 11 review: New OS has us asking, update or wait?
8:32
The post How to Get Word, Excel and PowerPoint Without a Microsoft 365 Subscription first appeared on Joggingvideo.com.
]]>