The post Hear hidden sounds with a DIY microphone first appeared on Joggingvideo.com.
]]>
Now playing:
Watch this:
Make your own microphone
0:53
In the following guide, I’m going to show you how to make and use a simple microphone that will allow you to hear everyday objects in new and interesting ways. If you love having fun with sound, this project is for you.
Contact microphones, or piezo mics, come in all shapes and sizes. They’re commonly used to record acoustic instruments, such as violins, or acoustic guitars. But they’re also uniquely able to pick up unusual sounds that we can’t easily hear with our own ears. “Star Wars” sound designer Ben Burtt famously created the movie’s iconic laser blaster sound by hitting a radio station guy wire with a wrench and recording the results using a contact mic.
You’ll hear some more sound examples later, but first let’s go through the materials you’ll need to make your own contact mic.
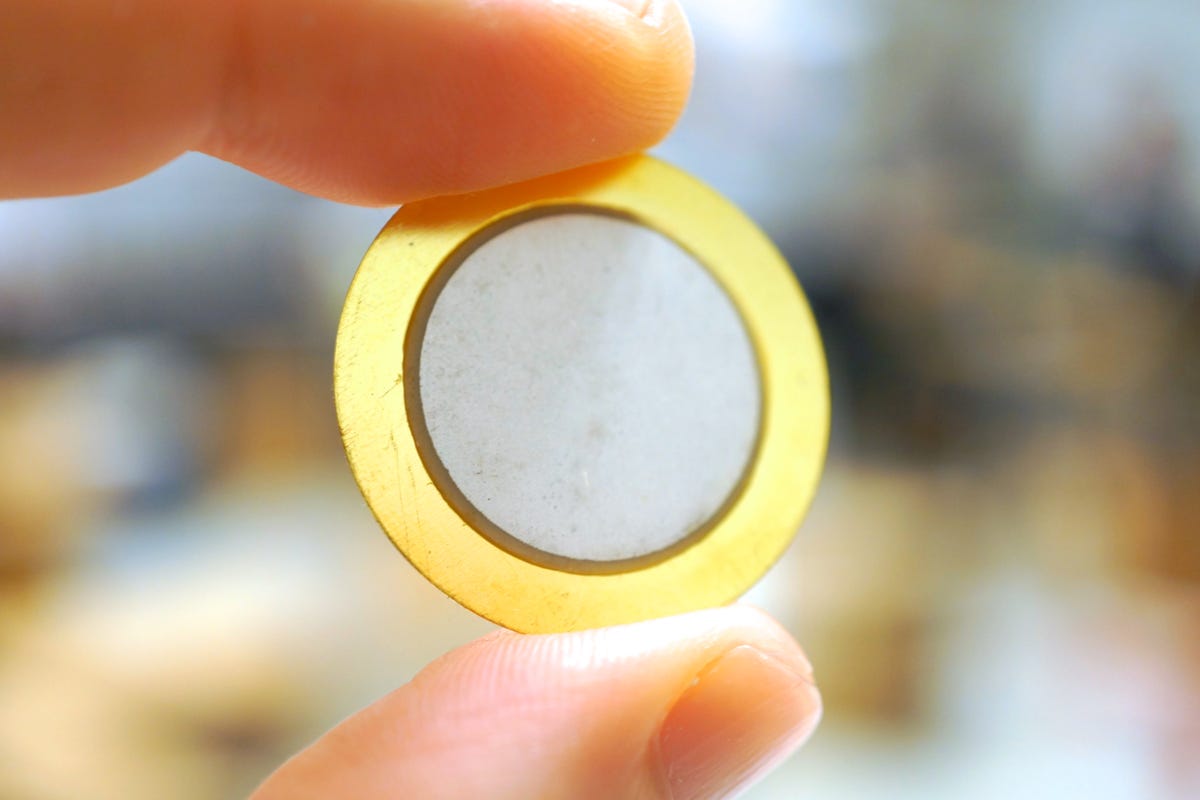
Donald Bell/CNET
You’ll want a handful of 27mm piezo discs. Technically, you’ll only need one, but having some throwaways will make the project less stressful. These discs are commonly used as buzzers or doorbell buttons. I picked a pack of 10 up on eBay for around $7 shipped. You can also get some that are pre-wired, but I prefer a challenge.
Donald Bell/CNET
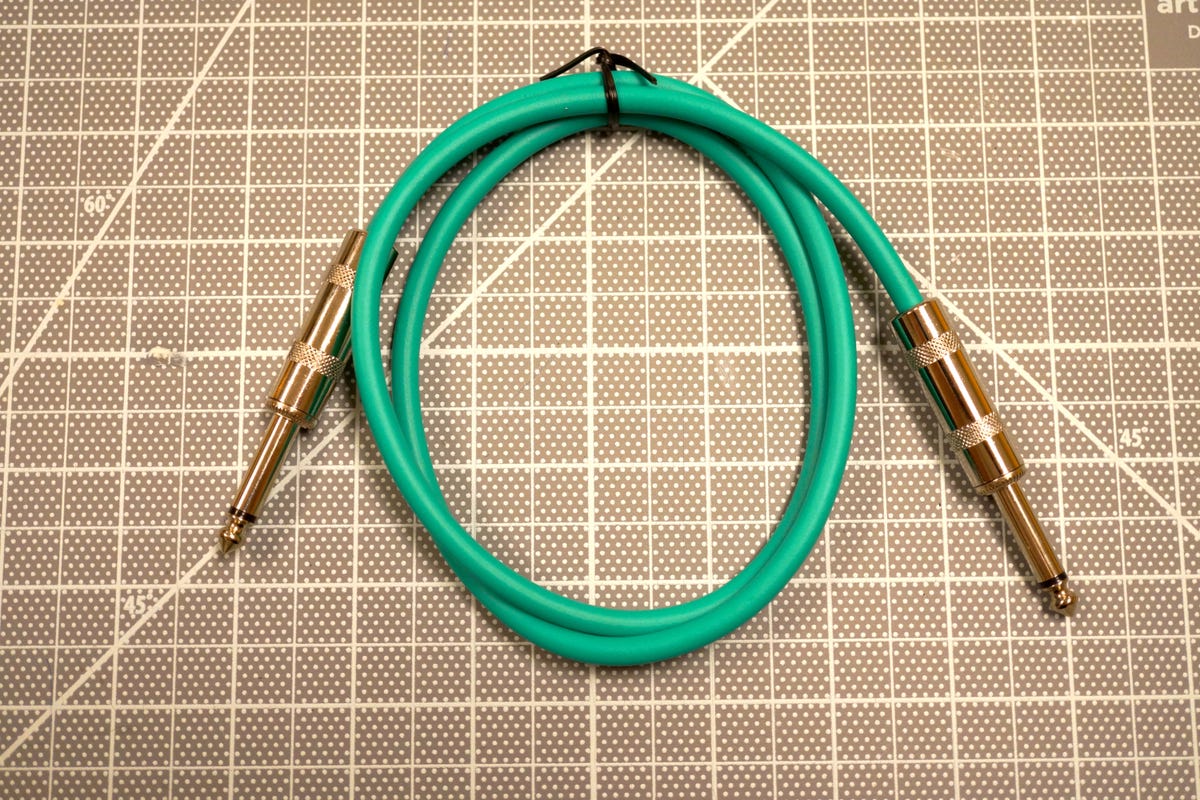
For the cable, I’m using a ¼-inch guitar cable. This 3-ft long one was just $6 on Amazon.
For the tools, I have a soldering iron, some solder, some wire strippers, and a pair of safety glasses can’t hurt. I’ll also be using some helping hands but they’re aren’t necessary. Just realize that if you’re soldering this flat on a table, the disc is so thin that you may roast the table a little.
Donald Bell/CNET
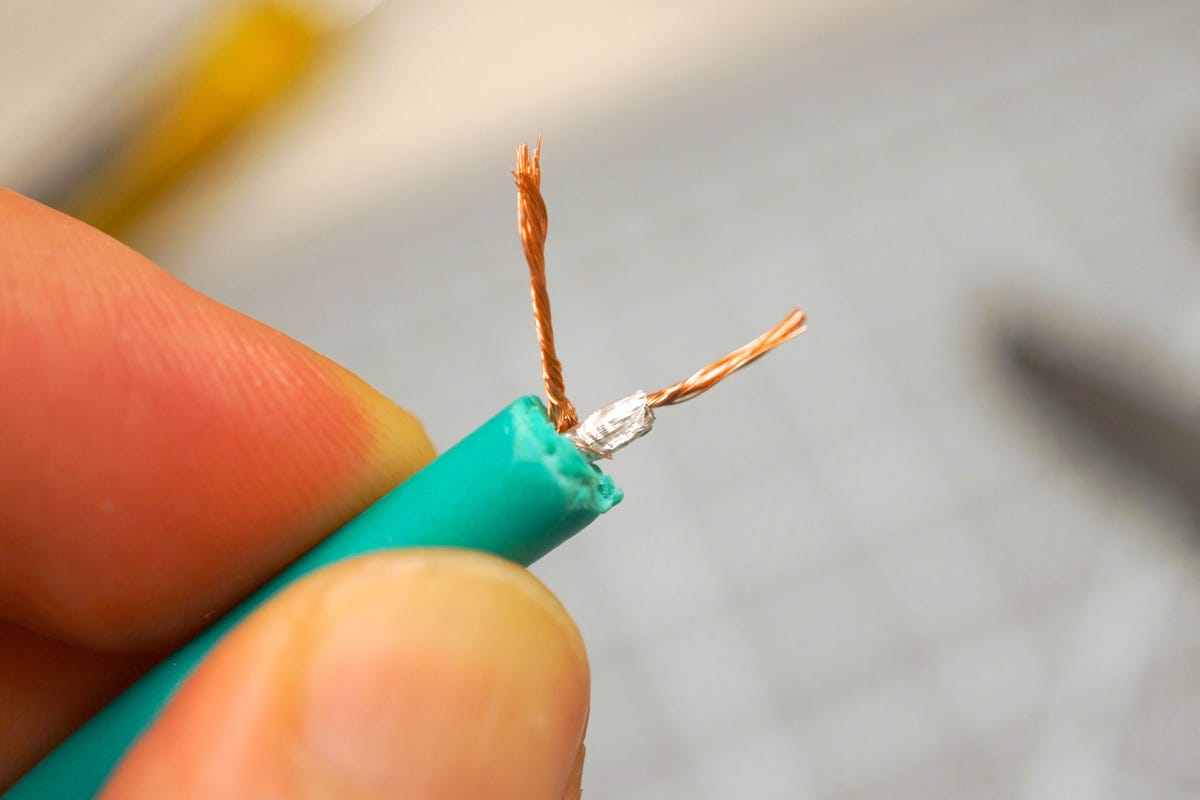
The first thing you’ll want to do is trim one end off the cable, then strip it down to expose the wires inside. You should see two wires. The inner, coated wire is the signal, and the outer, bare wire is ground.
Pull the bare wire to the side and give it a twist to prevent it from fraying. Then, strip about a ¼ inch of coating from the inner, signal wire.

Donald Bell/CNET
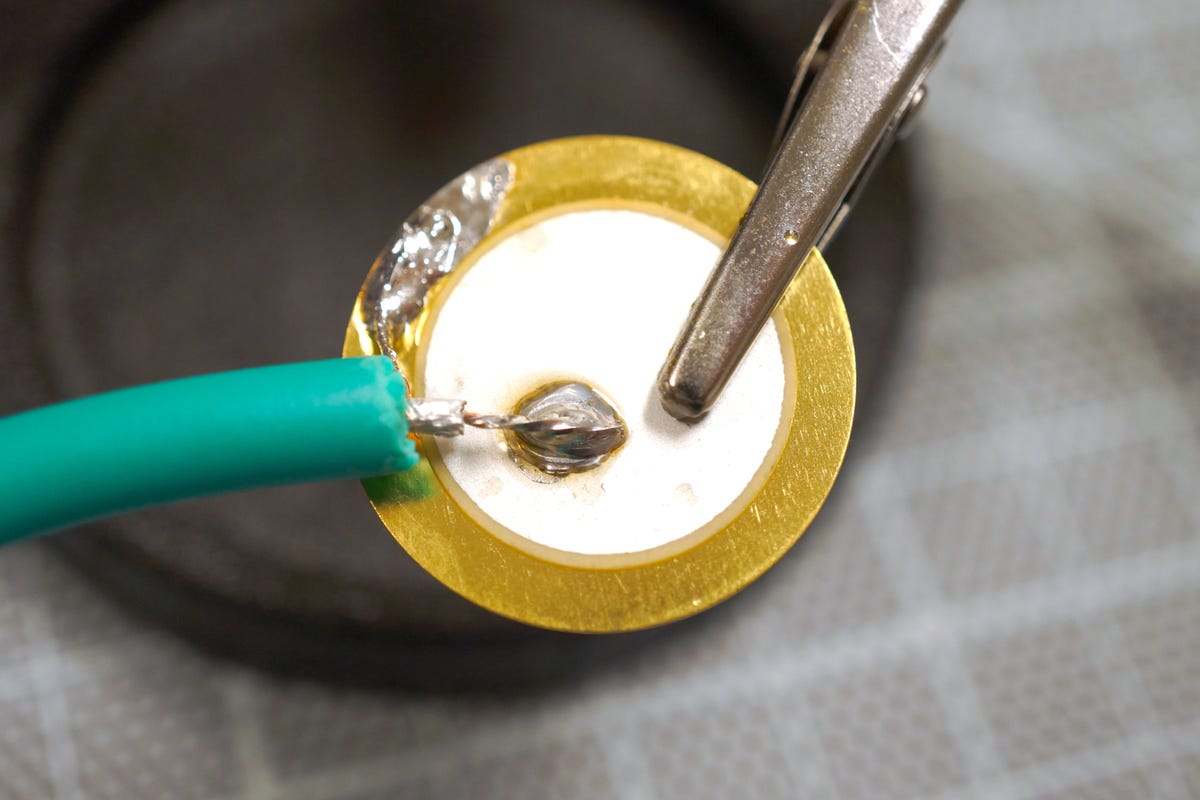
Next, solder the signal wire to the center ring. If you have an adjustable soldering iron, try to use as little heat as possible or else the metal on the disc starts to pool up. It won’t affect the sound but it looks sorta ugly.
Then, using a high heat, take the ground wire and solder it to the outer ring. That’s all there is to making a contact mic.
Donald Bell/CNET
You can use your mic with a an audio mixing board or a nice handheld audio recorder like the popular Zoom H4n ($200). Because the mic spits out a very weak signal, I recommend an impedance transformer like the $12 HOSA MIT-129. This will open up some extra low end on the microphone and increase its volume.
With this setup and a little double sided sticky tape, we can record things like an aluminum heat sink pulled from an old computer, or the sound of scissors opening and closing, or the sound of an industrial water jet cutting through steel. The following sounds were collected using my contact mic (full playlist).
There’s a whole world of sounds that open up with a contact mic. And now you know how to make one, so go out and explore. And if you record something amazing, upload it to Soundcloud and share it with me (@donald) on Twitter. Now go have fun.
The post Hear hidden sounds with a DIY microphone first appeared on Joggingvideo.com.
]]>The post Beyond plastic: Talking new directions in 3D printing first appeared on Joggingvideo.com.
]]>
Now playing:
Watch this:
New directions in 3D printing
19:42
In a short amount of time, the options in consumer 3D printers have exploded. Makers now have a vast amount of choices when it comes to print size and print quality, but are still restricted to one medium: plastic.
Anyone who has used a 3D printer will tell you how much patience is required in working with hot plastic. It shifts, it shrinks, it sticks, it is slow to work with, and the end product feels cheap.
Related stories
For this panel, I speak with representatives from three companies who are taking 3D printing in new directions by opening up new possibilities in materials: wood, paper, metal, circuit boards, rubber and resins.
If 3D printing is to be a revolution in product prototyping and fabrication, it’s going to take more than plastic. These are the innovators who are expanding the scope of 3D printing and the palette of options available to us.
The panelists include Danielle Applestone, CEO of Other Machine Co.; Conor MacCormack, CEO of Mcor Technologies and Colin Raney, managing director of Formlabs.
3D printing stands out at CES 2014 (pictures)


+23 more
The post Beyond plastic: Talking new directions in 3D printing first appeared on Joggingvideo.com.
]]>The post New ways to use your tech this holiday season first appeared on Joggingvideo.com.
]]>
Now playing:
Watch this:
New ways to use your tech this holiday season
9:55
The holidays are more than just a time to unwrap new tech toys. They’re also a great time to make the most of the tech you already have. In this episode of The Fix, we’ll show you how to harness what you probably already own to make the holidays memorable.
Lexy Savvides chimes in from CNET Australia (Santa’s first stop) with a fun project that will turn your iPad into a full-fledged photobooth, perfect for capturing festive moments with family and friends.
If you’re reluctant to import your holiday music into your everyday iTunes collection, I’ll show you how to upload your seasonal tunes to a quarantined home in the cloud. After all, nobody wants to hear Jingle Bell Rock in July.
And for anyone who’s ever unsuccessfully tried to use gloves with a smartphone, Sharon Profis shows us how to make touchscreen-friendly gloves with a simple DIY project that also makes a great gift.
Happy holidays from all of us at The Fix!
Subscribe to The Fix:
iTunes (HD) | iTunes (HQ) | iTunes (SD) RSS (HD) | RSS (HQ) | RSS (SD)
The post New ways to use your tech this holiday season first appeared on Joggingvideo.com.
]]>The post DIY: Make a mini boombox first appeared on Joggingvideo.com.
]]>
Now playing:
Watch this:
Make your own mini boom box
4:00
In a time where unlimited access to an infinite catalog of instantly available music, I’ve never been more sentimental about my old mixtapes. There’s something about the act of creating a mixtape that’s gone missing from today’s music culture. More than the music, a mixtape contained and symbolized the efforts of its maker — dubbing each song in real time, writing the labels, decorating the case, and taking pride in the presentation.
To that end, this DIY project is a way to bring back some of the mixtape’s hand-crafted magic. I’ll show you how to hack an $18 portable music player (X-Mini Happy) to power your own custom boombox. It makes a unique gift, or at least a geeky conversation piece.
Josh Miller
Materials:
- –X-Mini Happy capsule speaker w/SD card slot, $18
- -SD Card, $6
- –4-inch speaker (4 ohm), $8
- –Wood box, $15
- -Set of four bolts and nuts to attach speaker, $1
- -Momentary SPST switch, $4
- -Stranded wire, $1
- -Solder, $3
- -Hot glue sticks, $5
- -Music (MP3s)
Tools:
- -Screwdriver
- -Jeweler’s Precision screwdriver (Phillips head)
- -Router for cutting speaker hole
- -Drill
- -Pencil
- -Soldering iron
- -Glue gun
- -Wire clippers
- -Safety glasses
Donald Bell
Hacking the X-Mini
If we were to truly make our own portable, self-contained, MP3-playing boombox from scratch, you’d need a whole weekend and some serious circuit-making chops. We’re not going to do that. We’re going to cheat by taking a cheap, off-the-shelf portable music player and bending it to our needs.
Which isn’t to say that hacking the X-Mini is easy. We’re talking about a device no bigger than a tennis ball with plenty of small parts inside. If the idea of soldering, tinkering, or voiding your warranty makes you uneasy, turn back now.
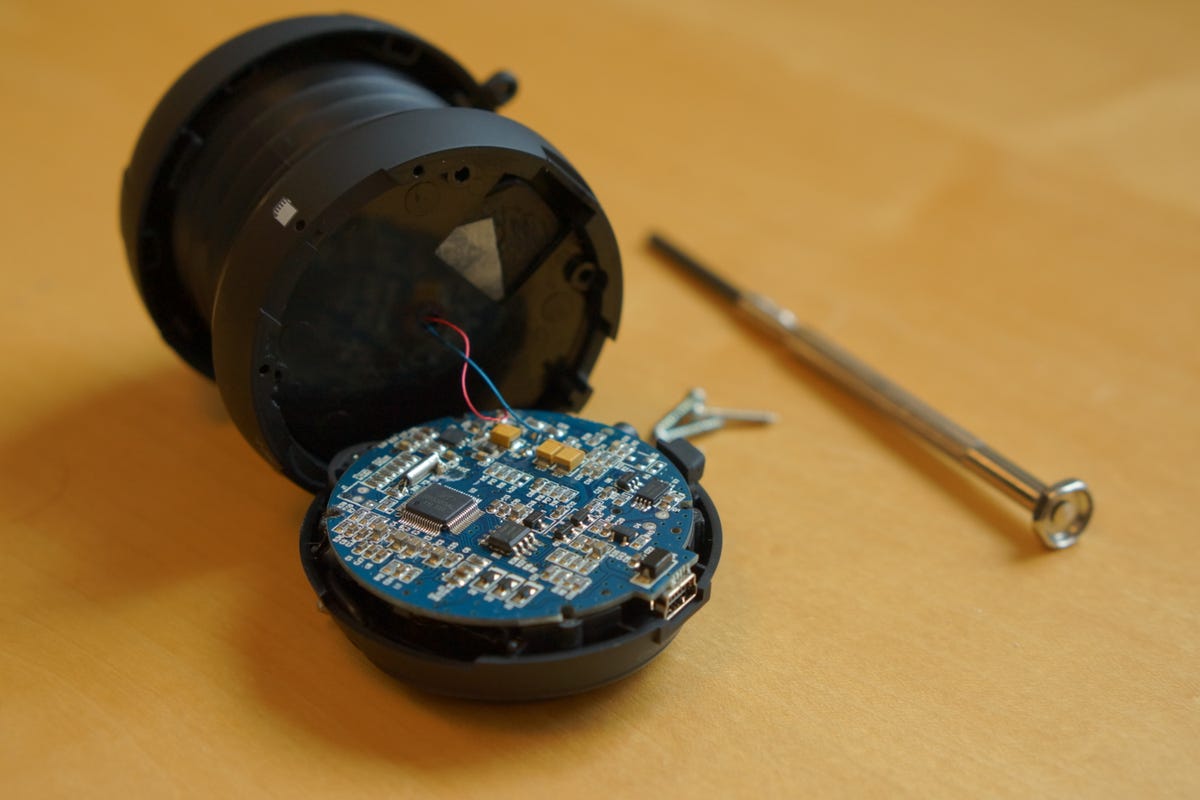
The rest of you can start by unscrewing the four screws at the base of the X-Mini’s unique accordion-style speaker chamber. You can then pull the speaker away from the base, clipping the pair of dental floss-thin wires that connect the circuit board to the speaker (which you can toss).
To trim this just down to the bare essentials, let’s also clip off the mini jack cable that’s wound into the bottom of the case. We don’t need it — plus, it will let you pull away the remaining plastic shell from the circuit board. A slow, careful prying of the glued-in rechargeable battery tucked under the circuit board is the last step in shucking this gizmo from its shell.
Donald Bell
What you’re left with is the Oreo cookie-sized guts of the X-Mini. Do me a favor and take a minute to marvel at the fact that this little handful contains an MP3 player, amplifier, and a 12-hour rechargeable battery. If this had fallen from the sky ten years ago, it would have been considered indisputable proof of advanced alien intelligence. Today, it’s an impulse buy at the grocery checkout. Progress!
Alright, now here’s all you need to know about this circuit board. Those red and blue colored strings where you snipped away the X-Mini’s speaker — that’s where you’re going to connect the new speaker. That’s the easy part. The tricky part is extending the music playback controls to a simple button that can be mounted on the outside of the box.
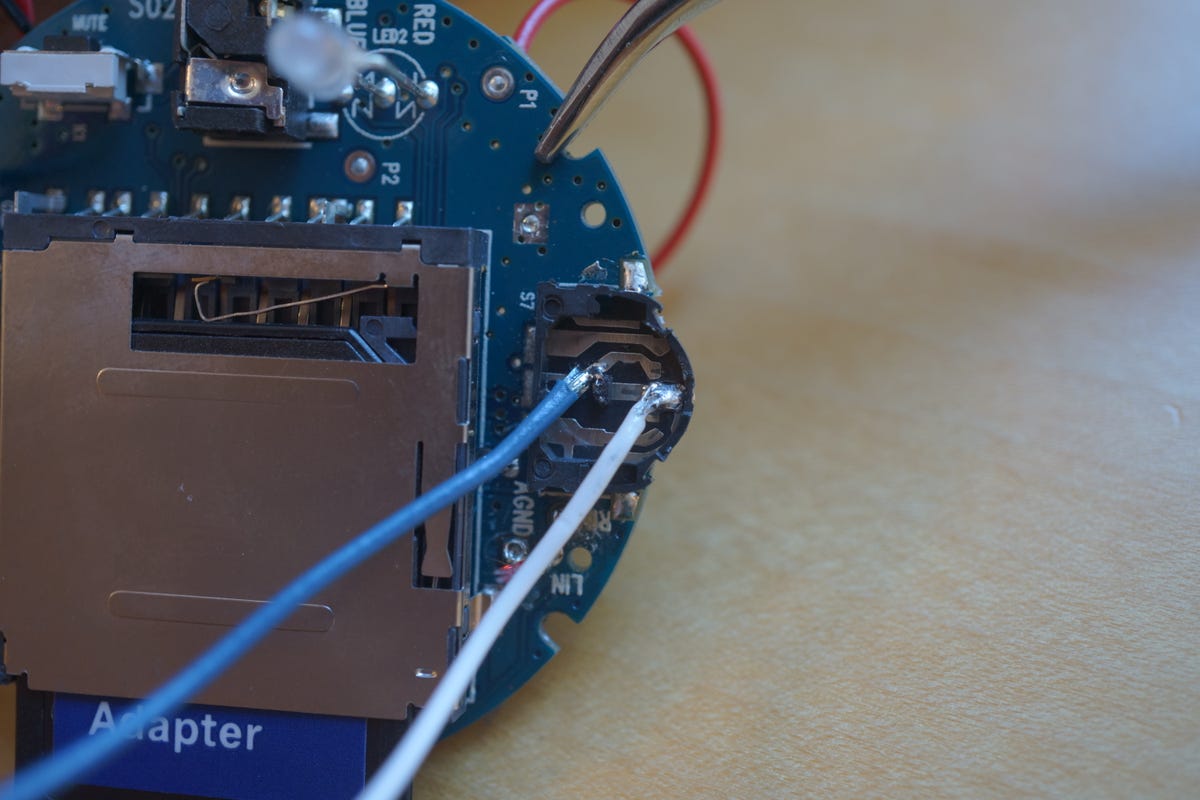
Mounted on the side of the X-Mini circuit board is an intricate little 3-position switch that controls volume, track skip, play/pause, and also powers the device on and off. That’s a lot of responsibility for one switch, and a real chore to reverse engineer. Fortunately, this switch is relatively hack-friendly. The trick is to break it.
Flip the circuit board bottom-up so that the side with the SD card holder is facing up. Now grab the playback switch and peel it back like you’re opening a can of soda. It should come right off and reveal what looks like a map of little flat metal roads. These are the contacts for the switch, and by making connections between them you can perform all the various functions of the switch.

The X-Mini circuit board with its switch removed, exposing the pads that you’ll use to wire your new controls.
Donald Bell
For the purpose of this project all we need is to recreate the power button, which also serves as play and pause. We can do this by wiring up a simple momentary switch (I got mine from Radio Shack) from the contact closest to the edge to the opposite contact furthest in. We’ll do this as the final step when we’re done with the enclose and have mounted the switch, so you have some time to mentally prepare yourself.
The box
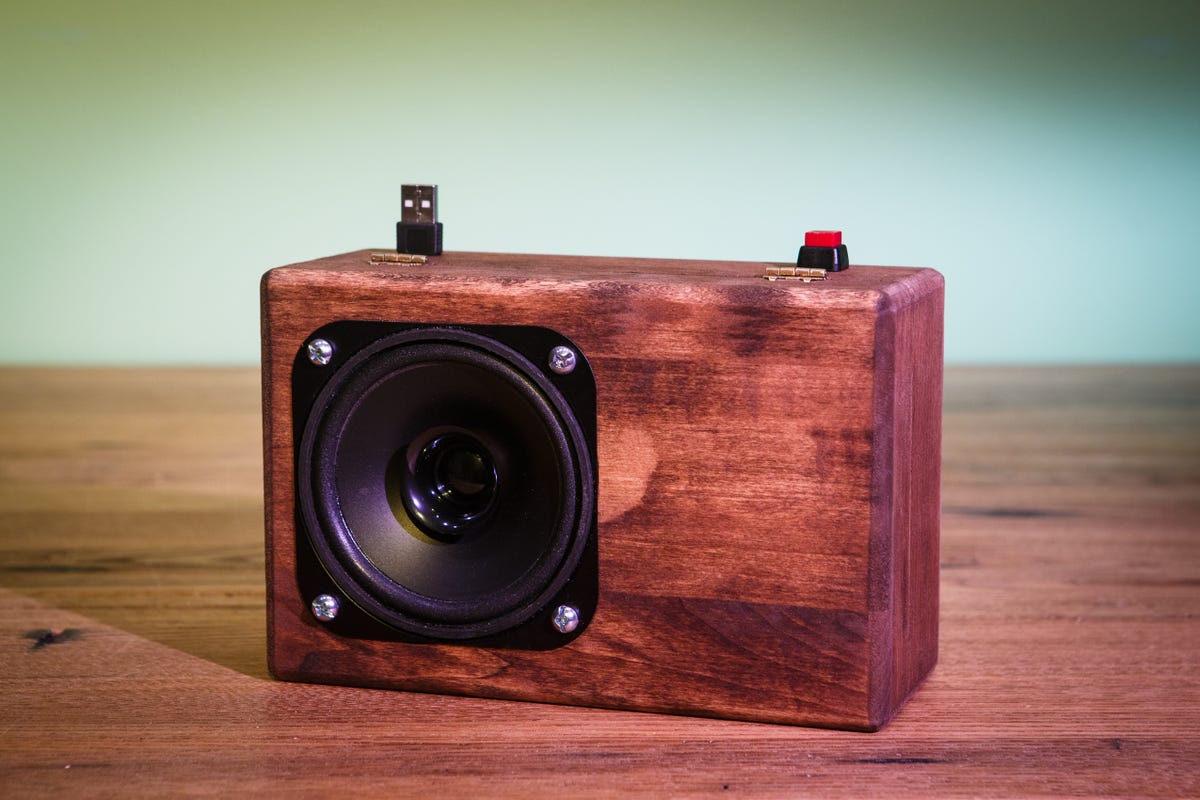
Now that we’ve hacked the digital heart of this thing, it’s time to transplant it into an analog body. My choice for my boombox enclosure was a $15 unfinished walnut box with a hinged lid — the kind of thing you could pick up at any craft store.
Tracing a cut-hole for the speaker.
Donald Bell
There are some things to consider when choosing a box for this project. First, make sure the side of the box you’ll be mounting the speaker on is wide enough to accommodate the speaker. Likewise, you’ll also want to be sure it’s deep enough to fit the back of the speaker, which can be substantial depending on what type of speaker you buy.
The speaker
I picked up a 4-inch replacement car speaker on Amazon for $8. It’s capable of handling up to 50 watts of power. The X-Mini only spits out 2.5 watts, so it’s a tad overkill. The price was right, though, and it had the right boombox speaker look. Most important, the speaker’s impedance matched the X-Mini (4 ohms) and its frame could be easily mounted on the box using screws or bolts in each of its four corners.
You could also try salvaging a speaker from any old PC speakers you may have around your home or office. I pulled one out of some old Labtec PC speakers at the office and it was a 4 ohm speaker that could have handled the job with no problem (and at no cost). But I liked the look of the car speaker better.
Cutting the hole
Cutting out a hole for the speaker is one of the trickiest part of this project. If you’ve ever tried to cut out a perfect circle using paper and scissors, you get the idea. But instead of paper, you’re cutting into a ¼ inch of walnut, and instead of scissors I recommend a router with a straight bit. By using a router (instead of say, a saw) you can drop into the circle from above instead of coming in from the side.
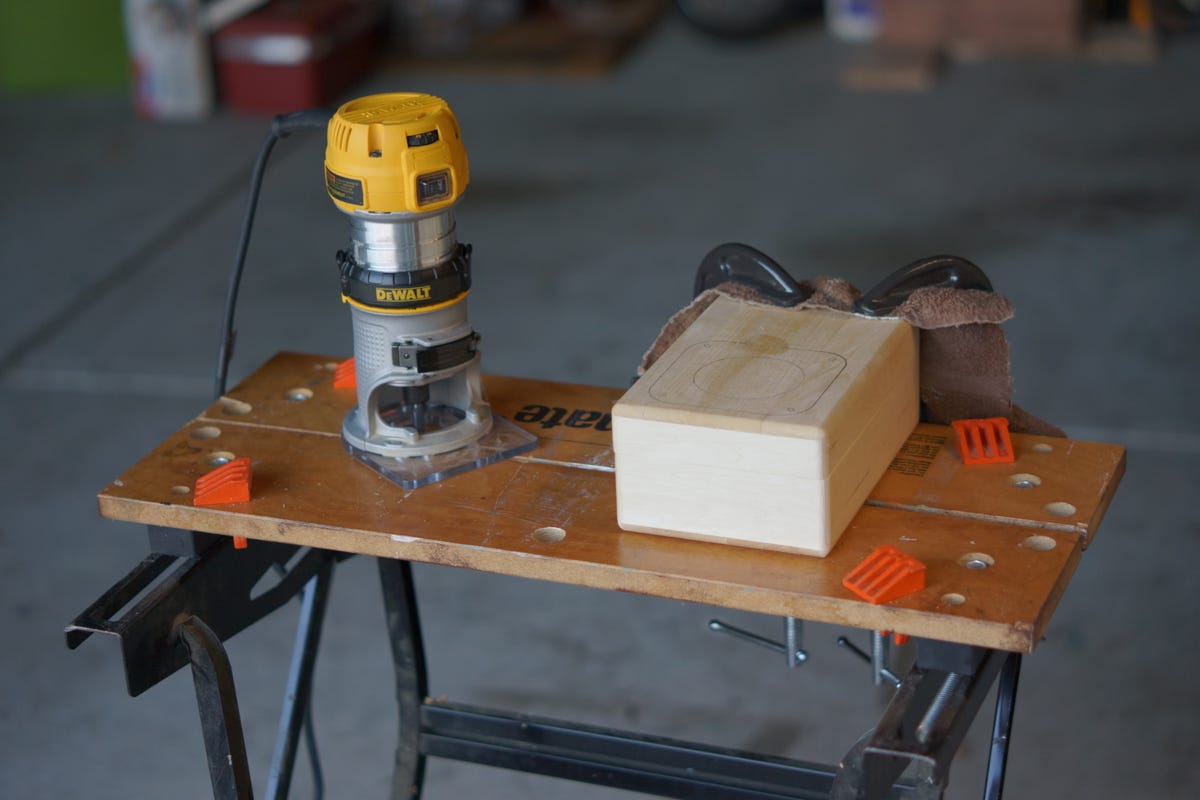
Clamping down the box before carving out a hole for the speaker.
Donald Bell
Create the guide for your circle by placing the speaker face down on the surface you intend to mount it on and tracing the edges with a pencil. Be sure to also mark where the mounting holes are for the speaker, as these will be the areas where you’ll want to leave the wood intact. Draw a rough circle within the traced area, and get cutting. So long as you don’t go outside the traced area and avoid the areas in the corner where you’ll be bolting the speaker, you’ll be in good shape. Give it a pass with the router, check to see if the speaker will fit, then repeat until the speaker fits flush against the wood.

The finished hole doesn’t need to be perfect. The lip of the speaker will conceal most imperfections.
Donald Bell
Finally, with the speaker sitting snug in the hole (and with sawdust covering everything you own), pre-drill the holes in the corners where the speaker will bolt to the box with a small drill bit that won’t damage the speaker frame. Then remove the speaker and drill the holes again with a larger drill bit that matches the diameter of the bolts or screws you’ll be using to attach the speaker. No bolts or screws are included with the speaker, so a trip to your local hardware store with your speaker in hand is the quickest way to figure out what kind of mounting hardware will work best for you.
Buttons and ports
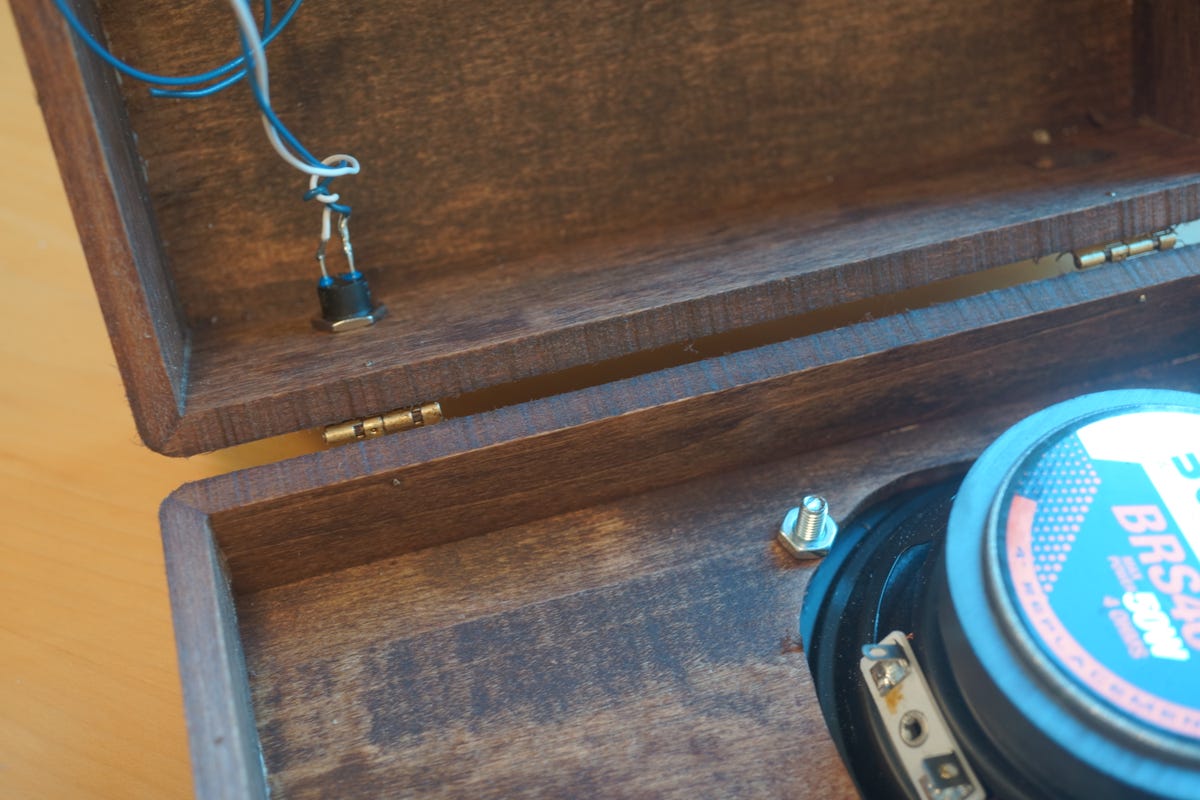
Before you get to cleaning up the mess your router has wrought, there are two more holes to drill. You’ll need to drill a hole for the momentary switch that will turn the boombox on and off and also control play and pause. You’ll also need to drill a separate hole for the USB charging cable to pass through.

Drilling holes for buttons and USB.
Donald Bell
I went with a big, friendly button for my momentary switch (Radio Shack part #275-1566), which required a hole roughly ½-inch wide. I drilled this hole on the side of the box with the hinges, figuring it would be the side I’d least likely rest the box on. Down closer to the bottom of the same side I drilled another ½-inch hole to fish the charging cable through.
Make it yours
With the box looking like a big chunk of Swiss cheese, free from any delicate electronics, now is the time to infuse it with your unique style. Get out the glue, paint, markers, glitter, whatever you need to transform this from a simple box into something with personality.

Let’s stain this thing.
Donald Bell
I kept mine pretty tame since I knew it had to hold up to public scrutiny. I rubbed a small amount of mahogany stain inside and out to give it a kind of rustic, natural look. The result is a boombox that looks like it should be loaded up with a John Denver playlist, but I can live with that.
With a little more time (and artistic talent) I thought it would have been cool to paint this to look like a proper ’80s boombox, or maybe a little turntable, or a cassette tape.
Iron time
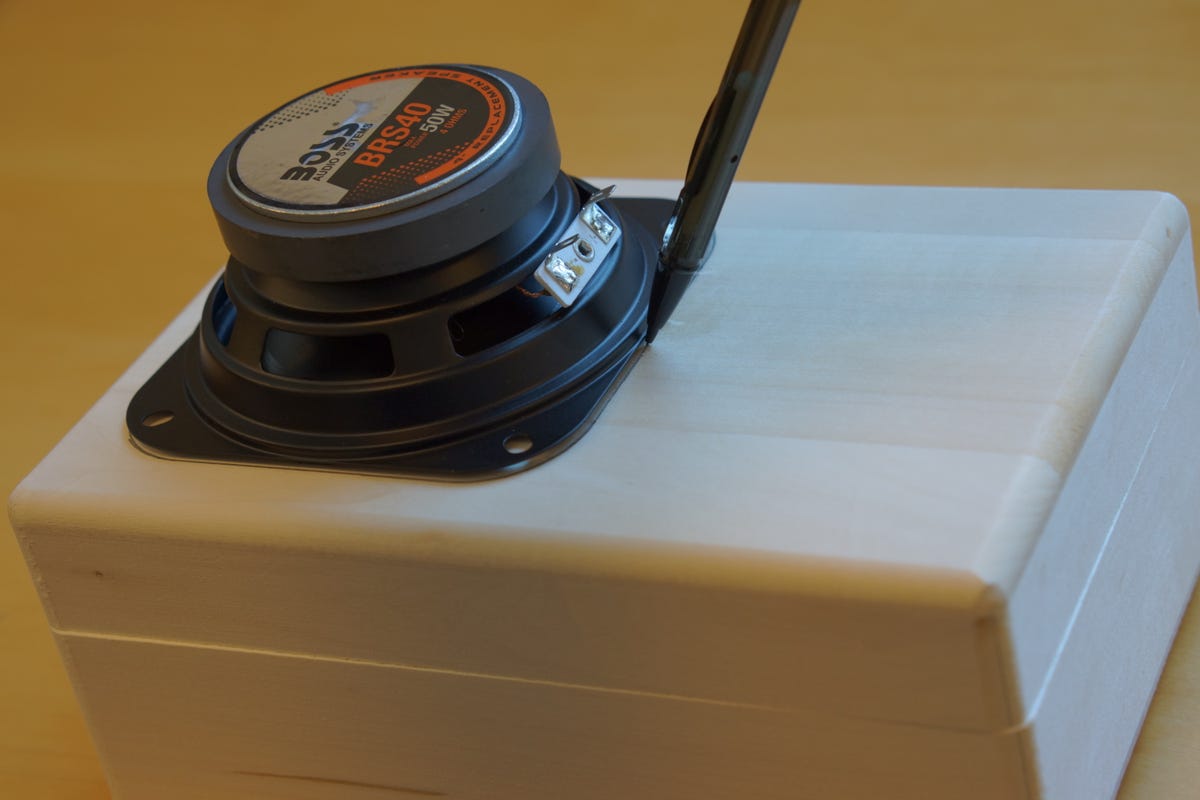
It’s time to start putting the pieces together. Mount the speaker in the hole, and bolt it into place. Slip your momentary switch into the hole you drilled and tighten it down.
While your soldering iron warms up, cut 4 pieces of stranded wire, each approximately 6 inches in length. Using different colors of wire will make it easier to keep track of what’s going on, and will make repairs easier, as well.
Speaker mounted and switch installed.
Donald Bell
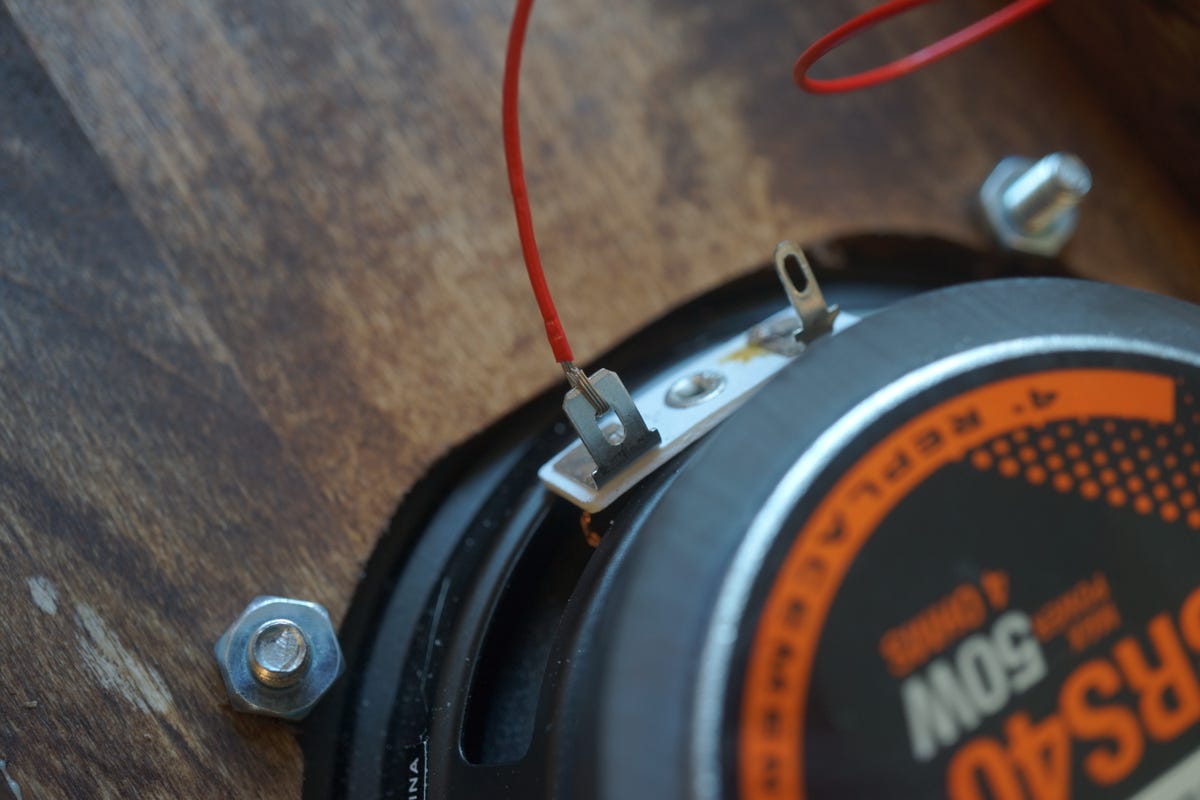
Strip a small amount of the plastic sheath (1/8th-inch) off the tips of the ends of each wire to expose the metal, and then give the strands a little twist to prevent them from fraying.
With the soldering iron hot (and your safety glasses in place) solder separate wires to each of the terminals on the back of the speaker. Make a note of which terminal is positive (+) or negative (-). Now take a look at the circuit board of the X-Mini and note where you disconnected the wires that connected its original speaker. You probably still have remnants of the thin red and blue wires attached to the circuit board. The red wire represents the X-Mini’s positive speaker output (+) and blue represents negative (-).
Wrapping wire on the speaker terminals before soldering in place.
Donald Bell
Starting with the red wire, use the soldering iron to heat up the solder holding it to the board and pull away the wire once the solder melts and lets it loose. Then, take the wire you’ve attached to the positive (+) terminal of the new speaker and solder the free end to the corresponding spot on the X-Mini. Repeat this same process for the negative terminal, connecting it to the negative speaker output of the X-Mini circuit board. You’ve now given the X-Mini a substantial speaker upgrade.
The remaining two wires are for connecting the momentary switch to the two metal contacts we uncovered by breaking apart the X-Mini’s switch at the beginning of this project. Start by soldering one end of each wire to one of the two metal posts sticking out from the bottom of the switch.
Soldering the wires from the momentary switch to the exposed pads on the X-Mini switch.
Donald Bell
Next, carefully solder the free end of one of the wires to the contact closest to the edge. Because these contacts are so small and grouped so closely, be careful not to use too much solder or you risk connecting nearby contacts accidentally. After you connect the contact at the edge, take the other wire’s free end and connect it to the opposite contact furthest in.
If all goes well, a long press of the momentary switch should turn on the X-Mini, lighting the built-in LED. A second long press will turn it off.
Showtime
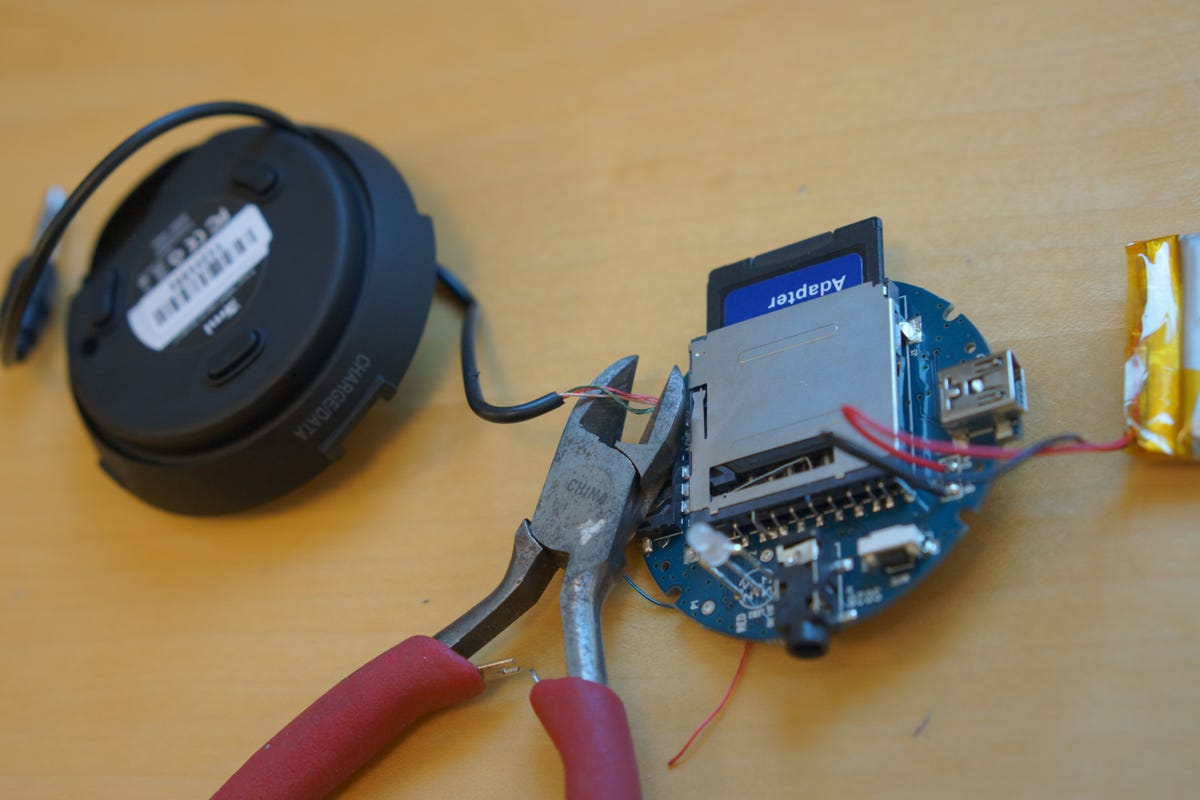
Now for the final touches. Load up your carefully curated selection of MP3 files onto the SD card and place it in the slot of the X-Mini circuit board. Then, give it a test drive using the momentary switch to turn it on, play, pause, and turn it off. With any luck, it’s all working fine. But if nothing’s playing or it won’t turn on, try the reset button on the X-Mini. You can also try charging the X-Mini using the included USB cable or popping the SD card out and gently pushing it back in.
Finally, with everything working properly, I recommend using some hot glue to fix the X-Mini circuit board in place so that it doesn’t wobble around. You don’t want a connection to jostle loose or find the circuit board stuck to the magnet on the back of the speaker.
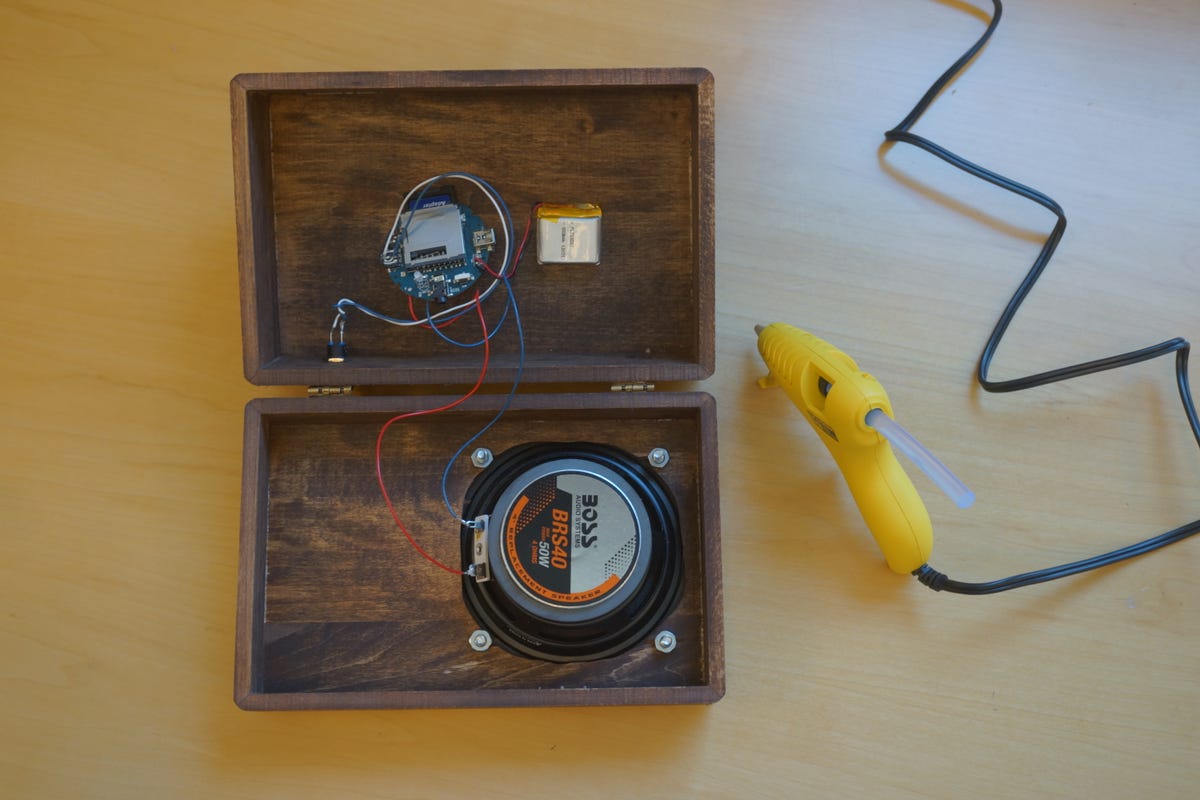
Gluing the innards in place.
Donald Bell
Before you close up the box, pull the USB cable through the hole you drilled for it and attach it to the mini USB port on the X-Mini board. The onboard battery hold around 12 hours of music playback, but you’ll eventually need to recharge it using this cable.
With the cable in place and the circuit board glued down and functioning, you can use a few drops of glue to seal the lid in place, concealing forever the hacked bits of the X-Mini inside. Wrap it up, give it to someone special, and I guarantee the music will sound sweeter for all the effort you put in it.
A version of this story appears in the new CNET Magazine.

The post DIY: Make a mini boombox first appeared on Joggingvideo.com.
]]>The post Shoot time first appeared on Joggingvideo.com.
]]>
Now playing:
Watch this:
Shoot time-lapse videos with your phone
3:35
Time-lapse photography — when done right — can reveal the beautiful, imperceptible slow movements of an otherwise mundane scene. By speeding up time, a sunset plunges into the horizon, and the slow crawl of cars in traffic take on a look of blood pumping through asphalt arteries.
Capturing scenes like this used to take a lot of money, time, and special equipment, but today you can get professional quality results using just your smartphone.
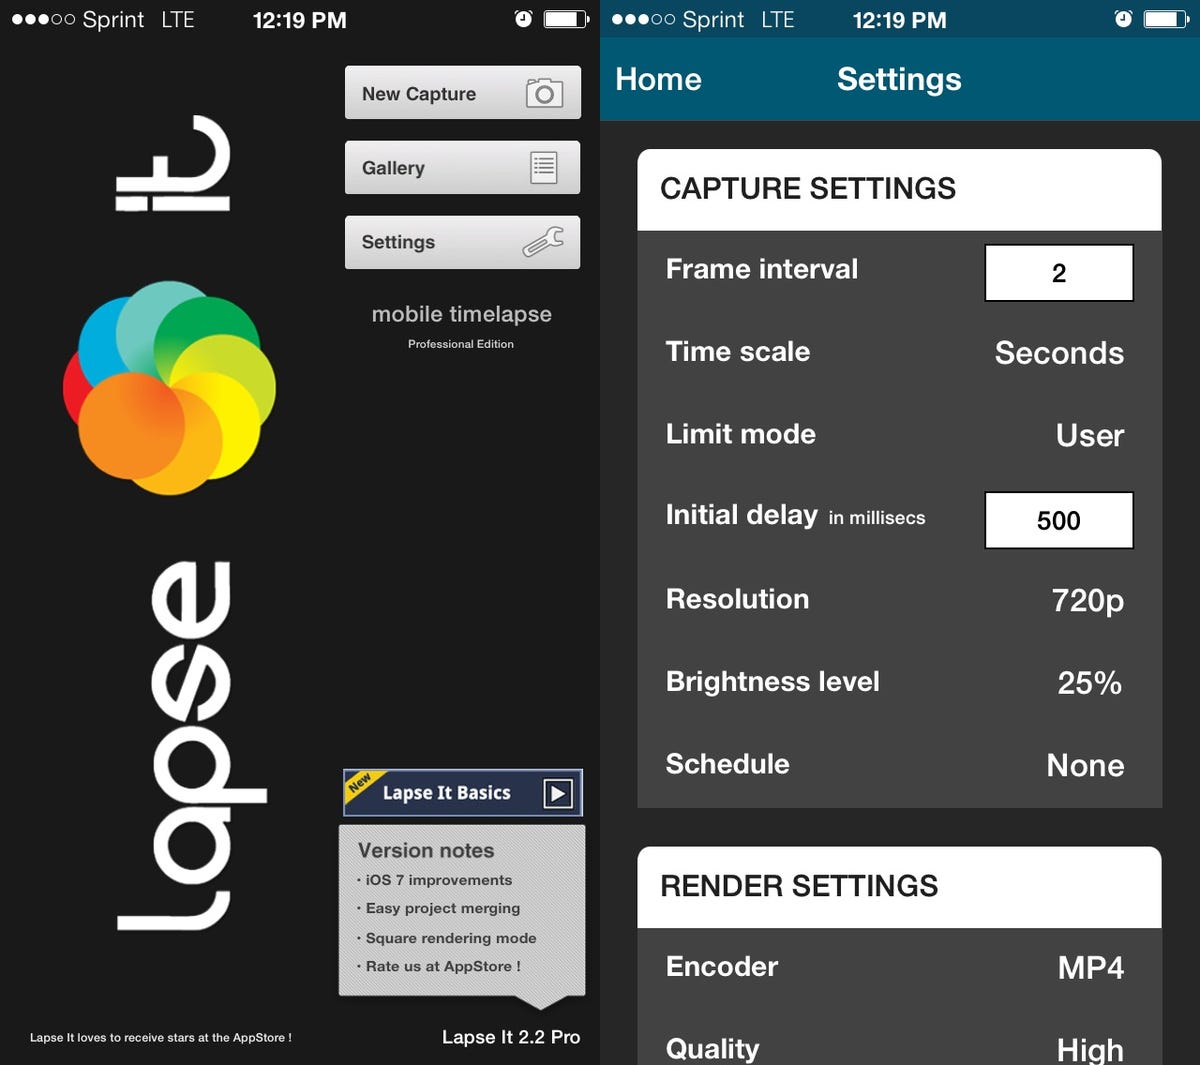
The app I’ll be showing here is called Lapse It Pro. It’s available for both iOS and Android. There are a lot of options out there, though, and most of the following tips can be applied to competing apps.
Choosing the scene
Time-lapse photography doesn’t lend itself well to every situation. When you’re picking a scene, make sure you’re capturing something where there will be some action — even if it’s subtle. Waves on the beach, trees in the wind, cars on the road, people walking by, that kind of thing.
And even though the end result looks quick, these things take time to make — 10 to 15 minutes minimum. Because of that, make sure you’re in a location where you can relax for awhile or be able to leave your phone unattended. Placing your phone in a window works well, or perhaps the patio of your hotel room if you’re on vacation with a nice view at your disposal.
Setting up
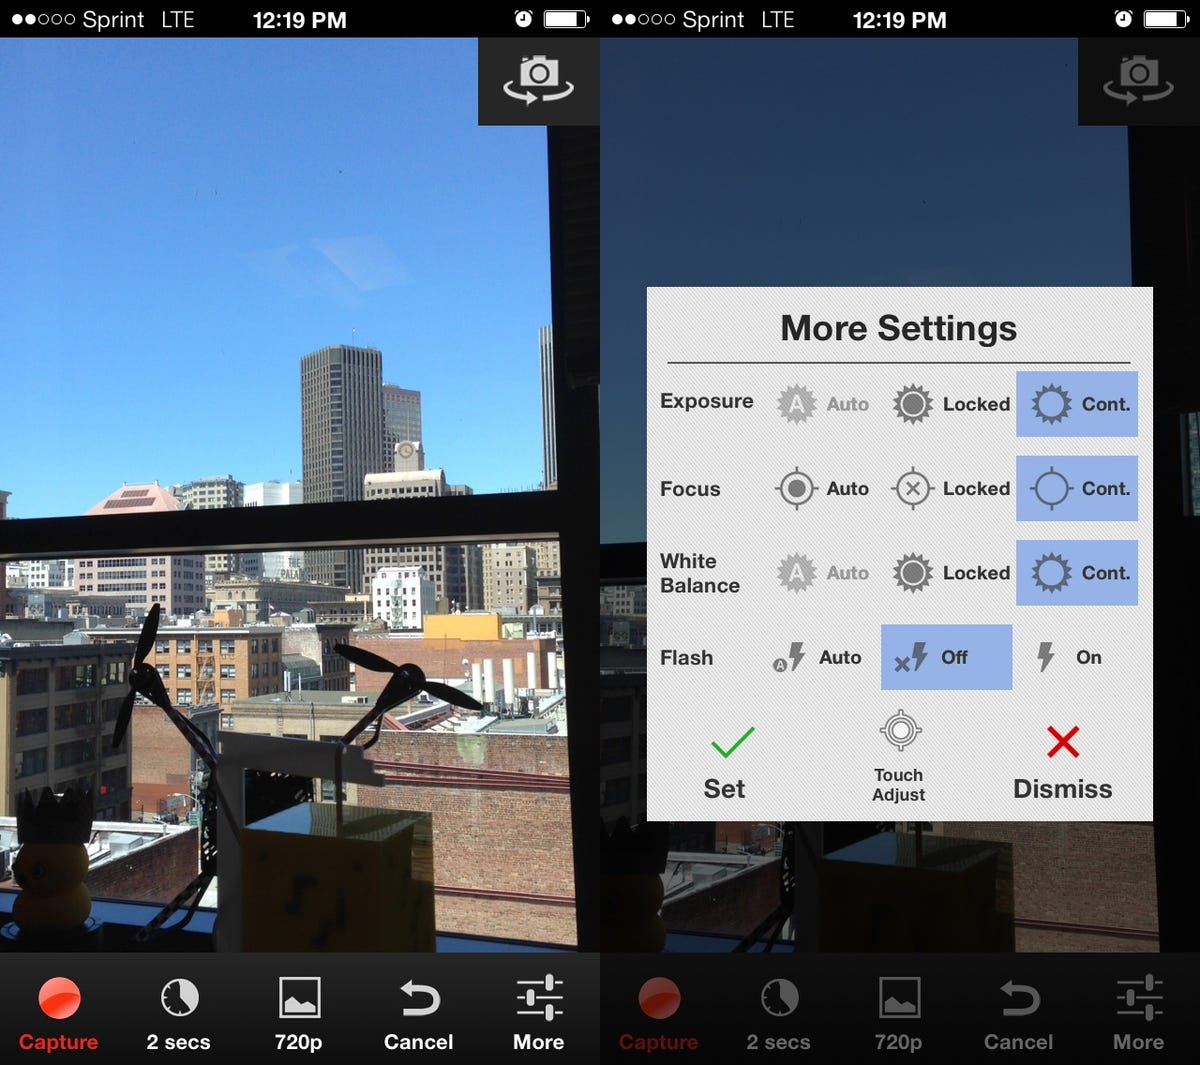
When it comes to setting up your smartphone camera to capture a time lapse, the most important thing is to make sure that your phone isn’t going to wobble around, since that will break the spell that these videos can cast. Unfortunately, with today’s thin smartphones, it’s nearly impossible to rest these things on a table or prop them up on their own.
CNET’s Sharon Vaknin has a great video on making your own tripod mount for your smartphone, but if you want something quick and cheap, try a binder clip. By placing one or two on the side of your phone, it makes it much easier to prop up or even hang on a nail.
Screenshot by Donald Bell/CNET
Also, before you commit to recording, tap the settings menu on the home screen. Here you can adjust the capture settings, video format, and resolution, and even automate when the capture will start and stop. By default, Lapse It will take a picture every 2 seconds, which is great for shorter videos. Fifteen minutes turns into around 18 seconds. But for longer stretches — say, capturing hours or entire days — it makes sense to raise this closer to 30 seconds, all the way up to a minute.
Screenshot by Donald Bell/CNET
Once you’re ready to shoot, you’ll see a separate settings menu on the capture screen. This will give you options for locking down the focus, white balance, and exposure. Play with these if you really know what you’re doing, but I got the best results leaving these on continuous automatic control. When you’re ready to go, hit record.
Editing the results
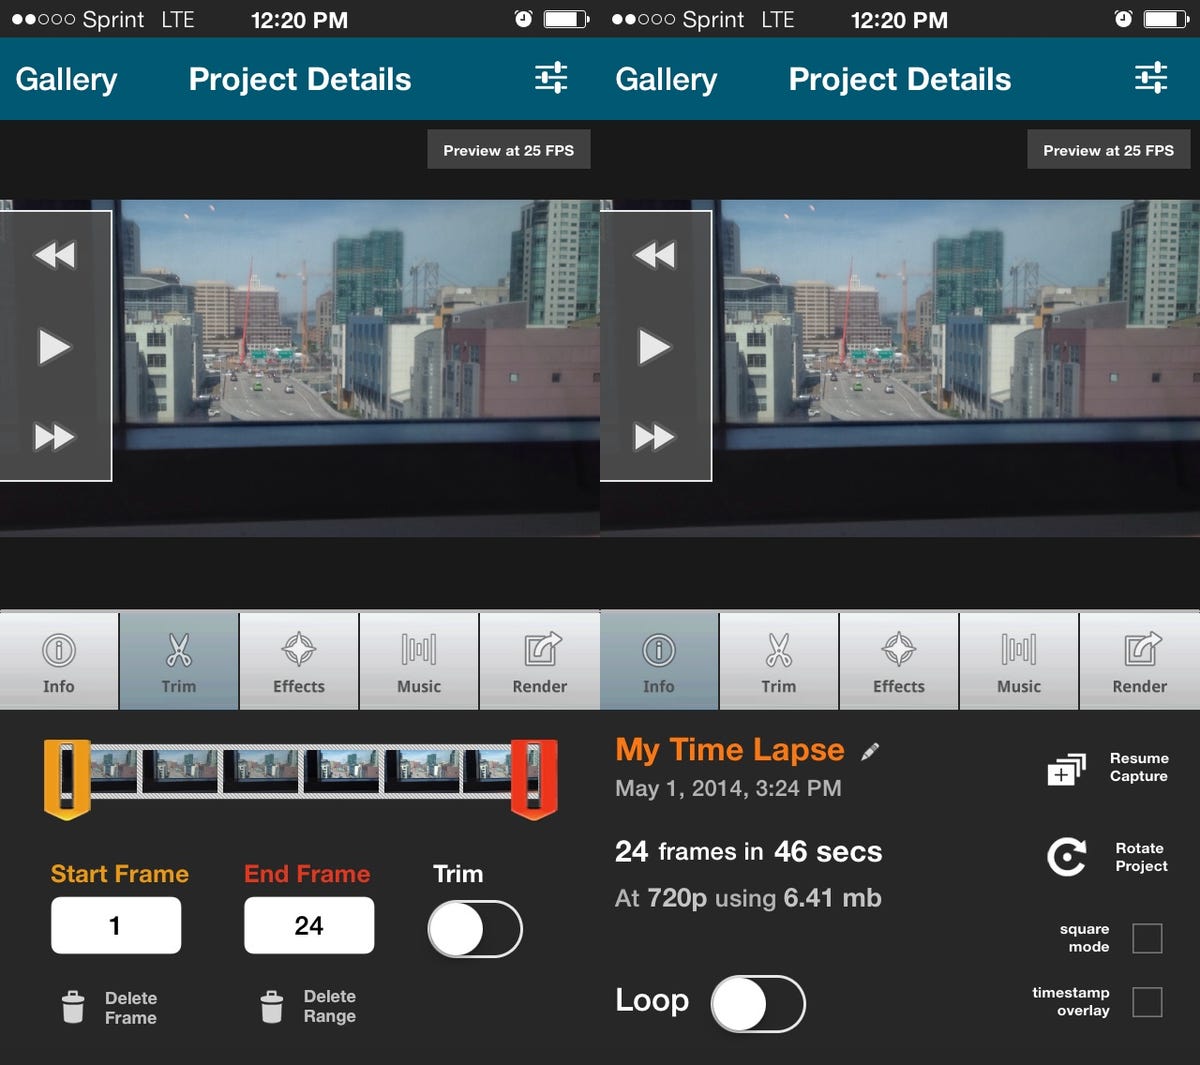
When you’re all done capturing your time lapse, wake your phone and hit the stop button. Then turn your phone to portrait orientation and you’ll see a number of options for editing your video, adding effects, music, and exporting the final product.
Screenshot by Donald Bell/CNET
Use the trim button to edit out the shaky parts from the beginning and end, when you were probably handling the phone. In the Info panel, you can rotate the video, make it square, or lay a time stamp over it.
And when you’re ready to export the final video, tap the Render tab, check the box for “copy to camera roll,” and give your movie a name. Then, hit the Render button.
After a minute, you should have a new video added to your camera roll, which you can upload to YouTube or share however you like. And now that you know how simple it is to create a time lapse, the fun part will be experimenting and staying aware of situations that will lend themselves to this technique.
The post Shoot time first appeared on Joggingvideo.com.
]]>The post Translate foreign menus first appeared on Joggingvideo.com.
]]>
Now playing:
Watch this:
Instant foreign menu translations
5:34
Vacations don’t excite me — eating excites me. Your city may have the most breathtaking vistas, and the most beautiful museums, but when all is said and done, my best traveling memories revolve around food. And nothing bums out my travel gluttony more than a menu I can’t decipher.
Fortunately, whether you have an iPhone or Android phone, there are some useful apps out there that can help you translate a menu in seconds. None are perfect, but having a couple on hand could keep you from eating the wrong part of a bull.
Waygo (iOS)
Let’s start with a new app out there called Waygo, currently only available for iOS. Waygo was designed specifically for translating Chinese text (though it now supports Japanese), and was designed with menus in mind.
The free version of Waygo gives you 10 free translations a day, or you can get a week pass for $1.99, or go unlimited for $6.99.
The above video gives you a basic idea of how the app works. You open the app and use your iPhone’s camera to line up a few lines of text inside an adjustable window. Then, within seconds, a translation of the text appears under the box.

Waygo
Are the translations accurate? Well, your mileage will vary, but for the most part Waygo was at least able to accurately identify the type of meat used for the dish. Since all then menus I was able to get ahold of already had translations included, it was easy enough to gauge the accuracy.
The obvious drawback to Waygo is the limited amount of language support. It’s also pretty tough on your battery and needs clearly printed type in order to work (fancy signs and calligraphy were nearly impossible for me).
That said, it tackles the two languages (Chinese and Japanese) that are most frequently missing in other apps. It also has the important advantage of being able to work offline, which can be critical if you’re out of wireless range or generally trying to conserve data consumption.
Word Lens (iOS/Android)
Next up is Word Lens, which is technically a free download for iOS or Android, but you pay $4.99 for each language you want translated. Unfortunately, neither Chinese nor Japanese are languages it supports, but if you’re looking for Spanish, French, German, Russian, Portuguese, or Italian, this is worth checking out, even if just for the novelty.
Quest Visual
With Word Lens, you pick your translation mode, point your camera at your text and watch as it not only translates the text, but seamlessly replaces it in the image, doing its best to match the text size, font, and color. When it works, it’s uncanny — billboards and newspapers mutate into their translated alter egos. And with a tap of the pause button, you can freeze the translated image, save it to your camera roll or share it in an email.
The major drawbacks are price, language support, and the battery drain required to pull off its real-time magic. On the upside, you get to see your translations in their original context, and it’s a fun one to show off.
Google Translate (iOS/Android)
Finally, let’s talk about your best free option: Google Translate. This app is available for both Android and iPhone, and it has the broadest range of language support. You get around 80 languages to choose from, ranging from Arabic to Zulu. But the Android and iOS versions are not identical. In this case, Google has blessed the Android version with a picture translation capability.
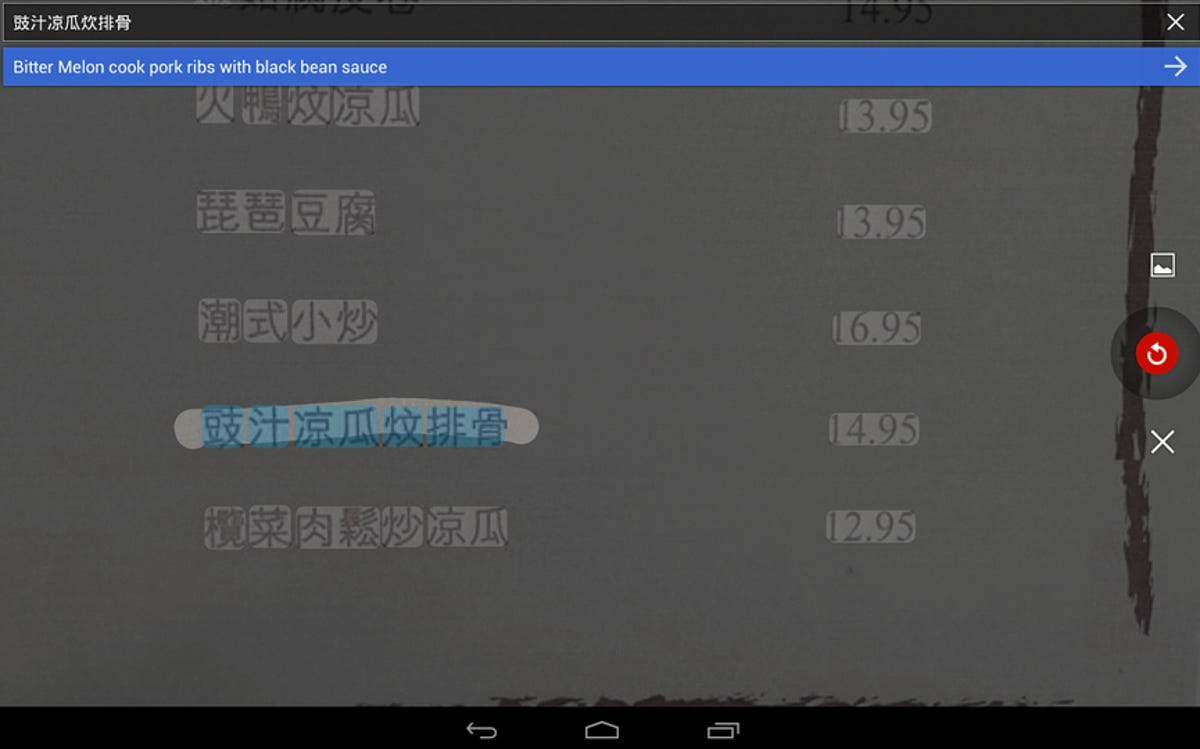
To use it, open the Android version of the Google Translate app, select the languages you’re translating to and translating from, then tap the photo icon. From here you’ll take a snapshot of the text you want to translate, allow the image to be processed, and then specifically select the area to be translated using your fingertip.
The results may not have the gee-whiz factor of Word Lens, but the whole system works pretty well. Highlighting the text with your finger provides some context for the translation. Selections are also saved to the app’s home screen for later reference.
Conclusion
What I love about these apps is that they’re truly a phenomenon that could only happen at this moment in time, when smartphones, their cameras, processors, and data connections are all sufficiently advanced to churn out a kind of magic.
Are the translations perfect? Nope. In fact, most of the time they were hilariously bad. But if it helps you order food more confidently when traveling, and experience new tastes and flavors, then be sure to keep a few of these handy.
The post Translate foreign menus first appeared on Joggingvideo.com.
]]>The post Top tips for traveling with your smartphone first appeared on Joggingvideo.com.
]]>
Now playing:
Watch this:
Top tips for traveling with your smartphone
12:31
We all know that smartphones have become an indispensable travel tool. It’s your camera, your planner, your map, your diary, and your connection to friends and family back home.
But there are some emerging new trends in travel apps that push your smartphone’s capabilities to the extreme.
For example, did you know that your smartphone camera could translate foreign languages on the fly? There are a number of real-time translation apps on the market now, but which ones work best and support the languages you need most? In this show, I’ll put them to the test and walk you through your best options.
Eric Franklin reports from Barcelona with some tips on how to send free international voice and text messages. If you’ve ever been burned by roaming fees while traveling abroad, learn Eric’s tricks for beating the system.
And if you can’t stand the chaos of traveling with your tech and all the cables and chargers that come with them, Sharon Vaknin has a DIY project for keeping it all neat, tidy, and strapped down.
Thanks for watching. Give us your feedback.
The post Top tips for traveling with your smartphone first appeared on Joggingvideo.com.
]]>The post Simple smartphone photo tips first appeared on Joggingvideo.com.
]]>
Now playing:
Watch this:
Insider tips for better photos
3:37
Today’s smartphone cameras have become nearly as complex and feature-laden as the compact cameras they replaced. It’s easy to get overwhelmed, but here are four simple tips for better photos that will work with virtually any modern smartphone.
High Dynamic Range (HDR)
Most smartphones now have an option called HDR, which is short for High Dynamic Range.
When you take an HDR photo, your camera actually shoots three photos at three different exposures: low, standard, and high. Then, your phone stacks all those photos to create one composite image that’s super sharp and looks closer to what the human eye sees.
When to try HDR:
– Landscapes. You’ll notice bluer skies and richer details in trees and buildings.
– Direct sunlight. For those situations where the sun is right behind the subject you’re shooting and there’s no way around it.
When to avoid HDR:
– Action shots. Moving subjects will result in a blurred composite image.
– Portraits. Enhancing the detail on an old barn is great. Enhancing the wrinkles on your old mom is not recommended.
Remote shutter
That camera shutter button on your display isn’t the only way to take a photo. If you want steadier shots, and a little more flexibility, there are a few more ways to snap a photo.
On iPhone and Android, use the volume-up to snap your photo. Or use a connected pair of headphones with inline volume control as a remote shutter.
For select Android phones, such as Samsung Galaxy S4 or LG G Flex, say “Cheese” to take photo without pressing a button.
Burst mode
When it comes to taking photos of kids, pets, or fast-paced sporting events, Burst mode will help you get a clear shot every time.
CNET
On iPhone: Tap and hold the shutter button on the iPhone for as long as you like. Watch photo count indicator. When done, all photos will be saved into one thumbnail (on the iPhone 5S), and you can then choose your favorites.
On Android (depending on model): Tap the mode button and select Burst from the menu. Holding down the snapshot button will now take up to 20 shots in rapid succession.
Lock focus/exposure
By now you probably know that tapping the screen sets the focus and exposure. But the moment you or the subject moves, that setting is lost.
To force your phone to lock the focus and exposure, tap and hold the screen until the setting locks. Now, even if you move around, the exposure and focus will stay the same.
To learn more about your smartphone’s camera and other tips for better photos, check out this week’s episode of CNET’s The Fix.
The post Simple smartphone photo tips first appeared on Joggingvideo.com.
]]>The post Easily mount your HDTV first appeared on Joggingvideo.com.
]]>
Now playing:
Watch this:
How to easily mount your TV
3:50
When I moved into my new place, I left behind my ancient, embarrassingly small TV. I jumped up to a 47-inch HDTV, which is still modest by today’s standards, but big enough where I had good reason to worry about it toppling over — especially with a kid in the house.
I decided to wall-mount the TV, not just to protect my kid (and the TV) but because a beautifully mounted TV looks amazing. It’s like it’s just floating there, defying gravity.
After doing some research on wall mounting, three things became clear. First, mounts have become ridiculously inexpensive. The Cheetah Flush Tilt mount I went with was only $30, and it came with its own HDMI cable and two levels.
Second, the project is easier than you think. Unless you’re trying to mount a TV on brickwork or on a wall with non-standard in-wall stud spacing, this is a “moderate” difficulty project at most. The hardest part is summoning the bravery to drill into your wall.
Third, and most important, the real difficulty is figuring out how you’re going to conceal the cables running from your TV. A wall-mounted TV with a mess of tentacles dangling from it looks much worse to me than just leaving it on a stand and running the cables behind your furniture.
Unless you conveniently have an outlet and low-voltage cable pass-thru already behind your proposed wall-mount location, you’ll either be arranging a visit from an electrician or compromising with some kind of cord concealer painted to blend in with your wall. I was too stubborn to do either, so I went with a product called PowerBridge designed to safely run both power and AV cables through your wall. It’s a great product, in theory, but the number of horizontal braces (or firebreaks) in my wall made the whole process too messy to detail here as a separate How To.
Regardless, I recommend figuring out ahead of time how you’re going to wire up your mounted TV. If you don’t, the feeling of accomplishment around mounting it yourself will be short lived.

Donald Bell
As far as the installation itself, the video above pretty well covers it. I used a screwdriver (one with interchangeable tips helps, as well as an extender to tighten those lock screws), a drill, a pencil, a magnetic stud finder, and a socket wrench (though my old skateboard wrench did the trick). The whole process, including the careful consideration of TV height and placement, took under an hour. I would also recommend having an extra pair of hands, especially if the TV you’re mounting is over 50 inches.
Would I recommend this as a do it yourself project? Absolutely! Think it through, though, and be sure your stud spacing is compatible with the mount and you have a plan for how you’ll deal with managing the cluster of cables that inevitably accompany today’s TVs.
If you have any questions, leave them here and I’ll do my best to answer them or point you in the right direction.
The post Easily mount your HDTV first appeared on Joggingvideo.com.
]]>The post The Fix: Optimize your smartphone first appeared on Joggingvideo.com.
]]>
Now playing:
Watch this:
The Fix: Optimize your smartphone
12:39
Welcome to the second episode of The Fix! This is CNET’s newest show, and each episode revolves around ways to make the most of the technology in your daily life.
This episode will change how you use your smartphone. They’ve become an indispensable part of our lives, and when they underperform or run out of power, it’s enough to make you scream. To help you out, we’ve got some simple advice that can make your phone faster and its battery last longer.
First off, to see if your phone’s browser is slowing you down, Eric Franklin, Sharon Vaknin, and I put three browser options through a grueling speed test. Is there a benefit to making a switch? You be the judge.
After that, Sharon shares some useful tips for extending your phone’s battery life, and Eric gets down to brass tacks on why and when you should replace your battery (probably before it catches fire).
Let us know what you think, and be sure to send us ideas for future episodes. We want this series to actually help people. So hand your tech dilemmas over to us — or better yet, tell us about a useful fix you’ve discovered that’s worth sharing.
The post The Fix: Optimize your smartphone first appeared on Joggingvideo.com.
]]>